[3 Ways] Transfer iTunes Playlist to USB With/Without iTunes
Want to know how to export iTunes playlist to USB flash drive? This guide will introduce you three effective ways about how to transfer iTunes playlist to USB flash drive.
By Demi / Updated on January 18, 2024
Transferring iTunes music to USB flash drive
In my new car, there is a place to put a USB flash drive. I want to be able to transfer iTunes playlist I have on my PC to a USB flash drive, so I can play music in my car. How do I do this? Thanks so much.
- Question from Apple Community
Sometimes, you may think of copying iTunes playlist to USB for car, so that you can enjoy music in your car during the long journey using your car’s sound system. What’s more, you may just want to backup iTunes library to prevent data loss. Here in this guide, three methods about how to transfer iTunes playlist to USB flash drive are available for you.
![]()
Part 1. How to transfer iTunes playlist to USB with iTunes
iTunes provides you two ways to transfer iTunes playlist to USB with iTunes itself. However, the two methods are kind of contradictory choices. Although they’re much convenient, music in M4P format from iTunes may fail to play normally after transferring to a USB flash drive. To fix this issue, you can either convert iTunes playlists into MP3 files or turn to Part 2. to try the more effective method.
Preparation: Convert iTunes playlist into MP3 files
Just in case, the following steps elaborate you how to convert iTunes playlists into MP3 files in detail.
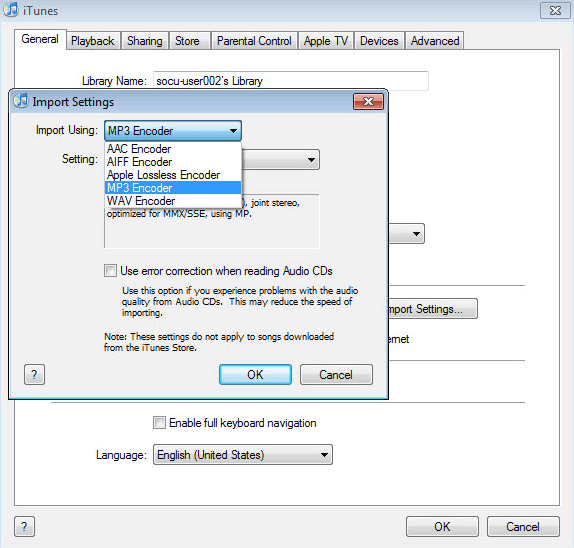
Step 1. Open iTunes > In the menu bar, choose Edit > Preferences > General > Click Import Settings.
Step 2. Choose MP3 Encoder for the Import Using option > Select OK > Click OK again to return to your library.
Way 1. Export iTunes playlists to USB as MP3 directly
iTunes offers you a way to copy playlists to flash drive directly. It is suggested to create a new folder in your USB, so that music can be found easily. Depending on the types of your computer, the methods can be slightly different.
Step 1. Plug the USB into your computer > Create a new folder.
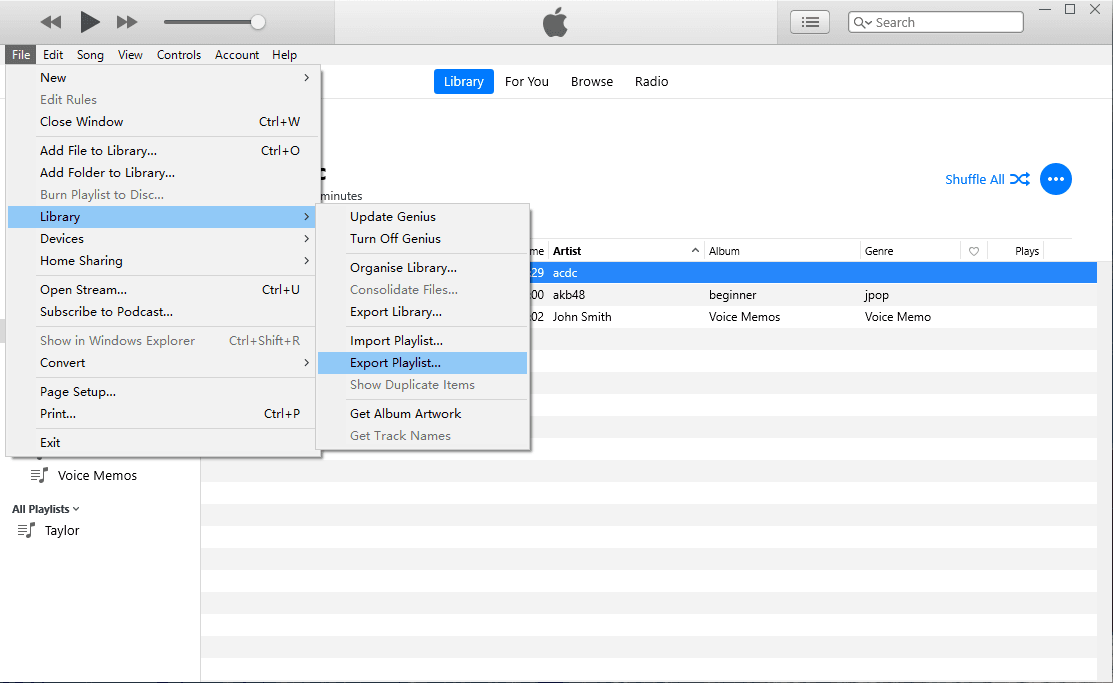
Step 2. Open iTunes > Select the playlist you want to transfer > Click File > Library > Export Library.
Step 3. On the file browser, select the USB as the destination to save the playlist file.
Way 2. Export iTunes playlist to USB from iTunes Media folder
iTunes also enables you to export iTunes playlist from iTunes Media folder to USB. Here are tutorials about how to export iTunes playlist to USB as MP3 from iTunes Media folder.
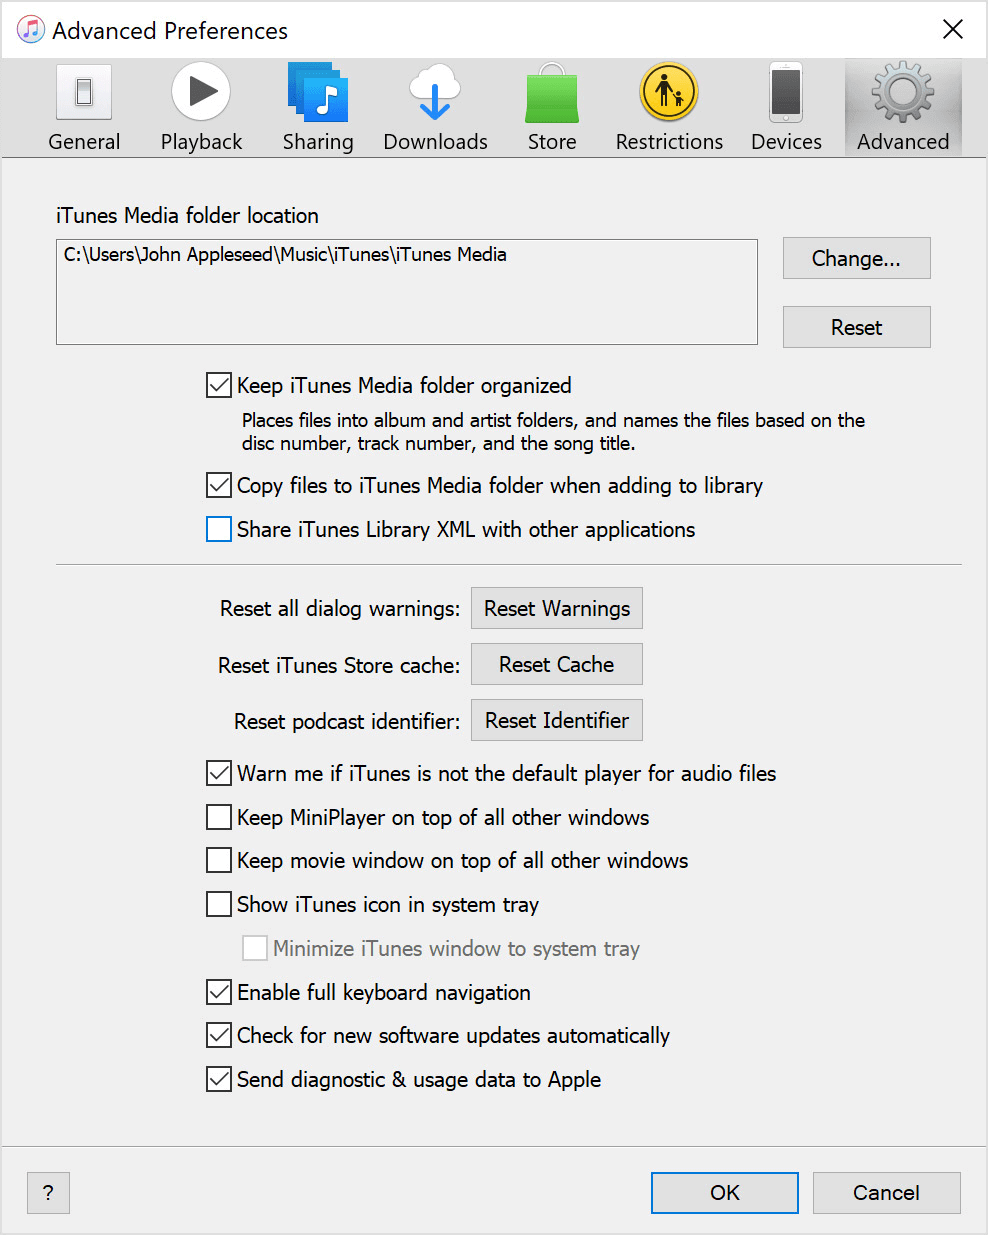
Step 1. Open iTunes, click Edit > Preference..., then a new window will pop up.
Step 2. Check both Keep iTunes Media folder organized and Copy files to iTunes Media folder when adding to library > Click OK.
Tip: You may also want to change iTunes Media folder location. You can click Change... to make it.
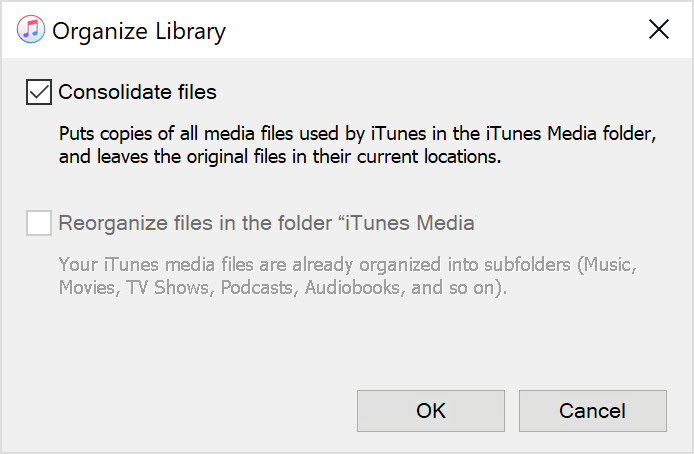
Step 3. Click File > Library > Organize Library... > Consolidate files and click OK.
Once you have done these steps, all media files are saved in iTunes Media folder. You can go to the folder, then drag and drop the playlists as you like to the USB. You need to copy playlists to USB with iTunes with patience. If you want an easier way, you can try the method introduced below.
Part 2. How to export iTunes playlist to USB via FoneTool
It's kind of complicated to export data using iTunes, especially since you may encounter iTunes Windows problems when moving songs from iTunes to external hard drive directly.
Alternatively, If the iTunes playlists have been synced to your iOS devices like an iPhone, you can export them from iPhone to USB via FoneTool, the professional transfer tool for iOS devices.
What FoneTool can provide you:
✓ Fast transfer speed. With a clear interface, you can transfer 100 songs in a few minutes with ease.
✓ Simple transfer process. Unlike the complex operation of iTunes, you can finish the transfer task in a few clicks with the help of FoneTool.
✓ Multiple functions. As an iTunes alternative, FoneTool offers you selective and full backup choices to protect your data. The transfer services enable you to transfer songs from any source on PC to iPhone.
Now, download FoneTool for free by clicking the icon below, and follow the steps below to learn how to transfer iTunes playlist to USB flash drive.
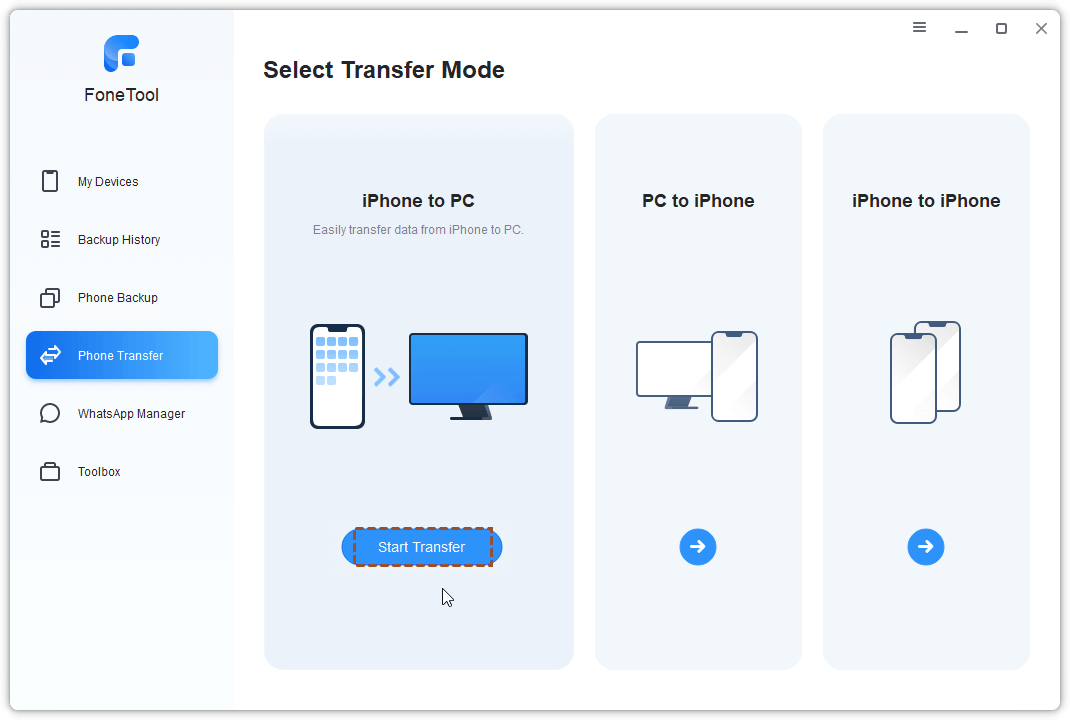
Step 1. Launch FoneTool > Plug in both USB drive and your iPhone > On the Home screen of FoneTool, click Phone Transfer. Go to iPhone to PC and click Start Transfer.
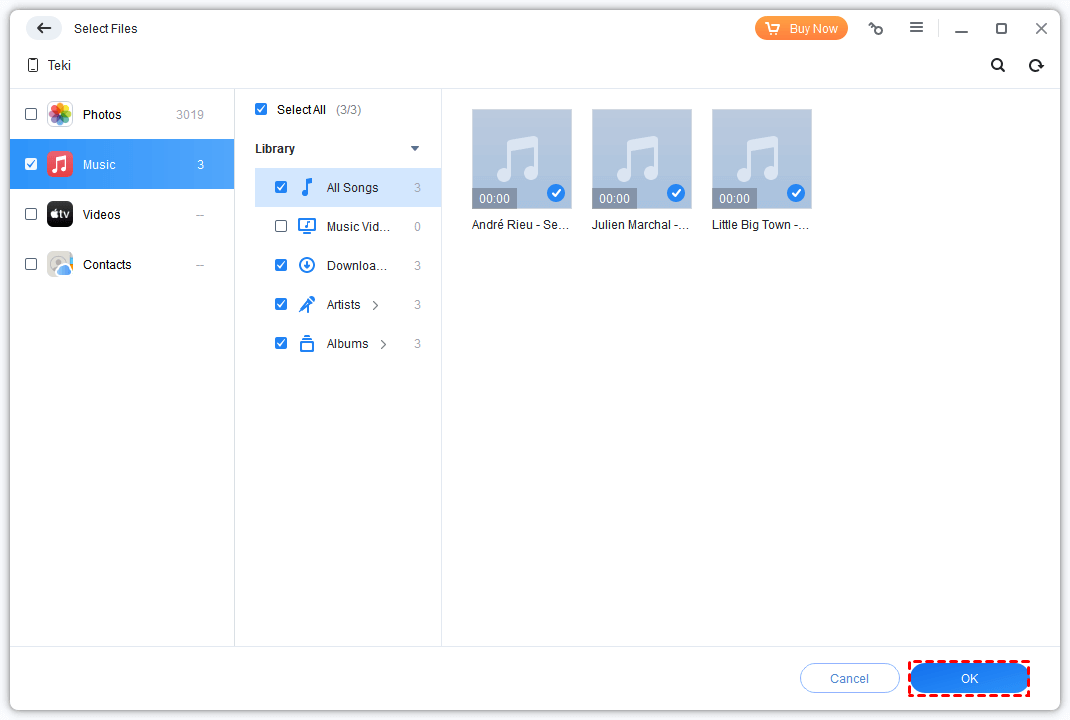
Step 2. Click the “+” icon > Choose the songs you want to transfer to USB and click OK.
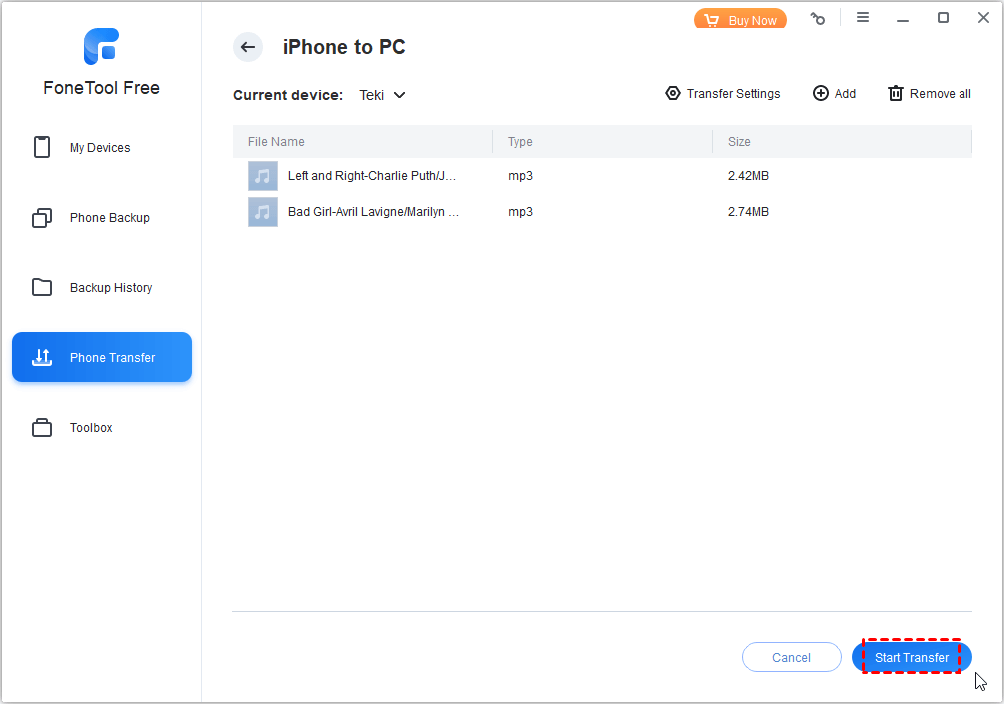
Step 3. Choose a folder of the USB as the storage path from Transfer Settings > Click Start Transfer to start the process.
As the picture showed above, FoneTool is so multi-functional that you can not only transfer music among different Apple devices and computer, but also backup and restore iPhone with it.
Conclusion
Here are the three ways how to transfer iTunes playlist to USB flash drive. You can rely on either iTunes or FoneTool to meet your demands. I’m inclined to choose FoneTool to transfer in a safer and faster way. If you have any other queries or feedback, feel free to contact us.
