How to Fix Purchased More iCloud Storage But Not Showing Up
Purchased more iCloud storage but not showing up? Don’t worry! Please read on to learn why this happen and how to fix extra iCloud storage not showing in easy ways!
Purchased iCloud storage, not showing up?
I recently purchased more iCloud storage, but it’s playing hide and seek on me. I did all the purchased steps in the settings, but the extra space isn’t showing up. Has anyone else faced this?
- Question from Apple Community
Why Is My Purchased More iCloud Storage But Not Showing Up?
If you’ve purchased more iCloud storage but not showing up in your account, here are some possible reasons:
Billing Issue: Ensure that your payment method associated with your Apple ID is valid and has sufficient funds. If there's a problem with your payment method, the purchase may not go through.
Failed Transaction: The purchase might not have gone through successfully. Double-check your purchase history in your Apple ID account settings to confirm if the transaction was completed.
iCloud Account Mismatch: Verify that you purchased the storage for the correct iCloud account. People sometimes have multiple Apple IDs, and the purchased storage might have been applied to a different account.
Delayed Processing: Sometimes, it takes a little time for Apple’s servers to process the purchase and update your account with the additional storage.

How to Fix Purchased More iCloud Storage But Not Showing Up
If you find yourself encountering the “iCloud storage not updating after purchase” issue, there’s no need to panic. This section has compiled easy and useful methods to help you fix this issue.
Method 1: Log Out and Log Back into iCloud
If the storage expansion is not reflected even after adding iCloud storage, you can try logging out of your iCloud account and signing in again. Follow the steps below:
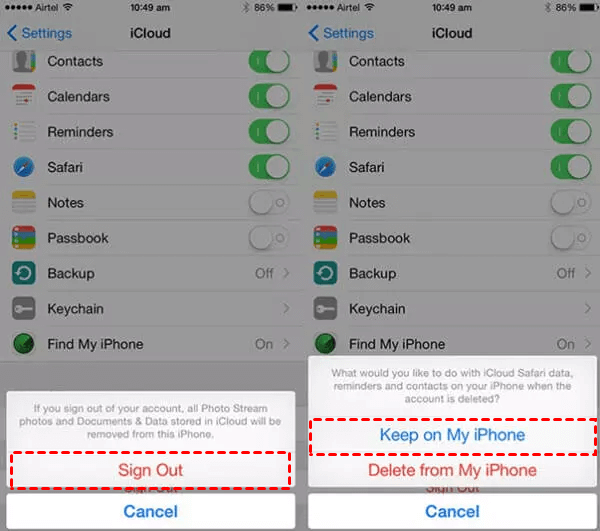
Step 1: Open your iPhone’s Settings, navigate to your Apple ID, and scroll down to find and tap the Sign Out option.
Step 2: Enter your Apple ID password when prompted > Then, select Turn Off and begin toggling the switches next to the data types you wish to retain on your iPhone.
Step 3: Finally, confirm your decision by tapping Sign Out > Choose the Keep on My iPhone option.
Method 2: Reset Network Settings
If you’ve encountered the extra iCloud storage not showing issue, it’s possible that network settings are to blame. To address this, consider resetting your network settings by following these steps:
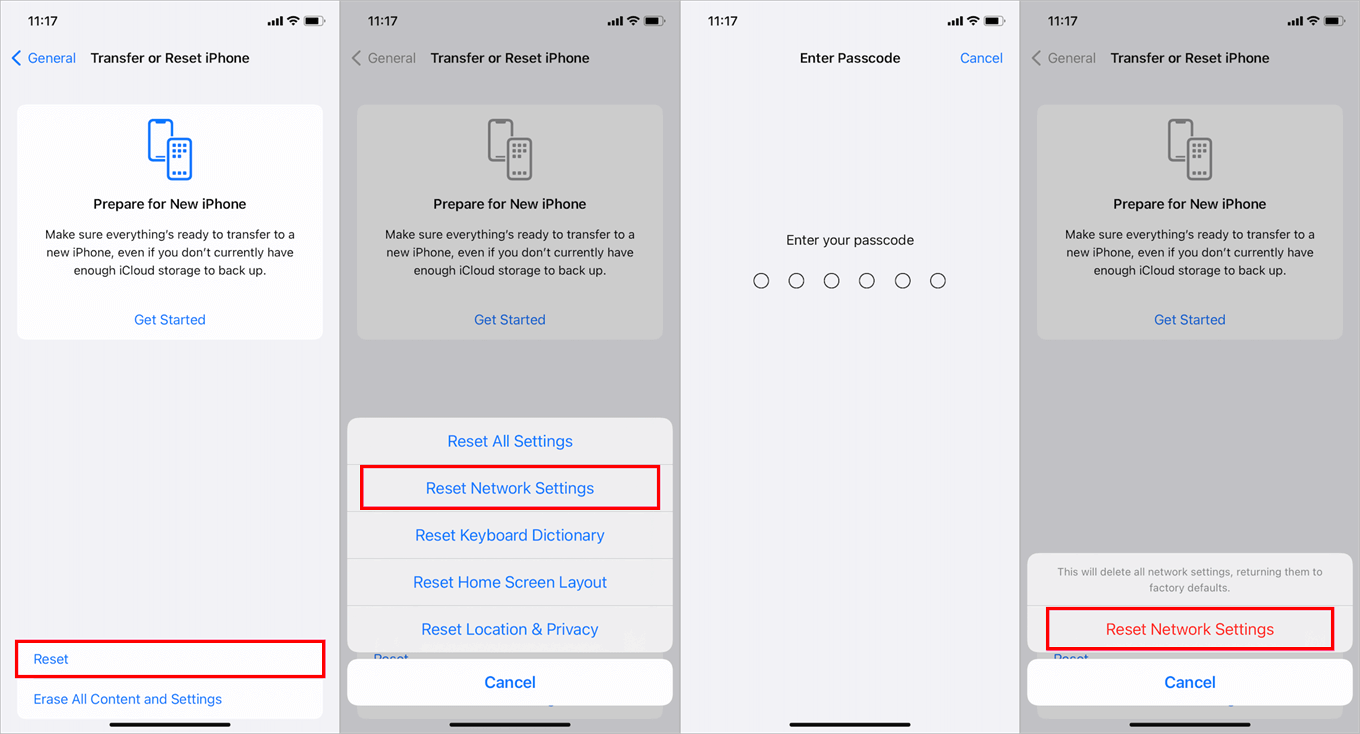
Step 1: Navigate to your iPhone’s Settings, select General, and scroll down to Reset. Tap Reset Network Settings.
Step 2: Enter your device’s passcode and then confirm the action by tapping Reset Network Settings once more.
Method 3: Perform a Hard Reboot on Your iPhone
This is a frequently employed solution, which has proven effective for numerous users encountering the issue of bought newly iCloud storage but not working. The steps slightly vary across different iPhone models. Below, we outline the procedure for each model:
For iPhone 15 to 8:
- Press the Volume Up button, then release it immediately.
- Press the Volume Down button and release it immediately.
- Press and hold the Power button until you observe the Apple logo on your screen.
For iPhone 7/7 Plus:
- Simultaneously hold down the Power and Volume Down buttons.
- Release them when the Apple logo becomes visible.
For iPhone 6 and earlier models:
- Begin by simultaneously pressing the Power and Home buttons.
- Continue this action until the Apple logo appears on the screen.

Method 4: Consult Apple Support
The last approach involves reaching out to the Apple support team to investigate any potential issues with the iCloud server. In the event of server-related problems, the recently acquired iCloud storage may not be immediately visible. Additionally, you can monitor the Apple System Status website, which provides information about servers or systems currently undergoing maintenance.
Method 5: Alternative Way to Access iCloud [Recommended]
If you cannot access iCloud normally, you can try an alternative way to check you files on iCloud. In this case, it’s highly recommended to use FoneTool - an excellent iCloud management tool. Here is how to use it:
Step 1: Initiate enhanced iCloud data management by downloading FoneTool on your Windows PC today.
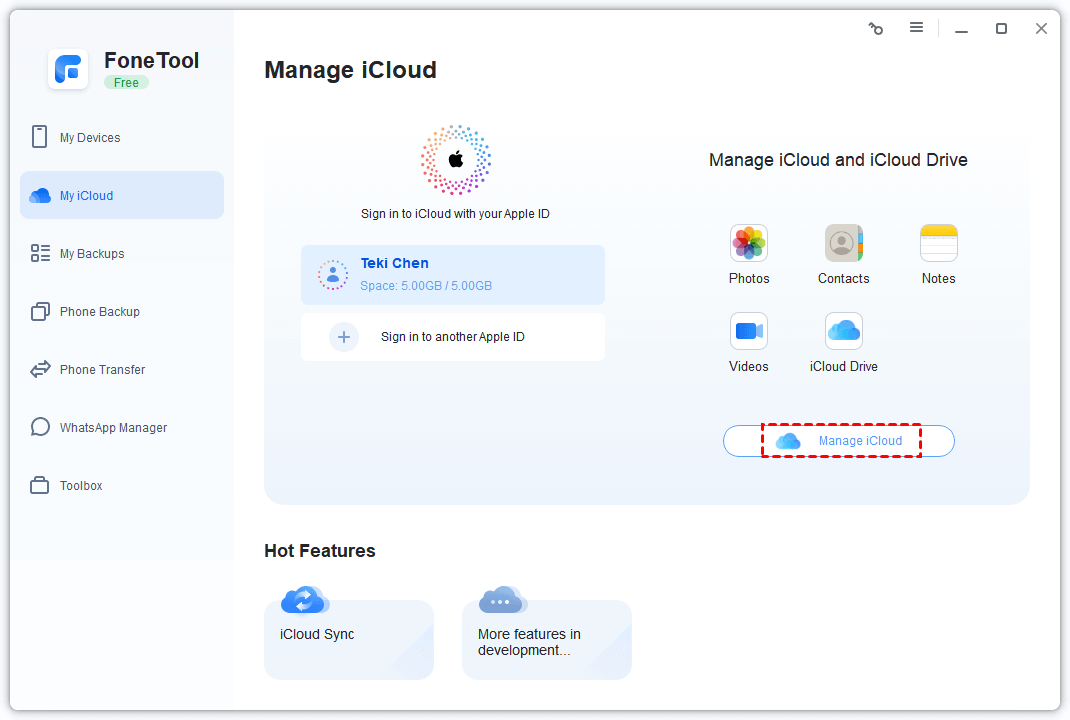
Step 2: Launch the application and navigate to My iCloud > Sign in with your Apple ID, then click on Manage iCloud.
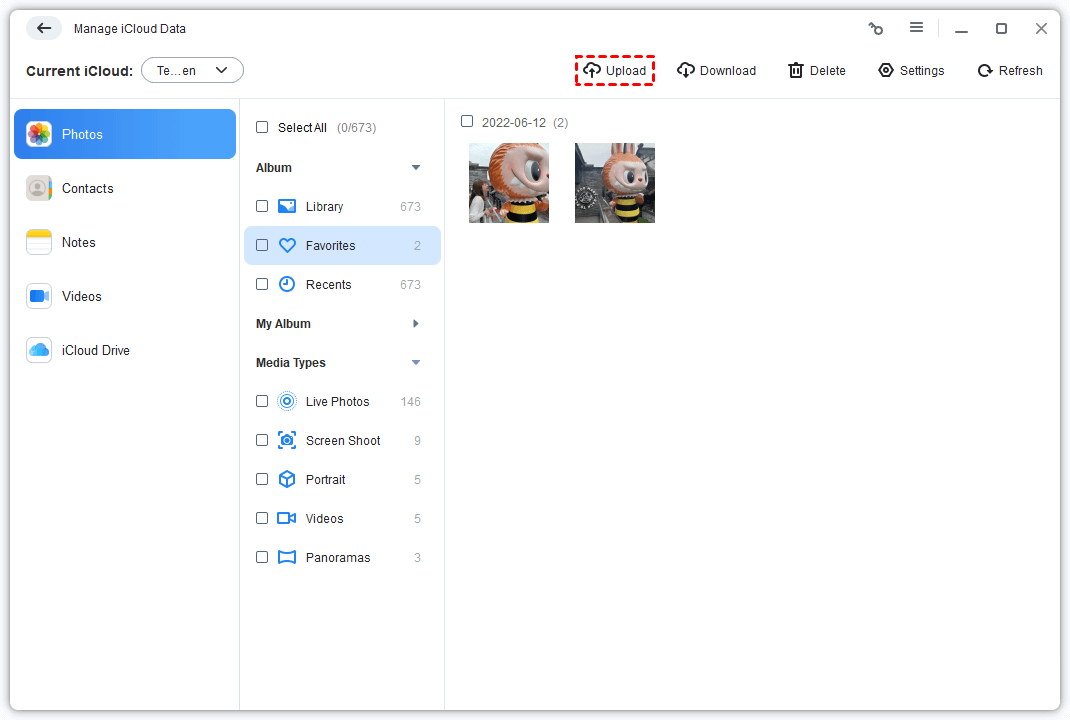
Step 3: Click each icon to manage your files like upload, download, or deletion > Confirm your action by clicking the corresponding button, such as Upload.
Bonus Tip: Backup iPhone Data Without iCloud [Free & Safe]
If you’ve explored all the methods mentioned earlier, and the issue of “purchased more iCloud storage but not showing up” still exists on your device, it might be time to consider alternative approaches for backing up your iPhone data. A highly effective solution to explore is FoneTool, now compatible with iOS 17. With the help of FoneToolo, you can make a full backup of your iPhones, including photos, contacts, call history, text messages, memos, calendars, and so on.
Highlights of Using FoneTool to Backup iPhone Data:
Comprehensive Data Backup: FoneTool offers a comprehensive data backup solution, allowing you to safeguard all your valuable information, including contacts, messages, photos, videos, and more.
No Network Required: You will find your iPhone won’t backup to iCloud due to poor internet, while FoneTool allows you to backup your iPhone data without the need for an internet connection.
Unlimited Storage: With FoneTool, you can select a PC or USB drive for your backups and enjoy the benefit of unlimited storage capacity for your backups.
User-Friendly Interface: The user-friendly interface of FoneTool makes the backup process easy and accessible for users of all levels of technical expertise.
So, how to make a full iPhone backup via FoneTool? Begin by downloading and installing FoneTool on your PC and then follow the simple instructions below.
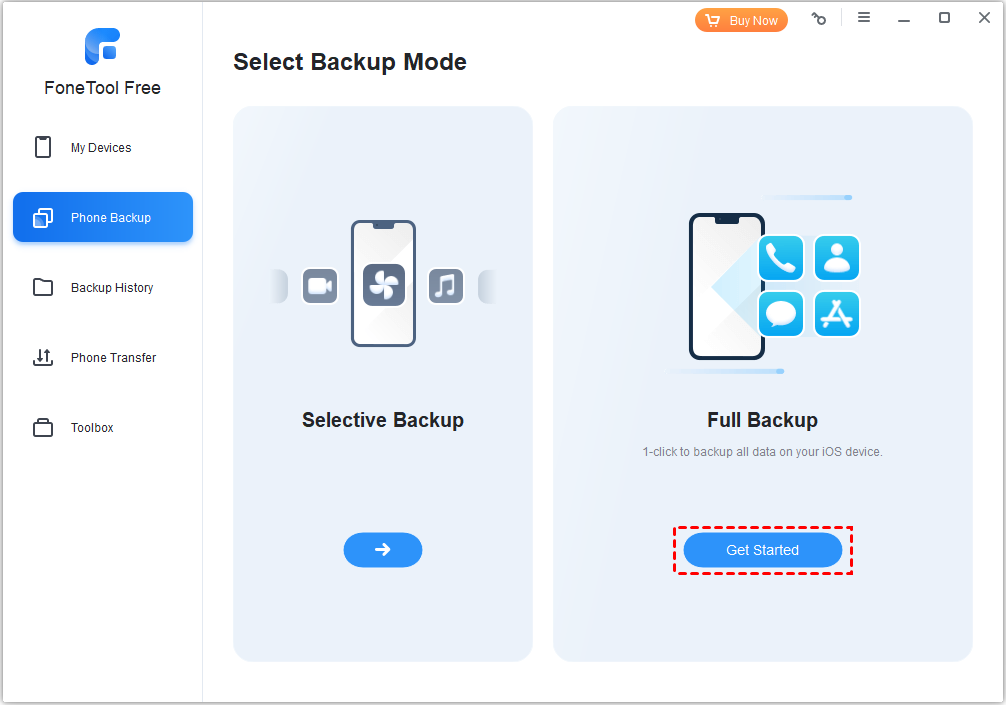
Step 1: Connect your iPhone to your PC with a USB cable > Launch FoneTool to its main interface > Select Phone Backup > Full Backup and then click Get Started.
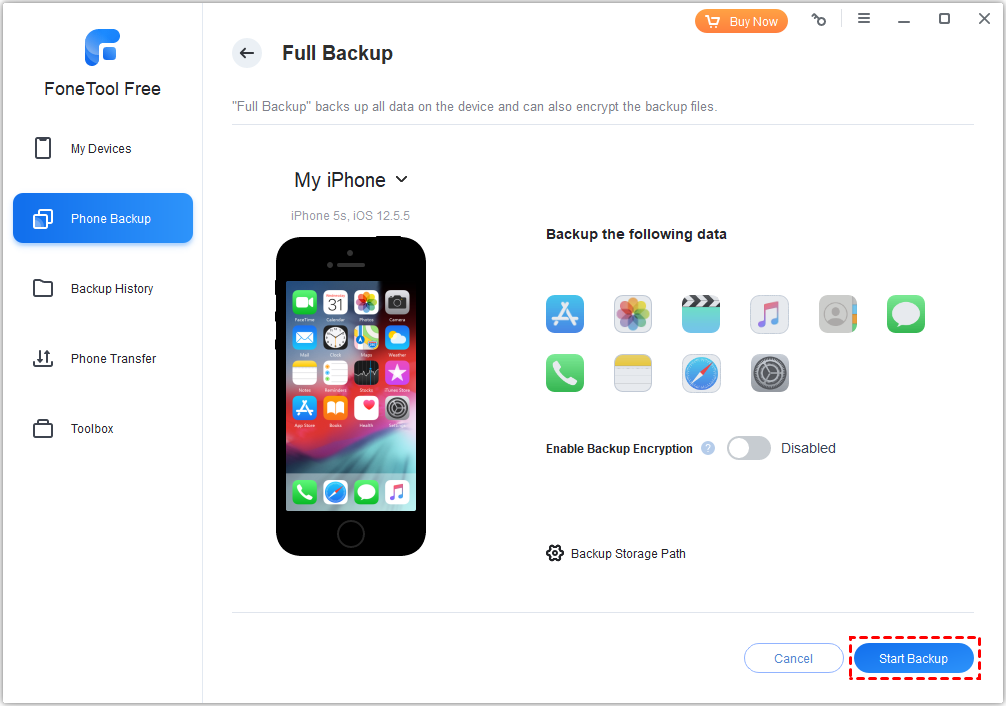
Step 2: Enable Backup Encryption to encrypt backup for iPhone > Click Backup Storage Path to select your preferred backup storage location and click Start Backup.
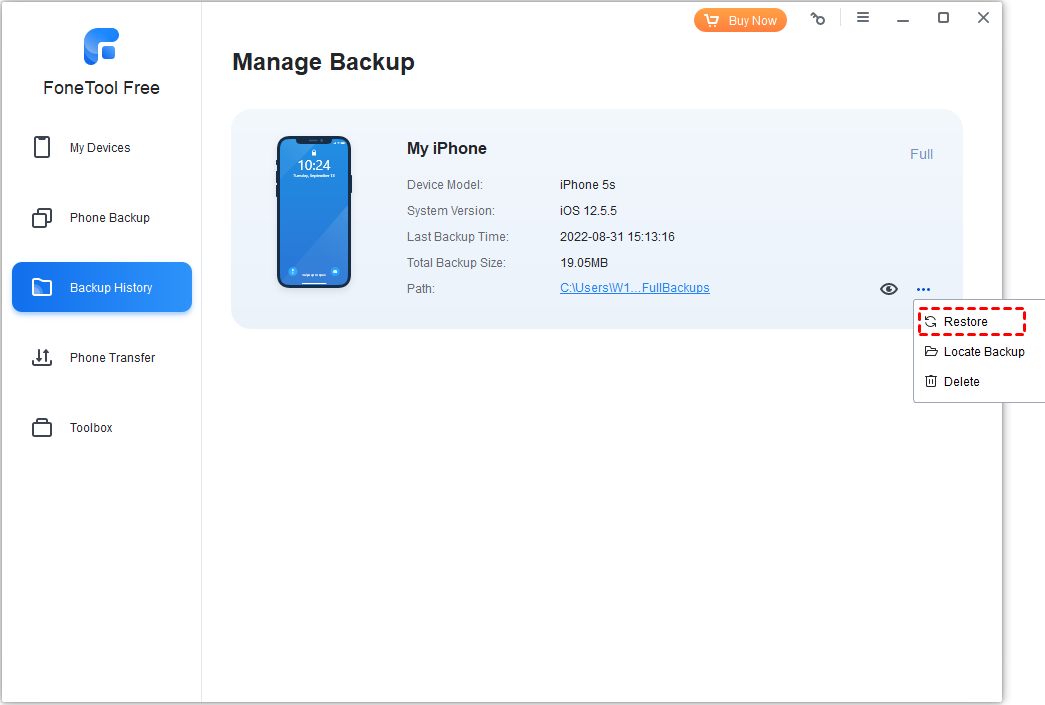
Step 3: Once the backup process is successfully completed, you can go to the Backup History section to effortlessly restore your data by clicking Restore.
The Bottom Line
This post has covered a range of methods to address the issue of “purchased more iCloud storage but not showing up”. Hope these methods can help you solve this problem easily and quickly. However, if you’re exploring alternative backup solutions for your iPhone, it’s highly recommended to give FoneTool a try. With FoneTool, you cannot only make a full or selective backup of your iPhone but also transfer iPhone to iPhone without iCloud. Try it out!
FoneTool - All-in-one iPhone Data Manager
Transfer, backup and manage data on iPhone, iPad and iPod touch in an easy way.
-
 iOS 27 Compatible
 iPhone 17 Supported
Windows 11/10/8/8.1/7
100% Secure

May is an editor who is passionate about sharing computer tips and providing reliable solutions, specializing in iOS/Android and file backup and recovery. In her spare time, May enjoys watching movies, going shopping, or chatting with friends.
Read author info >>