How to Delete Files from Google Drive on iPhone
Explore a comprehensive guide on deleting files from Google Drive on your iPhone. This article provides step-by-step instructions, expert tips, and best practices for efficient file management on your mobile device.
In today's fast-paced digital world, efficient file management is crucial. Google Drive has become a go-to cloud storage solution for many, offering accessibility and collaboration across devices. However, managing files, especially on mobile devices like iPhones, requires specific know-how. If you're wondering how to delete files from Google Drive on your iPhone, you've come to the right place. This guide offers detailed instructions, expert tips, and best practices for seamless file deletion.
Understanding Google Drive File Deletion
Before we delve into the step-by-step guide, let's briefly understand the basics of deleting files from Google Drive. When you delete a file in Google Drive, it goes to the "Trash" or "Bin" and stays there for a certain period. During this period, you can still recover the file. However, after a specified time, the file is permanently deleted from Google Drive.
Step-by-Step Guide: How to Delete Files from Google Drive on iPhone
-
Open Google Drive App:
- Launch the Google Drive app on your iPhone. Ensure you are signed in with the Google account associated with the files you want to delete.
-
Locate the File:
- Navigate to the file you wish to delete. Google Drive organizes files into folders, so find the relevant folder if needed.
-
Select the File:
- Tap and hold the file you want to delete. A checkmark will appear, indicating that the file is selected.
-
Access Options:
- Look for the three dots or "More" option, usually located in the top-right or bottom-right corner of the screen. Tap on it to open additional options.
-
Choose "Remove" or "Move to Bin":
- Depending on your app version, you might see options like "Remove" or "Move to Bin." Select this option to initiate the deletion process.
-
Confirm Deletion:
- A confirmation prompt will appear. Confirm the deletion to move the file to the "Trash" or "Bin" within Google Drive.
-
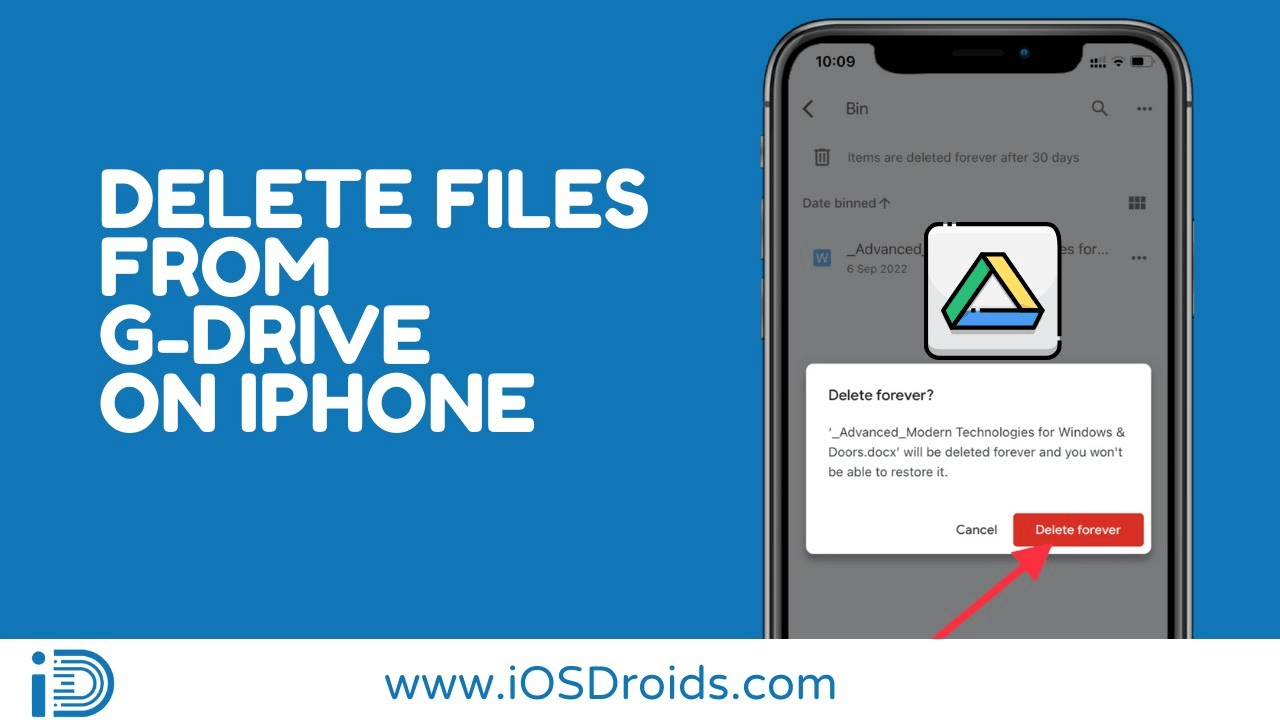
Empty the Trash (Optional):
- If you want to permanently delete the file, navigate to the "Trash" or "Bin" section in Google Drive. Select the file and choose the option to permanently delete it.
Best Practices and Expert Tips
-
Regularly Review and Clean Up:
- Periodically review your Google Drive for files you no longer need. Regular clean-ups help you optimize storage and keep your Drive organized.
-
Use Folders for Organization:
- Organize your files into folders within Google Drive. This not only makes it easier to find files but also streamlines the deletion process.
-
Enable Offline Mode (Optional):
- If you need to delete files without an internet connection, consider enabling offline mode in the Google Drive app settings.
How to Manage Google Drive on Desktop
If you also use Google Drive on your desktop, you can further streamline file management:
-
Sync with Desktop:
- Ensure Google Drive is synced with your desktop. Changes made on your iPhone will reflect on your computer, and vice versa.
-
Utilize Google Drive on Web:
- For more advanced features, consider accessing Google Drive through a web browser on your computer. This provides additional options for file management.
Bonus: How to Backup iPhone Files from PC
When it comes to safeguarding iPhone data, opting for iPhone data backup is a prudent decision. For efficiently transferring iPhone data to your Windows PC, FoneTool stands out with its extensive features.
Exceptional backup speed: FoneTool ensures rapid backup speeds, surpassing those of iTunes and iCloud, allowing you to transfer hundreds of photos within seconds.
Preview and selective backup: FoneTool provides the option to perform a complete backup similar to iTunes or selectively back up specific data like photos, videos, music, contacts, and messages on your PC.
Universal Restore: Easily restore iPhone backups to other iOS devices without any Apple ID restrictions.
Wide compatibility: FoneTool efficiently manages data from all iPhone/iPad/iPod Touch models on Windows PC, including iPhone 15 and iOS 26.
To experience the user-friendly FoneTool on your Windows PC and learn how to perform a comprehensive iPhone data backup, follow these steps:
Step 1: Choose "Phone Backup," select "Full Backup," and click "Get Started."
Step 2: Optionally, check "Enable Backup Encryption," choose a storage path to save the backup, and click "Start Backup" for a full backup.
For future restoration needs, simply go to "Backup History" and click "Restore" to accomplish the task effortlessly. Download FoneTool now for a hassle-free iPhone data backup experience.
Conclusion
Efficiently managing files on Google Drive from your iPhone is essential for a seamless digital experience. This guide equips you with the knowledge to delete files, organize your Drive, and optimize storage. Implement the step-by-step instructions and expert tips to enhance your file management on Google Drive. Stay tuned for more tech guides to elevate your digital lifestyle.
FoneTool - All-in-one iPhone Data Manager
Transfer, backup and manage data on iPhone, iPad and iPod touch in an easy way.
-
 iOS 26 Compatible
 iPhone 16 Supported
Windows 11/10/8/8.1/7
100% Secure

Kathy is an editor of FoneTool, who prefers to help more users address a series of iOS-related problems. She likes traveling and being close to nature makes her relax. She is also keen to engage in social activities and spend much free time with her friends.
Read author info >>