[Fixed] iOS 26 Screen Recording Not Working on iPhone/iPad
Are you looking for ways to fix iOS 26 screen recording not working? Luckily, this post will show you 7 useful methods to resolve the issue of the iOS 26 screen not working properly on your iPhone or iPad.
Why Is My Screen Recording Not Working iOS 26?
Some iPhone/iPad users have reported a frustrating problem with iOS 26 screen recording not working when trying to record their screens. The problem manifests itself in various ways, such as iPhone not recording video, the recording screen not saving, recording video without sound, recording screen crashes or not being able to stop iPhone screen recording.
Why does this happen? The reasons for iPhone/iPad screen recording not working as expected can be attributed to a variety of factors, including:
Screen Recording Disabled: When the screen recording feature is disabled in Control Center settings, it may trigger this problem.
App Restrictions: Some apps, especially streaming or media apps, may disable screen recording for copyright protection.
Screen Recording Limitations: Some apps or screens may not be compatible with screen recording due to security or privacy reasons.
Insufficient Storage: If your iPhone’s storage is almost full, screen recording may not work correctly.
…
Top Ways to Fix iOS 26 Screen Recording Not Working
No matter what the reason in your case, try the following methods and see if they can fix the problem. Scroll down for more details.
Method 1: Add Screen Recording to Control Center
To start screen recording on your iPhone or iPad successfully, the first thing you should do is to make sure that screen recording is enabled on your device. Follow these steps:
Step 1: Navigate to Settings on your device > Select Control Center from the options.
Step 2: Choose Customize Controls > Locate Screen Recording and add it to your Control Center.
Method 2: Verify Restrictions and Restart Screen Recording
If you have enabled the screen recording feature but are still experiencing the issue of the screen record iOS 26 not working, try turning it off and then on again. Here is a full guide to do that:
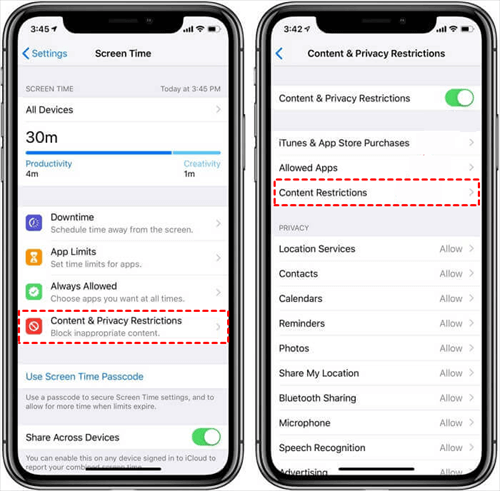
Step 1: Access Settings on your device > Tap Screen Time > Select Content & Privacy Restrictions.
Step 2: Navigate to Content Restrictions > Verify that Game Center allows screen recording.
Method 3: Fix iPhone Screen Recording No Sound
Certain users are experiencing problems with screen recordings that display content but lack accompanying sound. To correct this situation, follow the steps below:
Step 1: Access Control Center on your device > Tap the Screen Recording icon.
Step 2: Find the Microphone icon and turn it on to enable recording.
Method 4: Resolve Screen Recorder Crash Issue
Feedback from many users indicates that some older iPhone and iPad models may not be fully compatible with iOS 26. In this case, attempting to install iOS 26 on an incompatible device may result in the iOS 26 screen not working issue with the screen recording feature.
As a solution, consider updating to a new iPhone or iPad model that is fully compatible with iOS 26 to ensure seamless access to all features, including screen recording.
Method 5: Fix Screen Recording Failed to Save
If the screen recording fails to save, you can try several troubleshooting tips below:
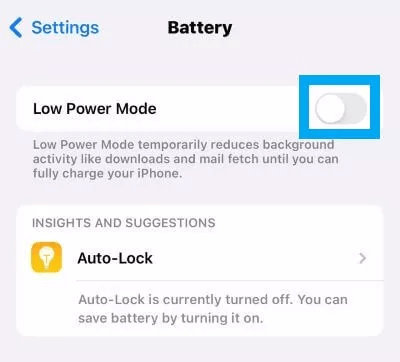
Step 1: Disable Low Power Mode
Ensure that Low Power Mode is turned off as it may limit background activity, which may prevent screen recordings from being saved to photos. Verify this by visiting Settings > Battery.
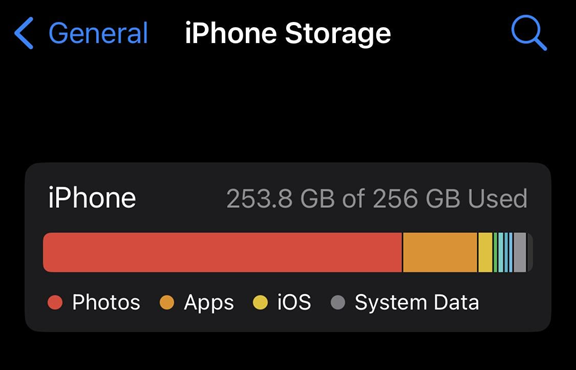
Step 2: Check iPhone storage space
Insufficient space on your iOS device can also cause screen recording to fail. Navigate to Settings > General > iPhone Storage to check your iPhone storage.
If you don’t have enough storage space, consider deleting unnecessary files or trying to transfer files from iPhone to laptop with USB to free up storage space.
Step 3: Force Restart Device
If the screen recording is still not available or cannot be saved, you can try to solve the problem by rebooting or force restarting the device.
Method 6: Repair iOS System to Fix Recording Glitches
If the screen recording issue persists after trying basic fixes, it might be caused by deeper iOS system corruption. FoneTool Repair specializes in fixing such system-level issues that can cause functionality failures like screen recording not working.
This powerful iOS system repair tool is the best way to fix iOS/iPadOS issues without data loss
Here’s how to use FoneTool Repair to fix screen recording issues:
Step 1: Download and install FoneTool Repair on your Windows computer. Connect your iPhone via USB cable. Tap "Trust" on your device if prompted.
Step 2: Select iOS System Repair from the main interface.
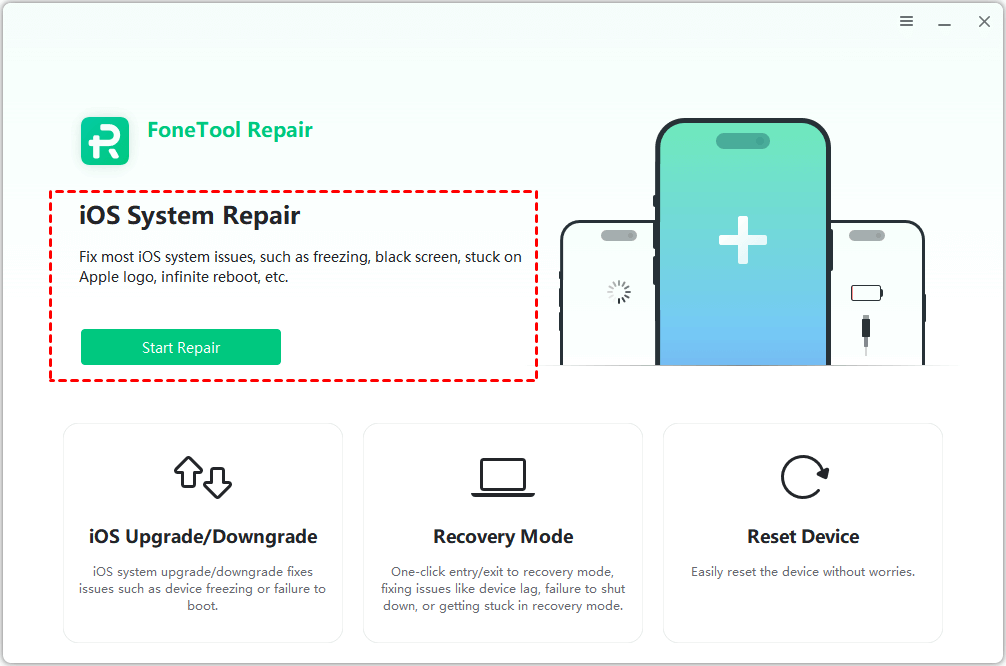
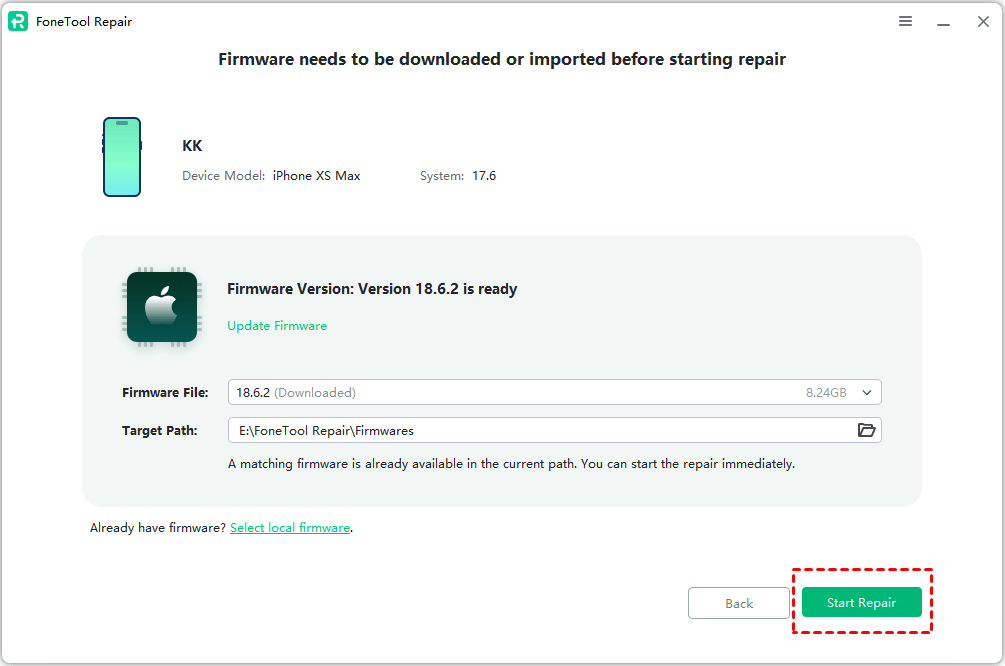
Step 3: Choose Standard Repair mode (highly recommended as it guarantees no data loss).

Step 4: Click Start Repair to begin the process. Your iPhone will restart automatically upon completion.
After the repair, attempt to use the screen recording feature again. This process resolves underlying system conflicts that often cause such persistent issues.
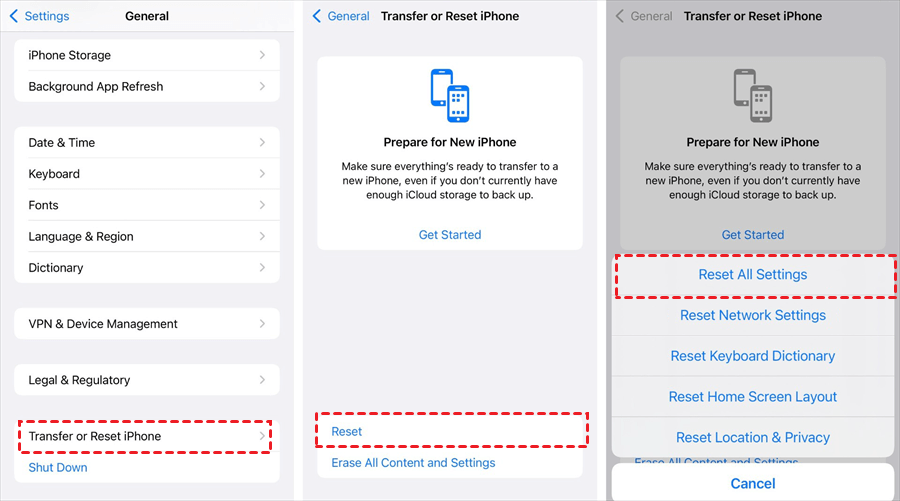
Method 7: Reset All Settings
If the above five methods don’t fix the iOS screen recording not working issue, you may consider resetting your iPhone as an alternative. Please be rest assured that this method won’t delete any data from your device. Instead, it will reset certain settings that may affect the screen recording function.
Step 1: Go to Settings on your iPhone/iPad > Tap General > Locate the Transfer or Reset iPhone option.
Step 2: Continue to Reset > Select Reset All Settings > Enter the passcode of your device > Tap Reset All Settings once again to confirm your selection.
Bonus Tip: How to Export Recording Videos from iPhone/iPad to PC
If your iPhone or iPad storage is almost full and you want to save more screen recording videos, why don’t you export these videos from your iOS device to your PC to free up more space? In this part, it’s recommended to use the best iOS data transfer tool – FoneTool, which is dedicated to transferring and managing your iOS data in a simple way.
Highlights of Using FoneTool to Export Recording Videos to PC:
Fast Transfer Speed: FoneTool ensures fast transfer speeds, enabling you to move videos to your PC in no time.
Selective Transfer: With FoneTool, you can choose specific recording videos to transfer, offering flexibility and control over the export process.
Support for Various Video Formats: FoneTool supports a wide range of video formats, making it compatible with various recording videos captured on your iOS device.
Backup and Restore: FoneTool also allows you to back up and restore your data without losing data from your iOS device to a PC, USB drive, or external hard drive.
So, how to export recording videos from your iOS device to your PC? Let’s see how it works for you.
Step 1: Free download and install FoneTool on your computer > Connect your device to your PC using a USB cable > Tap Trust to grant the necessary access to the software.
Step 2: Launch FoneTool > Choose Phone Transfer in the main interface > Click Start Transfer under the iPhone to PC mode to initiate the process.
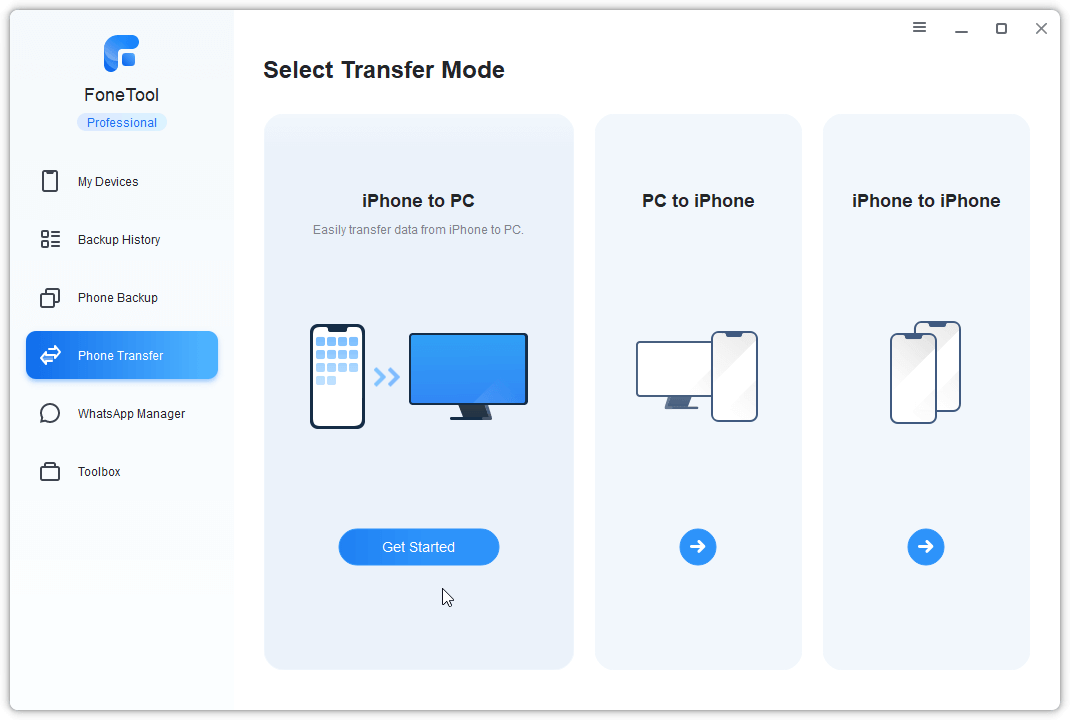
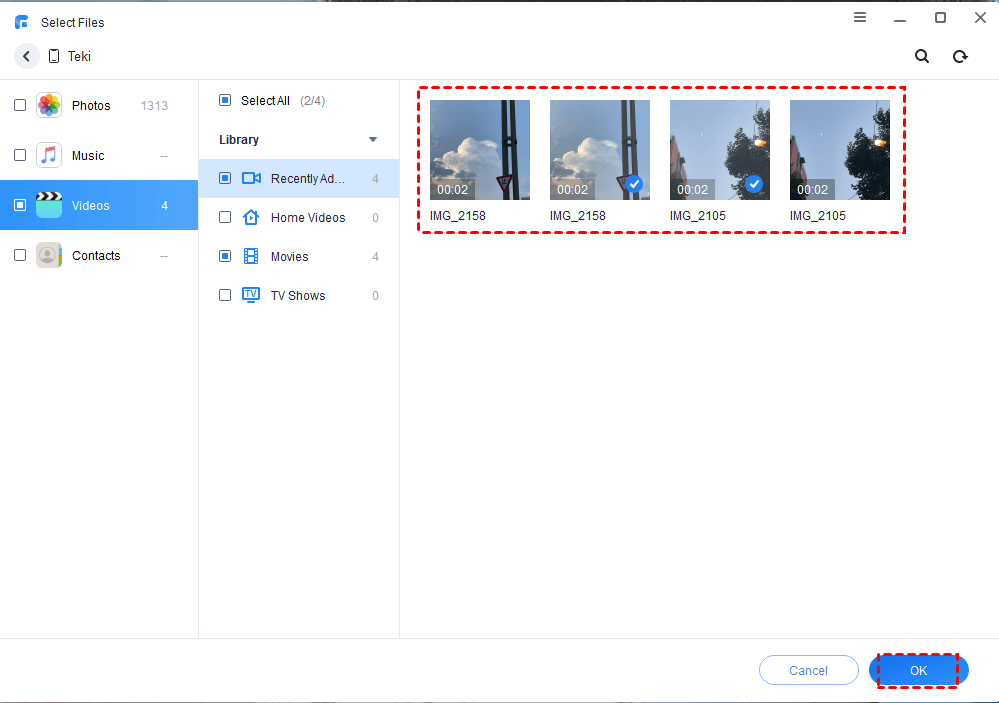
Step 3: Click the “+” icon and select the videos you wish to transfer to your PC > Confirm your selection by clicking OK.
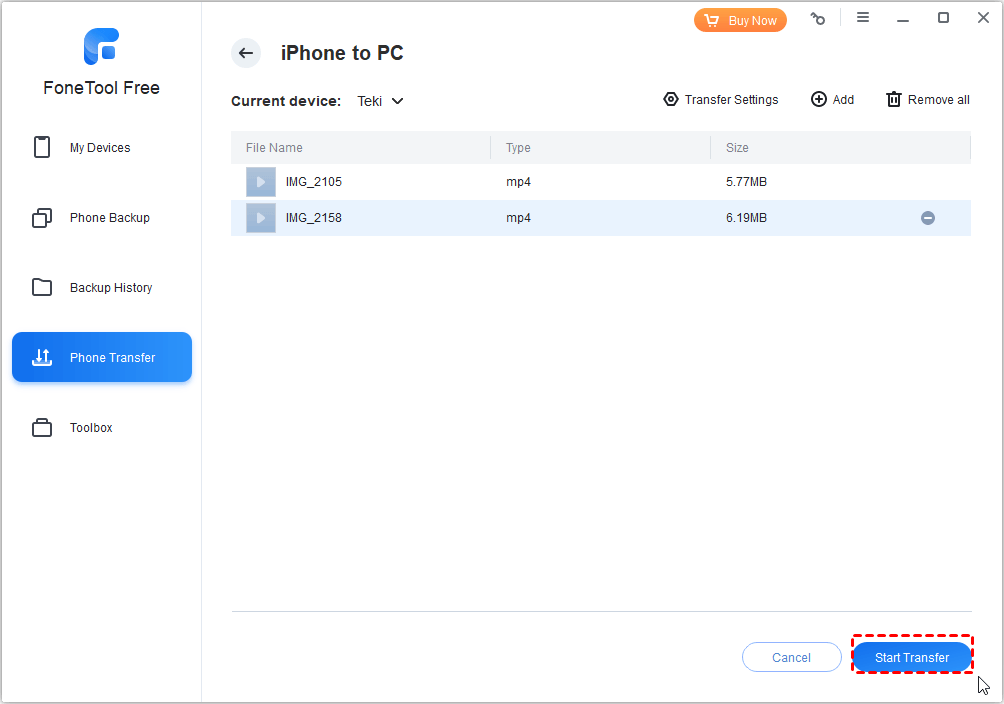
Step 4: Click the Transferred Settings to choose a destination on your PC to save the transferred video > Click Start Transfer to begin the transfer process.
The Bottom Line
This concludes the guide on how to fix iOS 26 screen recording not working. Hope these methods helped solve the problem. If the issue was caused by system glitches, FoneTool Repair offers a targeted and effective solution. For simply freeing up space to ensure recordings save properly, FoneTool provides an efficient way to manage your device's content.
FoneTool - All-in-one iPhone Data Manager
Transfer, backup and manage data on iPhone, iPad and iPod touch in an easy way.
-
 iOS 27 Compatible
 iPhone 17 Supported
Windows 11/10/8/8.1/7
100% Secure

May is an editor who is passionate about sharing computer tips and providing reliable solutions, specializing in iOS/Android and file backup and recovery. In her spare time, May enjoys watching movies, going shopping, or chatting with friends.
Read author info >>