[2026 Updated] How to Erase Blocked Numbers on iPhone
Sometimes, it may be not enough to block some of your contacts. And if you also want to delete them after you have blocked them. Then, how to erase blocked numbers on iPhone? Keep reading this guide to find answers.
Deleting blocked contacts on an iPhone is beneficial when you want to remove unwanted or unrecognized numbers from your list, or just simply manage contacts on iPhone. However, the process can be tricky if you're unfamiliar with it. Don't worry; we're here to help.
![]()
No matter the challenges you encounter, we're here to assist you. In this article, we'll guide you on how to block and how to erase blocked numbers on iPhone stress-free. Let's get started!
How to block numbers on iPhone
It is simple to block contacts on your iPhone. You can follow the detailed steps below to block, or stop a contact on your iPhone from reaching you whether via text, phone call, or FaceTime:
If the contact is listed: In the Contacts app, select the contact you wish to block > Scroll down to locate and tap Block this Caller > Confirm by choosing Block this Caller from the pop-up.
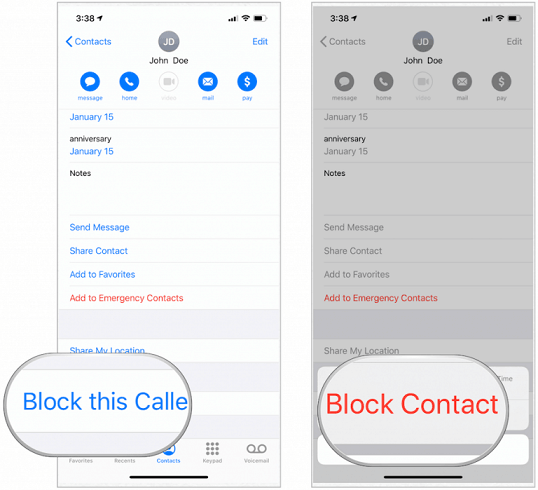
If the contact is not listed: Go to Phone app > Select the Recent tab > Choose the i icon > Select Block this Caller > From the pop-up, confirm your operation.
How to erase blocked numbers on iPhone
Erasing blocked numbers on iPhone can be accomplished using various methods. Here are the techniques you can utilize to successfully delete blocked numbers from your iPhone.
Delete blocked numbers from Phone Calls
From Phone Calls menu page, you are able to erase the number you recently blocked from reach you. This technique is incredibly straightforward, and the corresponding results occur almost instantly. Simply follow the steps below to know how to delete blocked contacts on iPhone.
Step 1. Click the green Call button to launch the Call log menu page > Tap on the Contact icon.
Step 2. Tap the blocked contacts, and tap on the Edit button > Scroll down to the bottom of the screen and tap Delete Contact.
Step 3. Click Delete Contact again to confirm the deletion.
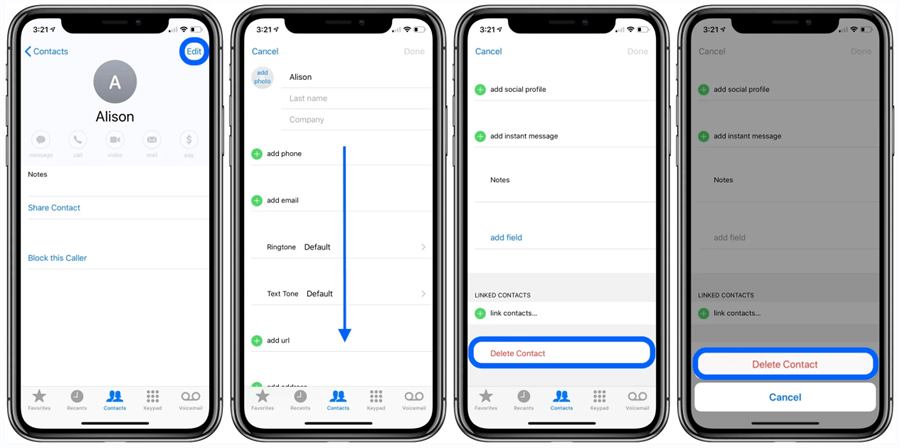
You need to repeat the same procedures to erase all your blocked numbers from your iPhone.
Delete blocked numbers from Messages
In addition to the aforementioned technique, there is another option to remove blocked contacts from your iPhone. This solution works perfectly if you have previously sent a message to the blocked contact. It allows you to delete the contact entirely from your device.
Follow the stepwise illustration below to get how to erase blocked contacts on iPhone:
Step 1. To access the Message app on your iPhone, simply tap on the green message button located at the lower part of your device's Home Screen.
Step 2. Once you've done that, find the specific contact that you want to remove from the Message app. To do this, press and hold the message associated with that contact.
Step 3. Afterward, choose the option to delete the message and then confirm your decision by clicking on the corresponding button.
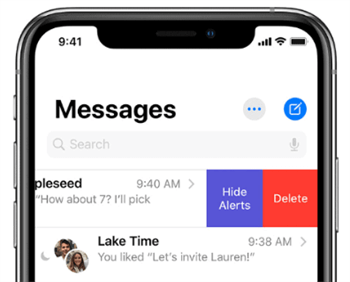
By following these steps, you can successfully complete the process of deleting a contact from the Message app on your iPhone.
Delete blocked contacts on iPhone Contacts
To delete blocked contact numbers on iPhone through the Contact menu:
1. Access the Contacts menu by tapping on its icon located on the Home Screen page.
2. Locate and select the blocked contact in question.
3. Proceed by tapping on the Edit option, and then scroll down until you find and choose Delete.
Bonus: How to erase all contacts on iPhone
Deleting individual contacts on iPhone is a familiar task, but erasing all contacts at once can be challenging as there is no "Delete All" button. However, with the powerful tool called FoneTool, you can achieve this seamlessly. The Erase private data function in FoneTool allows you to delete all contacts on your iPhone simultaneously.
Moreover, it ensures that the contacts are thoroughly erased, leaving no possibility of recovery. Embrace the efficiency and security of FoneTool's Data Eraser feature for a hassle-free contact cleanup. Here are how to delete all contacts on iPhone using FoneTool.
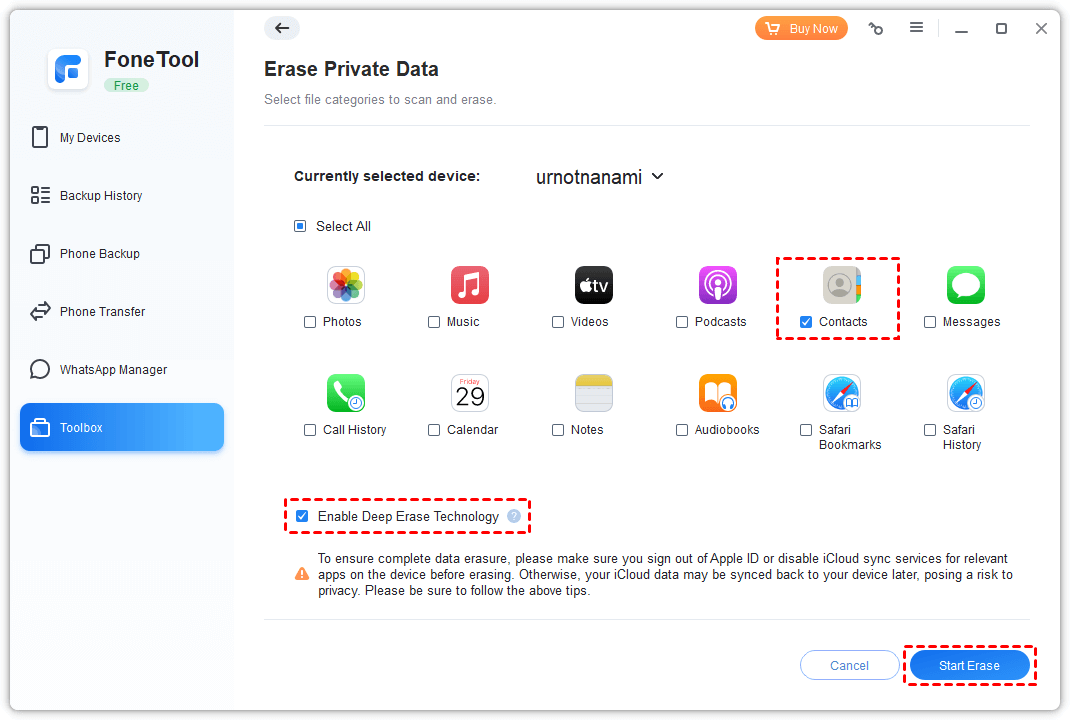
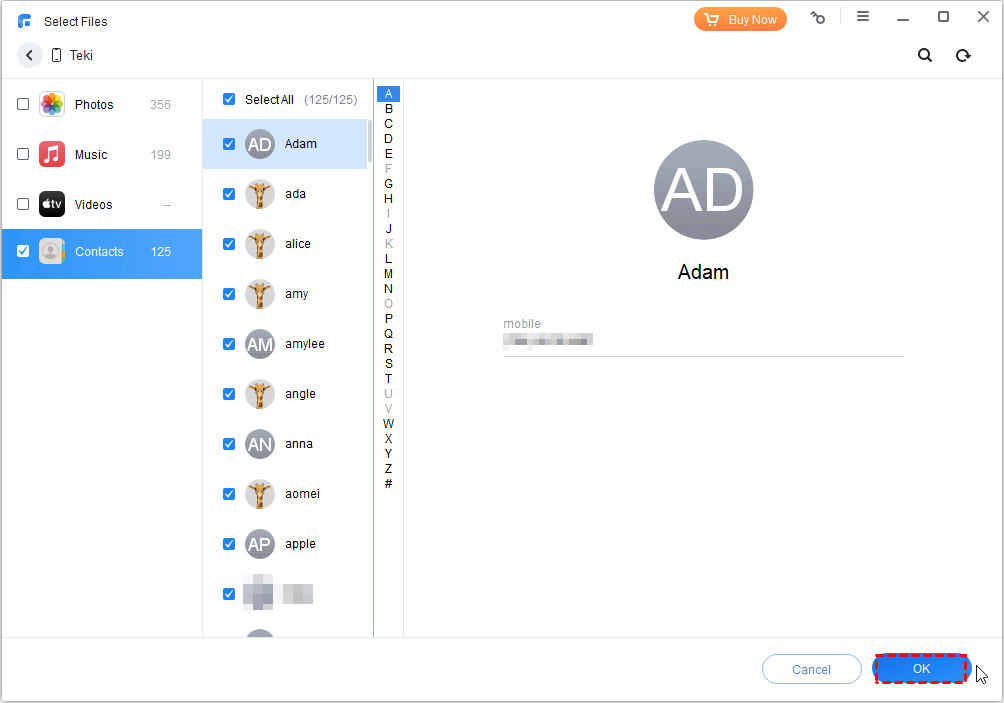
Step 1. Connect your iPhone to PC with USB > Launch FoneTool, and click Toolbox > Data Eraser > Mouse over to Erase private data and click Get Started.

Step 3. Check the Contacts icon > Check Enable Deep Erase Technology to ensure complete and deep data erasure > Tap Start Erase to begin the task.
? Warm tip:
If you want to backup iPhone contacts before the erasure task, you can go to Phone Backup > Selective Backup to preview and select the contacts you want to backup to computer.
To edit iPhone contacts on computer, you can try FoneTool’s data transfer function. You can go to Phone Transfer > iPhone to PC to copy contacts to iPhone.
More info: How to Export iPhone Contacts to Excel or CSV File Freely
Summary
That sums up the process of deleting blocked contacts from your iPhone. By using the outlined techniques, you can effortlessly remove unfamiliar, suspicious, or unwanted numbers from your contact list. These methods are straightforward, free, and highly efficient, ensuring a hassle-free experience while managing your contacts. Say goodbye to unwanted digits and keep your contact list clean and organized.
FoneTool - All-in-one iPhone Data Manager
Transfer, backup and manage data on iPhone, iPad and iPod touch in an easy way.
-
 iOS 27 Compatible
 iPhone 17 Supported
Windows 11/10/8/8.1/7
100% Secure

Demi is an editor of FoneTool group as well as an good advisor in the area of iOS-related issues. She does well in finding solutions to people's problems. She enjoys traveling, gardening, and watching movies. She spends most of her free time with her pet and family.
Read author info >>