iPhone AutoFill not Working Correctly? - Top Ways to Fix it
If you find your iPhone AutoFill not working correctly, solutions are here. This article will show you the causes and how to fix iPhone OPT AutoFill not working.
My iPhone AutoFill not working. I'm using an iPhone 15 running iOS 18. Whenever I try to use AutoFill, it doesn't suggest or fill in my saved information. Any tips on fixing this annoying AutoFill issue? Thanks in advance!
- Question from Apple Community
Why Doesn't My iPhone AutoFill Anymore?
AutoFill is a convenient feature that automatically fills in information such as passwords, usernames, addresses, and credit card details in apps and websites. However, there are instances where the AutoFill feature may not work as expected. If your iPhone OPT AutoFill not working, there are a few potential reasons:
- ✎... Incorrect AutoFill Settings
- ✎... App glitches
- ✎... iCloud Keychain Issues
- ✎... Outdated iOS version
For these reasons, we will provide 9 effective methods to assist you in the following article. These methods are not only applicable to iPhone, but also to iPad.
How Do I Get AutoFill Back on iPhone - 9 Top Ways
Here, we list 9 top ways to solve iPhone AutoFill not working. You can try them all one by one, or just choose the method you like best. Let’s start!
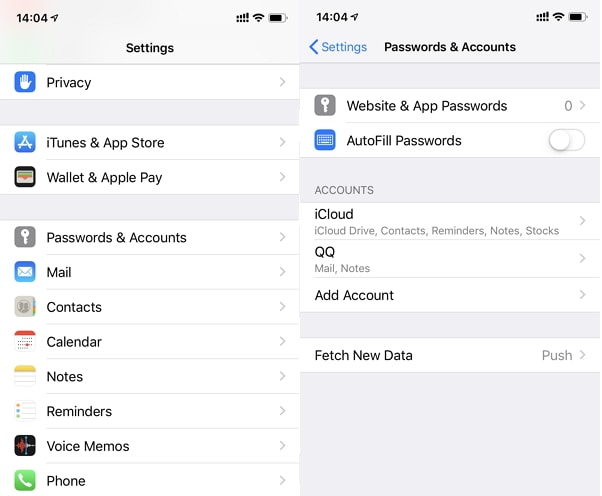
Way 1. Turn OFF and Turn on AutoFill Passwords
Turning off and turning on the AutoFill passwords button can help you get rid of AutoFill issues caused by some app glitches. And the steps are simple: Go to Settings > Locate Passwords > Tap on Password Options > Turn off the toggle next to the AutoFill Passwords > Wait for a while, turn it on.
Way 2. Enabled iCloud Keychain on the iPhone
If you want to use the Apple AutoFill feature, did you turn on the iCloud Keychain switch on your iPhone? Because AutoFill data, including passwords and credit card information, is stored in your iCloud Keychain. If there are any problems with your iCloud Keychain, it may affect AutoFill functionality. Enable the iCloud Keychain by the guide:
Step 1. Open Settings > Go to your profile > Tap iCloud.
Step 2. Click Passwords and Keychain > Turn on the toggle.
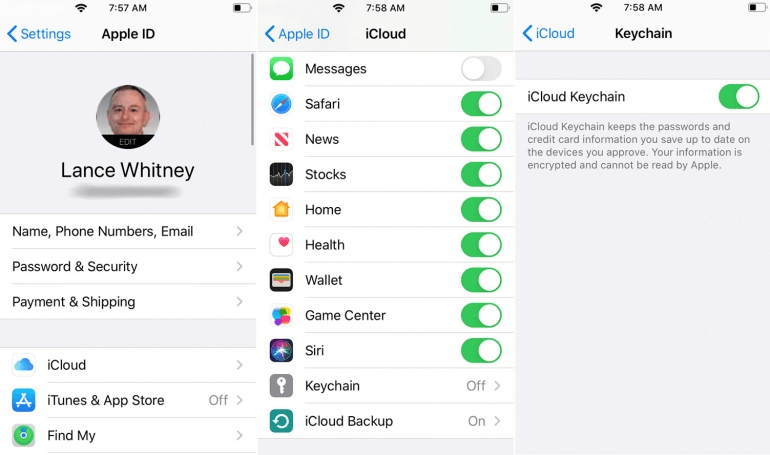
After you finish the above steps, try to AutoFill the password on any app to check if you have overcome the problem.
Way 3. Allow Filling from iCloud Passwords and Keychain
In addition to making sure you have enabled iCloud Keychain on your iPhone, there is one more thing you should note: Allow your device to fill in from iCloud Passwords and Keychain. Here are the steps:
Step 1. Go to Settings > Locate Passwords > Select Password Options.
Step 2. Under the Allow Filling From, make sure the iCloud Passwords & Keychain is turned on.
Way 4. Force Quit the Problematic App
If the app is stuck or unresponsive and cannot AutoFill, all you need to do is force-close the app. Proceed as follows: Swipe up from the Home bar and hold along the middle of the screen > Then, swipe up on the app card to close the problematic app.
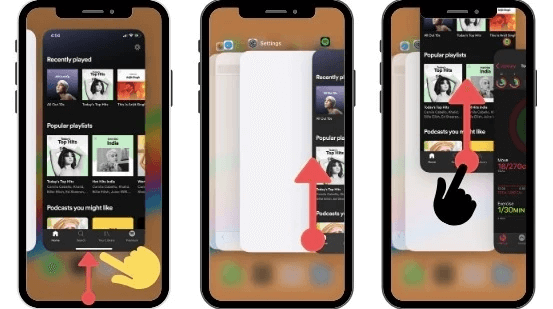
After that, open it again to see whether the password can AutoFill correctly.
Way 5. Disable the Private Browsing Mode
Is the problem of Apple AutoFill not working still there? Don't worry, there are other methods you can try. If your iPhone is set to private browsing mode, AutoFill passwords will not work in this state. So if you want to use AutoFill passwords for this feature, make sure you have disabled the private browsing mode.
Follow the steps: Open Safari on the iPhone > In the bottom right corner, tap and hold the tabs icon > Choose a general tab or a tab group.
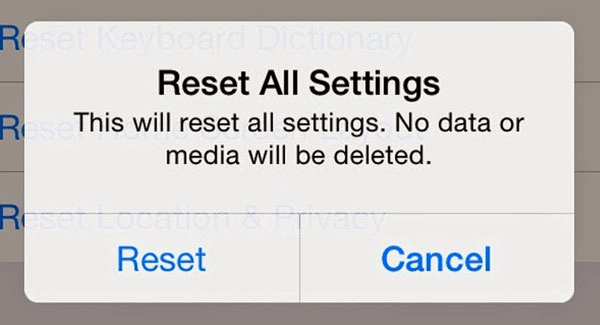
Way 6. Reset All Settings
Resetting all settings is also an effective and reliable way to deal with some iPhone issues, including iPhone SMS OPT AutoFill not working. This method does not erase any data on your iPhone and the steps are below: Open Settings > General > Transfer or Reset iPhone > Reset > Reset All Settings.
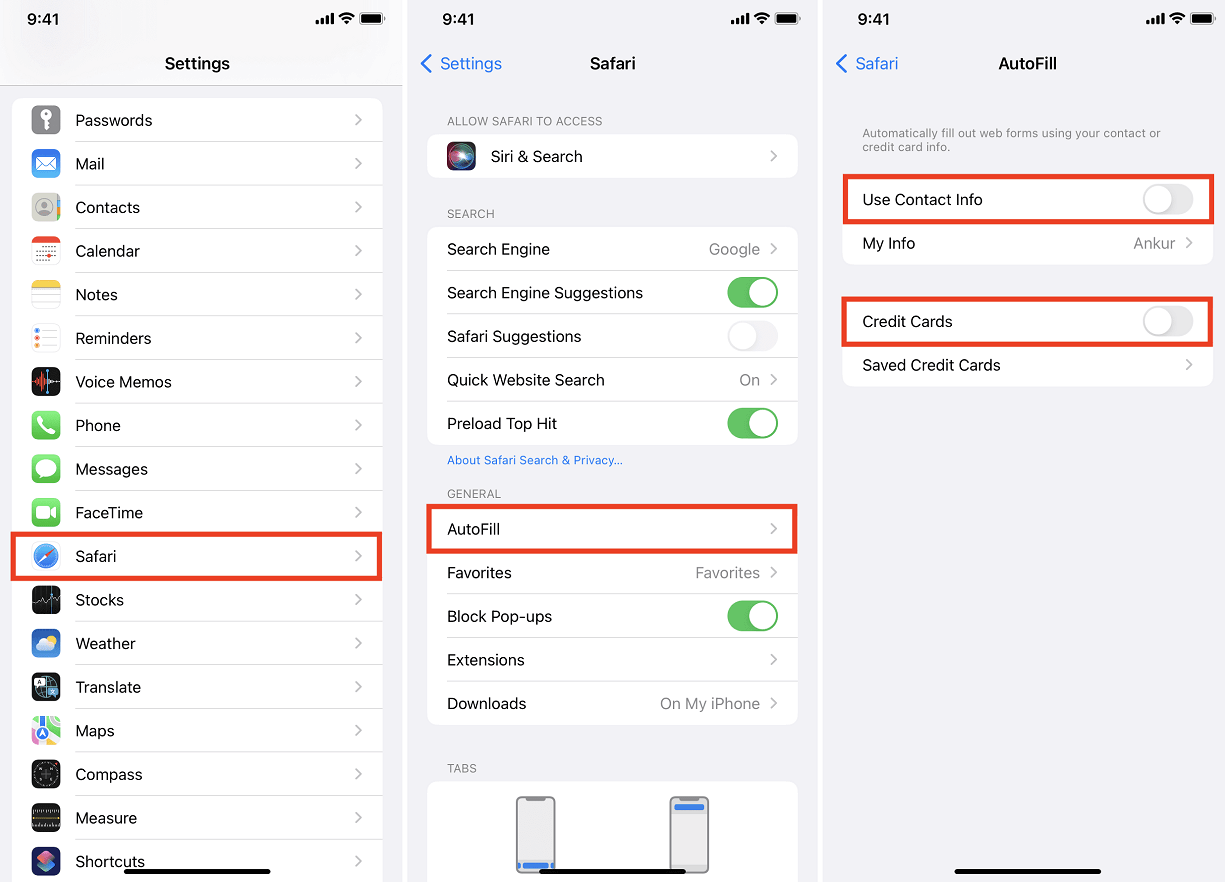
Way 7. Open AutoFill Toggles for Contact Info and Credit Cards
If you find that you cannot use the AutoFill function when filling in contact information or credit card information, you can check whether you have turned on AutoFill toggles for Contact Info and Credit Cards. If not, please follow these steps:
Step 1. Open the Settings app > Look for Safari > Tap on AutoFill.
Step 2. Turn on the Use Contact Info and Credit Cards by moving the toggles.
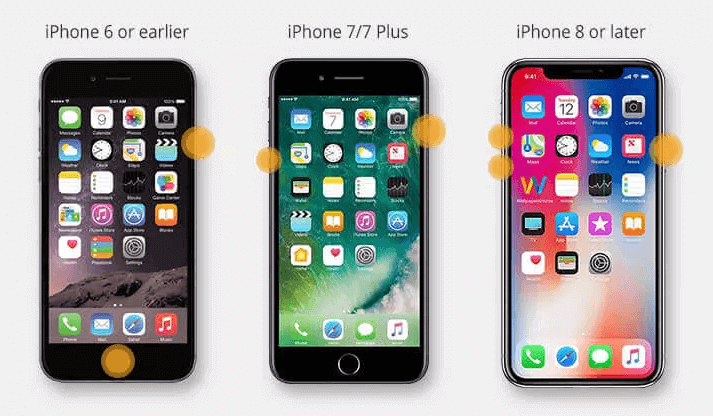
Way 8. Hard Reboot the Device
Have you tried force restarting your iPhone? This method can terminate some problematic programs and clear the cache. There are different methods of force restarting for different models, please see the following steps.
On iPhone 8/X or later:
Press and release the Volume up button quickly > Then, press and release the Volume down button quickly > Hold the Power button until the Apple logo shows up.
iPhone 7/7 Plus:
Hold down the Volume down button and the Home button at once > When you see the Apple logo, release them.
On iPhone 6s or earlier:
Hold and press the Home button and the Power button simultaneously > Release them until the Apple logo appears on the screen.
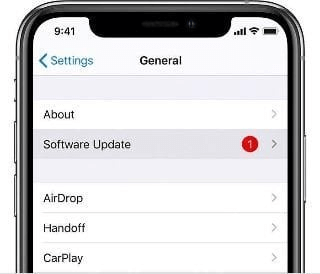
Way 9. Update the iOS
If you haven't updated your iPhone's operating system for a long time, to fix the iOS SMS code AutoFill not working issue, the last way is to update the iOS to the latest version. It can fix some software bugs. But notice that this way has the risks of losing your data, you’d better prepare an iPhone backup before following the below steps:
Navigate to the Settings app on the iPhone > Click General > Tap on Software Update > Download and install the latest version of the software.
Bonus Tip: How to Back up iPhone to Prevent Data Loss
If you want to fix iPhone AutoFill don’t working issues by updating the iOS, we strongly suggest you use a professional and powerful iOS management tool - FoneTool, to back up your iPhone data.
Compared with iCloud and iTunes, which are the official backup and transfer data provided by Apple, FoneTool provides simpler operation steps and faster backup speed. At the same time, it allows you to choose the backup path, you can backup iPhone to iPad/iPhone/PC or other external hardware. It means that your backup space is unlimited.
In addition, FoneTool provides full backup and selective backup functions. We will use full backup as an example. If you want to preview and selectively back up photos, videos, contacts, music, you can also let FoneTool help you!
Step 1. Download and open FoneTool > Connect your iPhone to PC via USB > Tap Trust on your iPhone to let computer scan the iPhone.
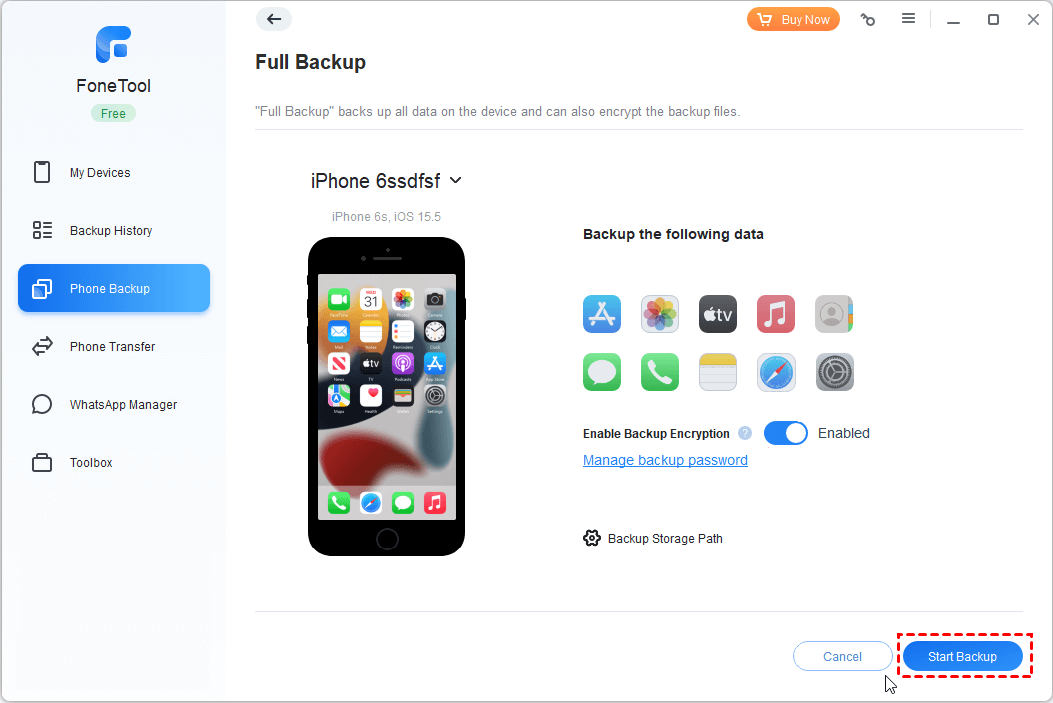
Step 2. Choose Phone Backup > Full Backup > Click Get Started.
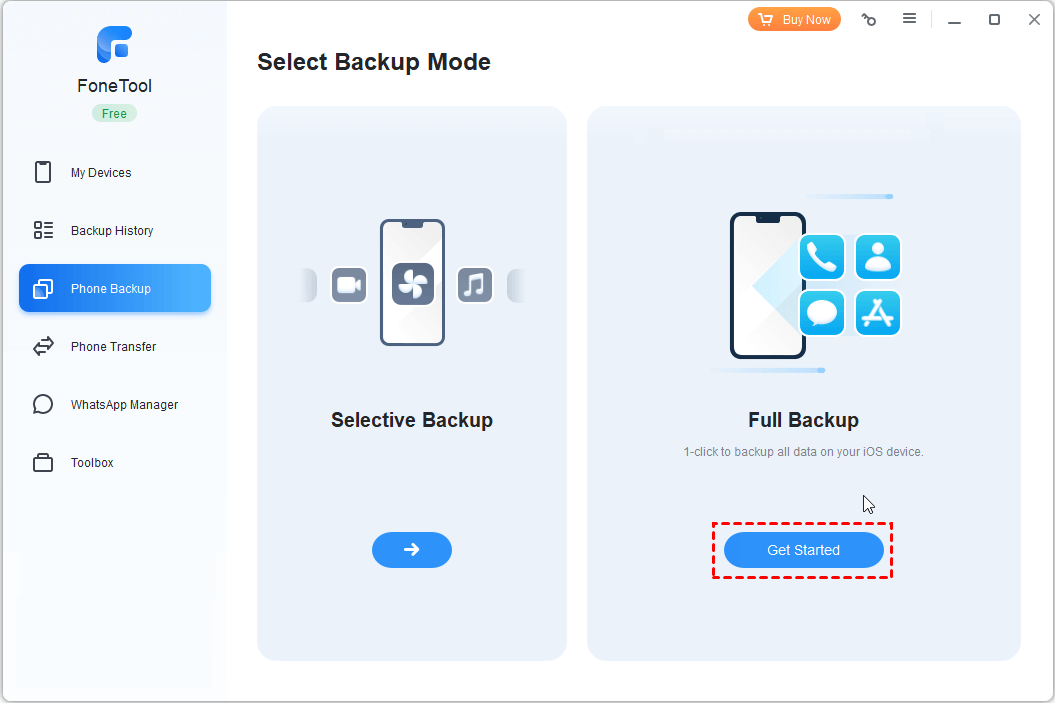
Step 3. Enable Backup encryption to encrypt local backup > Set a backup storage path > Tap Start Backup to begin.
When you need to restore a backup, you can go to Backup History and click Restore.
Conclusion
If you meet the problem of iPhone AutoFill not Working Correctly, hope you can find solutions in this article. It provides 9 top ways with the detailed guide, you can choose the suitable ways to fix 1 password iPhone AutoFill not working.
By the way, you can use FoneTool to back up iPhone data to avoid losing data. It also allows you to transfer data from iPhone to iPhone, iPhone to PC, or PC to iPhone. Download it and find more!
FoneTool - All-in-one iPhone Data Manager
Transfer, backup and manage data on iPhone, iPad and iPod touch in an easy way.
-
 iOS 27 Compatible
 iPhone 17 Supported
Windows 11/10/8/8.1/7
100% Secure

Clara is an editor of FoneTool, she helps people with issues related to the area of iPhone, including iPhone data backup & restore & transfer & erase and so on. Helping people solute to their problems makes her happy. She loves her family and enjoys going to the movies.
Read author info >>