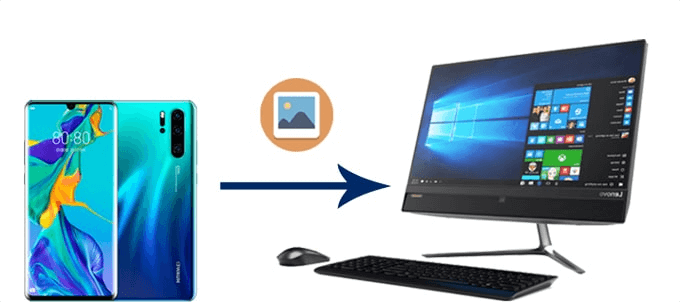
How to Transfer Photos from Android to PC with/Without USB
Need to transfer photos from Android to PC? No matter whether you prefer a wireless way or transfer with a USB connection, you will find workable way in this guide to do you a favor.
Transferring photos from your Android device to your PC is a common task that allows you to backup, organize, and share your precious memories. Whether you prefer a wireless or USB connection, there are multiple methods available to transfer photos from Android to PC.
In this article, we will explore 5 effective ways to help you achieve photo transfer from Android to PC with or without USB. Without further ado, let’s get started.
Part 1. How to transfer photos from Android to PC wirelessly
Wireless photo transfer provides convenience by eliminating the need for a physical connection between your Android device and your PC. It allows you to transfer photos seamlessly and wirelessly, saving you the hassle of dealing with cables or other physical connections. And there are three methods of transferring photos from the phone like Huawei to PC available for you.
Way 1. Via Bluetooth
Bluetooth's technology can still be a useful option for transferring data between Android devices and PCs. While it may not be as popular as Wi-Fi, Bluetooth allows for wireless data transfer without the need for a physical connection.
However, it's worth noting that not all PCs have built-in Bluetooth capabilities. If your PC does support Bluetooth, you can utilize it to transfer photos from your Android device to your PC. Keep in mind that Bluetooth transfer speeds may be slower, particularly for larger files. The followings are how to transfer photos from Android to PC via Bluetooth.
Step 1. Enable Bluetooth on devices
• On your Android phone, go to the Settings menu and locate the Bluetooth icon > Tap on it to access the Bluetooth settings. Ensure that all devices are enabled to detect your Android phone.
• On your computer, simply press the Windows key + A on your keyboard to open the Center Panel, then activate the Bluetooth option.
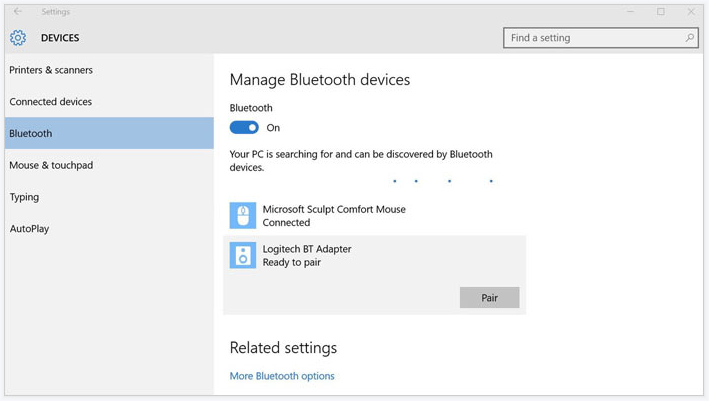
Step 2. Pair your Android phone to PC
• On your PC, Launch the Bluetooth.
• Locate your Android phone and select it for pairing.
• Confirm the connection by clicking Yes on your computer and then tapping OK on your Android device.
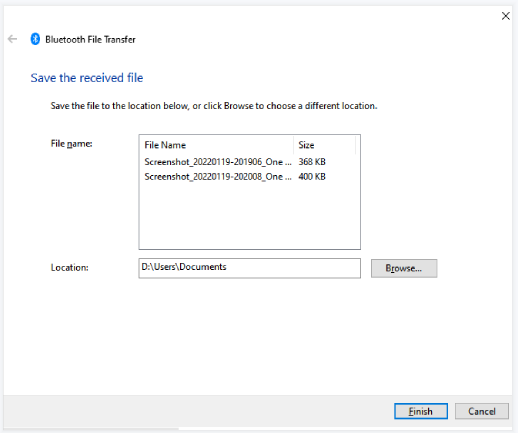
Step 3. Transfer photos from Android to PC via Bluetooth
• On your computer, go to Send or receive file via Bluetooth and select Receive files.
• On your Android device, choose the specific photos you wish to share > Tap Share and choose Bluetooth > Select the name of your PC.
• After that, your PC will automatically start receiving the files, and you can select a path to save them.
Way 2. Via Google Photos
Google Photos provides a straightforward and user-friendly solution for transferring photos from your Android phone to your computer wirelessly. Just make sure you’re using the same Google account on both platforms, and you can get access to your Android photos on PC. Check out the below steps.
Step 1. Upload Android photos to Google Photos
• On your Android phone, sign in with your Gmail account after launching Google Photos.
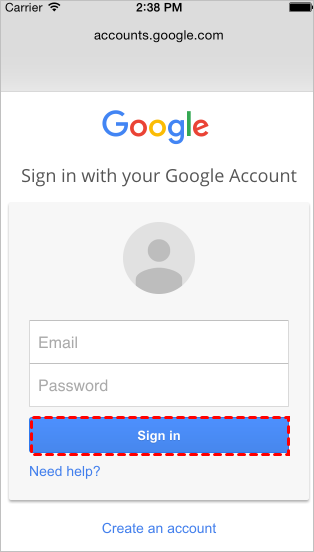
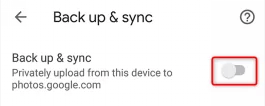
• Select the Settings option > Turn on Backup & Sync option, and the photos will sync to your Android device.
Step 2. Download photos from Google Photos to PC
• From your computer’s web browser, navigate to go to Google Photos > Sign in with your Google account
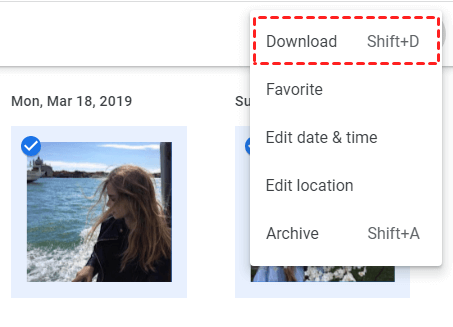
• Choose the photos you’d like to transfer to your PC > Finally, hit the three dots and choose Download to save them on your PC.
Google Photos app is also compatible with iOS devices, which means you can also get photos on Android phone by transferring photos from Google Photos to iPhone.
Way 3. Via Email
It’s a simple and straightforward way to transfer photos from Android to PC via Email, especially if you have only a few photos need to be transferred. To send Android photos to PC via email, follow the below steps:
Step 1. Open the email app on your Android phone and select New Message to compose a new email.
Step 2. Address the email to your own email address or the recipient's email address, depending on where you want to send the photos.
Step 3. Tap on the "Paperclip" icon or the attachment option in the email composition window.
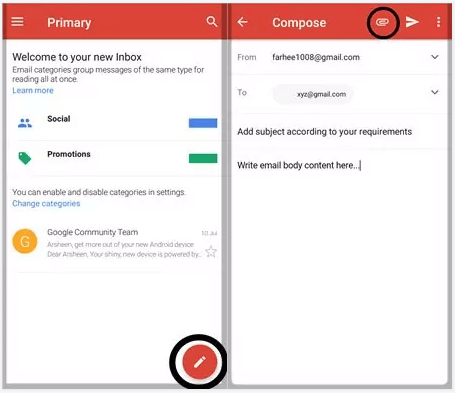
Step 4. Choose the wanted photos from your Android phone > Make sure you have attached all the photos, tap Send.
Step 5. On your computer, open your email app or browser and access the email you sent from your Android phone. Tap on the email to open it and view and save the attached photos.
Part 2. How to transfer photos from Android to PC using USB
Transferring photos using a USB connection offers a direct and reliable method to transfer large files or a large number of photos, especially when your internet connection is weak or unavailable. Keep reading to discover how to transfer photos from Android to PC on Windows 10/8/7.
Way 4. Using File Explorer
When it comes to transfer photos from Android to PC using USB, the easiest and most commonly used method is to utilize File Explorer. The biggest advantage of using a USB connection is consistent and secure data transfer. But note that, it often takes more time to send data via a USB cable. Here are the detailed steps you can follow.
Step 1. Use a compatible USB cable to connect your Android phone and PC
Step 2. On your phone’s notification shade, tap the USB notification and choose File transfer or something like this according to your Android phone.
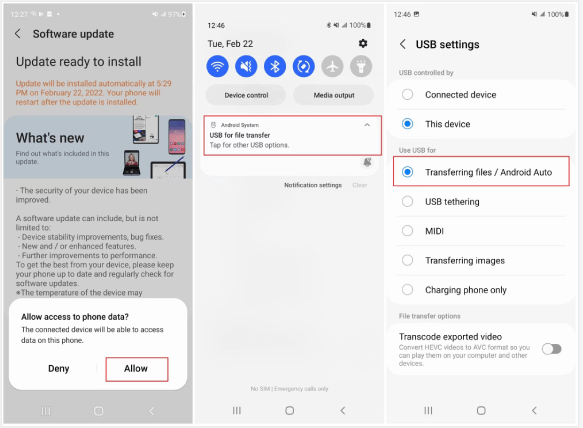
Step 3. On your computer, go to My Computer > Locate and click your Android phone’s name > Open the DCIM folder to select and transfer wanted photos to anywhere on your PC.
![]()
Way 5. Using Built-in Windows Photos
Since Windows 10, you are enabled a built-in app, namely, “Photos” that offers a quick way to transfer your photos to PC. Check out the below steps to know how to transfer photos from Android to PC on Windows 10.
Step 1. Connect your Android phone to computer > Once it’s connected, the Photos app will open automatically. If it doesn’t, go to Start and tap the Photos app to open it.
Step 2. Click on the Import icon on the top-right > Click From a USB device.
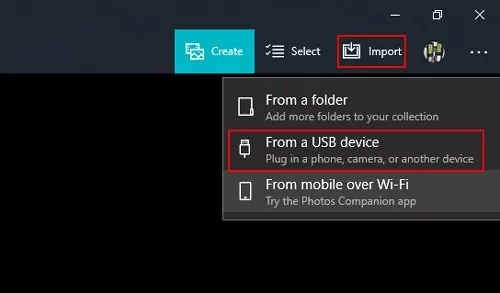
Step 3. Select your device name > Select wanted photos or click Select All > Click the Share icon and follow the onscreen instruction to save photos.
Conclusion
Transferring photos from your Android device to your PC is essential for backup, organization, and sharing purposes. In this article, we explored 5 effective methods for transferring photos wirelessly or using a USB connection.
Choose the method that best suits your preferences and follow the step-by-step instructions provided. Safeguard your photos, organize them on your PC, and enjoy easy access to your precious memories.
FoneTool - All-in-one iPhone Data Manager
Transfer, backup and manage data on iPhone, iPad and iPod touch in an easy way.
-
 iOS 27 Compatible
 iPhone 17 Supported
Windows 11/10/8/8.1/7
100% Secure

Demi is an editor of FoneTool group as well as an good advisor in the area of iOS-related issues. She does well in finding solutions to people's problems. She enjoys traveling, gardening, and watching movies. She spends most of her free time with her pet and family.
Read author info >>