Update iPhone 15 Before Transferring Data from Old Device
To update iPhone 15 before transferring data from old device is necessary. This article will tell you reasons. It will show you how to update iPhone 15 and how to transfer data to your new iPhone.
Quick help needed! Got the new iPhone 15, should I update iPhone 15 before transferring data from my old device? Any glitches to watch out for?
- Question from Reddit
Why Do You Need to Update iPhone 15 Before Transfer?
Many users encounter issues such as unexpected errors, compatibility glitches, or transmission failures, often due to neglecting this crucial preparation. Whether you're upgrading to a new iPhone 15, swapping from an Android device, or restoring data from a backup, following these steps will save you time and avoid potential headaches.
You may wonder whether updating is just an optional suggestion. Not like that. Here's why it's crucial:
Bug fixes and stability: Each latest i0S system update will fix bugs that exist in the initially released version. These errors can directly interfere with the data transfer process between devices.
Functional consistency: To use Apple's fastest and most reliable transfer methods, such as fast boot or device transfer, both iPhones need to be running a compatible i0S version, ideally the latest version. Updating ensures that all necessary frameworks are in place.
Security tips: Install the latest security patches for new devices at the beginning of their activation, so that your personal data can be effectively protected from the moment the device is activated.
Application compatibility: The latest apps and services are optimized for the latest version of i0S. Updating first avoids app crashes or data synchronization issues after data transfer.
Part 1. How to Update Your iPhone 15 to the Latest iOS
Here are two ways you can use to update iPhone 15 before transferring. You can choose to upgrade to the latest iOS version on your new iPhone directly, or use iTunes to download the update.
- ★Will the Update Affect My Data?
- Generally, updating iOS does not affect existing data. However, it's advisable to back up iPhone data before performing any updates to ensure its safety.
It is the easiest way to solve the question of “how to update my iPhone to iOS 17”, you can follow the guides to make it:
Step 1. Connect your iPhone 15 with stable internet.
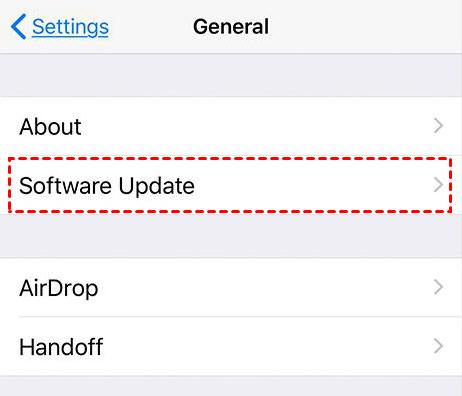
Step 2. Go to Settings > Click General.
Step 3. Choose Software Update to update the iPhone.
Step 4. Your phone will check for available updates. If a newer version of iOS is available, tap Download and Install. You may see options for standard updates or rapid security updates.
Step 5. Accept the Terms and Conditions. The update will download. Once complete, tap Install Now. Your iPhone will restart to complete the installation.
🛠️ Expert Recommendation for Update Issues
Sometimes, standard over-the-air (OTA) updates through Settings can fail due to insufficient storage, network issues, or underlying software glitches. If you're experiencing persistent errors like "Unable to check for updates" or if an update is stuck in progress, it's time for a more effective solution.
In such cases, consider using a dedicated iOS system repair tool like FoneTool Repair. This type of software is designed to fix various i0S system issues directly from your computer. One of its core features is the ability to securely upgrade or downgrade iOS systems in standard mode without data loss. It also bypasses common OTA update hurdles by establishing a direct, stable connection to Apple's servers, making it a reliable alternative to upgrading iOS when regular methods fail.
Part 2. One-Click to Transfer Data to the Updated iPhone 15
After you learn two ways about how to update iPhone 15 before transfer, we recommend a fast and easy iPhone transfer & backup tool - FoneTool. As an all-in-one iOS data management tool, FoneTool allows you to free back up iPhone and move everything from your old iPhone to the iPhone 15 with one click. Including photos, videos, contacts, messages, music, notes, Safari history, etc.
If you wish to send your data privacy data, such as Fitness records, Health, and Keychain, you can enable the backup settings to make it. Download FoneTool by clicking the below button and follow the guide to transfer iPhone to iPhone easily and quickly.
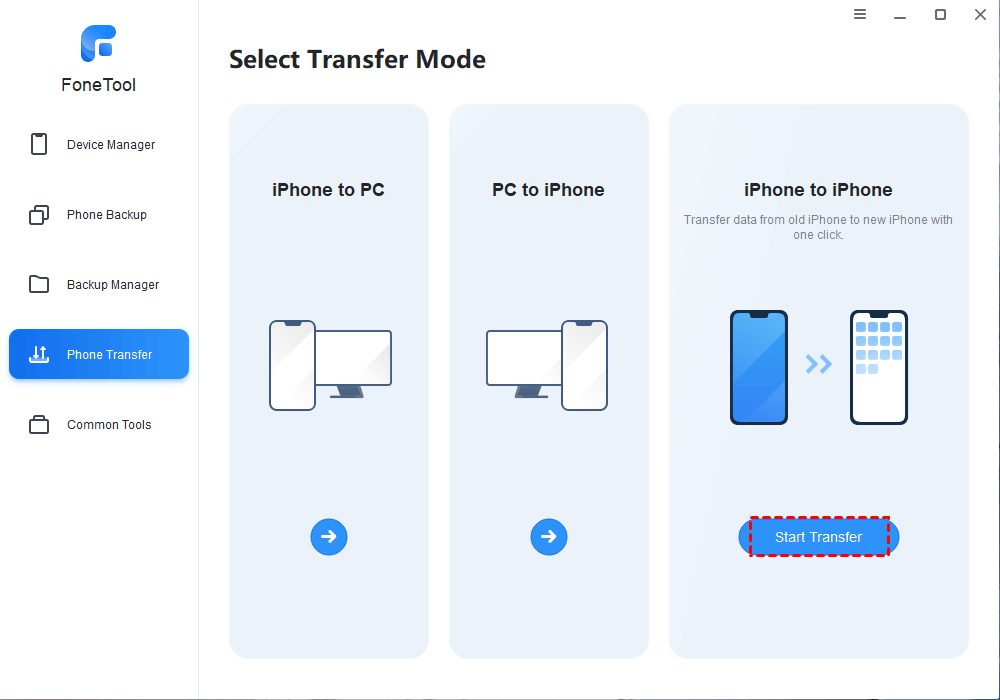
Step 1. Plug in two iPhones to the PC > Run FoneTool.
Step 2. Tap Phone Transfer > Select the iPhone to iPhone transfer option > Click Start Transfer to begin. If you want to switch data between iPhone 15 and PC, you can click the corresponding buttons.
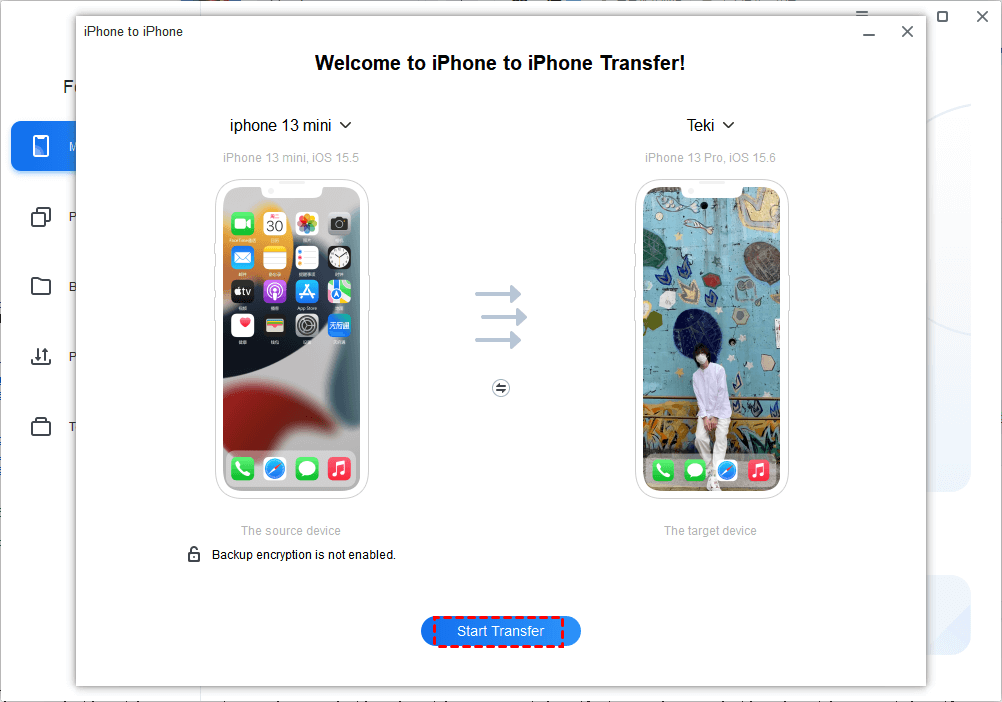
Step 3. Check Enable backup encryption to keep your private data safer >Then tap Start Transfer to begin.
Part 3. Wireless Share Files to iPhone 15 from Android
If you are a user who switches Android to iPhone, you can use FoneTool Android client to send data from Android to iPhone. FoneTool uses a WLAN technology, you just need to turn on Wi-Fi option without connecting to a network, then you can wirelessly share your data (Like Photos, videos, music, contacts, other files between Android and iPhone.
Here is the guide to transfer data from Android to iPhone 15:
Step 1. Download FoneTool for Android and FoneTool for iOS > Open it > Turn on the Wi-Fi option.
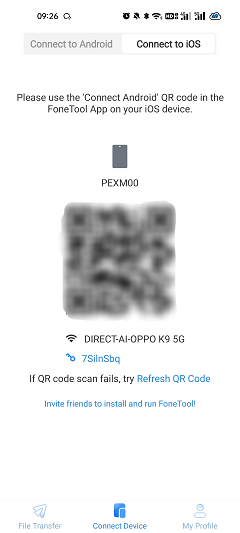
Step 2. On both devices, locate Connect Device screen> To establish a connection between your devices, select Connect to iOS on your Android, Choose Connect to Android on iPhone > Use your iPhone to scan the QR code.
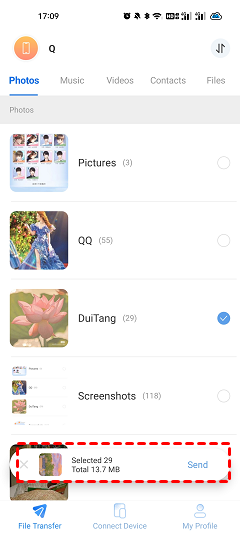
Step 4. On the Android phone, tap File Transfer > Choose the files you’d like to send to your iPhone > Then tap Send to start the process.
FAQs on Updating iPhone 15 Before Transfer
Conclusion
By taking the time to update your iPhone 15 before transfer first, you are laying the foundation for a perfect data transfer. This proactive step minimizes errors, maximizes compatibility, and gets your exciting new device ready for action with all your precious information intact. Enjoy your updated iPhone 15.
FoneTool - All-in-one iPhone Data Manager
Transfer, backup and manage data on iPhone, iPad and iPod touch in an easy way.
-
 iOS 27 Compatible
 iPhone 17 Supported
Windows 11/10/8/8.1/7
100% Secure
Kelsey is an English editor at FoneTool, passionate about helping users solve tech issues. She specializes in iPhone data management, backup, and recovery. In her free time, she enjoys learning IT skills and spending time with loved ones.
Read author info >>