How to Screen Record on iPhone 15/14/13/12
Elevate your iPhone skills! Dive into our full guide for seamless screen recording on iPhone 15/14/13/12. Master the art today!
Screen recording has become an essential feature on iPhones, offering users the ability to capture and share their device's activities. Whether you want to create tutorials, share gameplay, or save memorable moments, screen recording on iPhone 15/14/13/12 is a versatile tool.
In this comprehensive guide, we'll explore the step-by-step process, tips, and lesser-known features of screen recording on these iPhone models.
Why Screen Recording Matters
In the digital age, visual content reigns supreme. Screen recording on iPhones allows users to create engaging content, troubleshoot issues, or simply capture fleeting moments. According to a survey by Statista, over 70% of internet users engage with video content regularly, highlighting the significance of screen recording in modern communication.
Step-by-Step Guide: How to Screen Record on iPhone 15/14/13/12
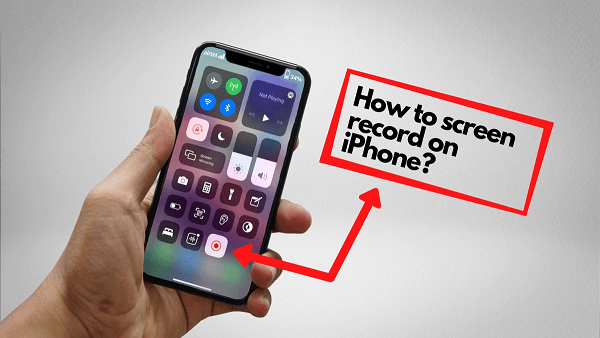
Step 1: Enable Screen Recording in Control Center
- Swipe down or up (depending on your iPhone model) to open Control Center.
- Tap the Screen Recording icon (a circle with a filled-in circle inside).
- If you don't see the icon, go to Settings > Control Center > Customize Controls, and add Screen Recording.
Step 2: Adjust Screen Recording Setting
- Long-press or 3D Touch the Screen Recording icon for additional options.
- Select the microphone icon to enable or disable audio recording.
- Tap "Start Recording" to initiate the process.
Step 3: Record Your Screen
- Navigate to the screen or app you want to record.
- The status bar will turn red, indicating the recording is in progress.
- For iPhones without Face ID, a red bar will appear at the top.
Step 4: Stop and Save Your Recording
- To stop recording, tap the red status bar (or the red bar for iPhones without Face ID).
- Confirm your action, and the recording will be saved to your Photos app.
Step 5: Edit and Share Your Recording
- Access the recorded video in the Photos app.
- Tap "Edit" to trim the video or add annotations.
- Once edited, share your recording through Messages, Email, or social media.
Tips for Optimal Screen Recording
1. Leverage External Microphones:
- For better audio quality, consider using external microphones compatible with your iPhone.
2. Optimize Storage:
- Regularly transfer and delete screen recordings to free up storage space.
3. Use Guided Access for Focus:
- Enable Guided Access in Accessibility settings to limit your recording to a specific app or prevent accidental interruptions.
Common Issues and Solutions
1. No Sound in Screen Recording:
- Ensure that the microphone is enabled in the Screen Recording options.
2. Large File Sizes:
- Consider using video editing apps to compress or trim recordings before sharing.
3. Unable to Find Recordings:
- Check the "Recently Deleted" folder in the Photos app, as deleted recordings may be recoverable within a 30-day period.
Bonus Tip: Transfer iPhone Videos to PC for Backup
Embark on a journey of digital harmony with FoneTool, the quintessential bridge between your iPhone and PC. Beyond a mere utility, FoneTool is a catalyst for seamless connections and effortless transfers, encapsulating the essence of simplicity and functionality. Picture this: your iPhone videos finding a new home on your PC, organized and secure. FoneTool isn't just a tool; it's an experience, a celebration of memories, and a commitment to making the complex beautifully simple.
Step-by-Step Guide: Bonus Tip – Transfer iPhone Videos to PC for Backup
Step 1: Download and Install FoneTool
- Begin your journey by downloading FoneTool onto your PC. The installation process is intuitive, guiding you effortlessly.
Step 2: Connect Your iPhone
- Launch FoneTool and establish the bridge between your iPhone and PC using a standard USB cable. Watch as the digital handshake takes place.
Step 3: Select "Backup" Feature
- Within the FoneTool interface, navigate to the "Backup" feature. This serves as the gateway to a world of organized data.
Step 4: Choose Video Content
- Exercise your control by handpicking the specific videos you wish to transfer from your iPhone to the PC. FoneTool empowers you with precision.
Step 5: Initiate Transfer
- Feel the thrill as you click "Start Transfer" on FoneTool. Watch in awe as your cherished iPhone videos seamlessly migrate to your PC, leaving you with a sense of accomplishment and the reassurance of a secure backup.
Conclusion
Screen recording on iPhone 15/14/13/12 is a powerful feature that opens up a world of possibilities for users. From creating engaging content to troubleshooting and documenting memorable moments, mastering screen recording enhances your iPhone experience. By following this comprehensive guide and implementing the tips and solutions provided, you'll be well-equipped to make the most of this versatile tool.
FoneTool - All-in-one iPhone Data Manager
Transfer, backup and manage data on iPhone, iPad and iPod touch in an easy way.
-
 iOS 27 Compatible
 iPhone 17 Supported
Windows 11/10/8/8.1/7
100% Secure

Demi is an editor of FoneTool group as well as an good advisor in the area of iOS-related issues. She does well in finding solutions to people's problems. She enjoys traveling, gardening, and watching movies. She spends most of her free time with her pet and family.
Read author info >>