Restore from iCloud VS. Transfer Directly from iPhone 2026
What is the difference between transfer from iPhone and download from iCloud? Just find details and here! You can finish the iPhone-to-iPhone transfer as you like. Or you can use the professional iPhone data transfer software - FoneTool to finish the process in one click.
Restore from iCloud vs transfer directly from iPhone?
Between restoring from an iCloud backup and the iPhone to iPhone transfer (where you scan the thing and let the phones sit next to each other). What is the most complete way to set up a new iPhone? What are the pros and cons of each. Will I need to resign into any of my apps?
- Question from Reddit
Unboxing a new iPhone can be an exciting experience, but if you have a lot of data on your old iPhone that needs to be transferred, it can become a bit of a headache. Should you use iCloud backup to transfer the data, or use Quick Start to transfer data directly between iPhones?
If you're curious about this question, keep reading to find the answer. You'll get all the details and step-by-step instructions on both methods.
What's the difference between download from iCloud and transfer from iPhone?
If you have created an iCloud backup of the old iPhone, then you can choose to restore from iCloud to transfer data from old iPhone to new iPhone.
If you want to transfer directly from iPhone, then you can use Quick Start to easily make it. You need to ensure that both of your devices are running on iOS 12.4 or a more recent version.
2 methods above require a Wi-Fi connection or need to consume cellular data to start the transfer. So if you don't have a good internet condition or there are too many documents that need to be moved, they will consume lots of time.
Then you can skip to the fourth part to get the professional iPhone data transfer tool and efficiently transfer all or part of data from old iPhone to your new iPhone.
How to restore backup from iCloud
To restore a backup from iCloud to your new phone, you first need to back up your old iPhone's data.
Part 1. How to back up old iPhone to iCloud
Connect your old device to a Wi-Fi network > Go to the Settings app > Tap [your name] > Click iCloud > Go to iCloud Backup > Tap on Back Up Now.
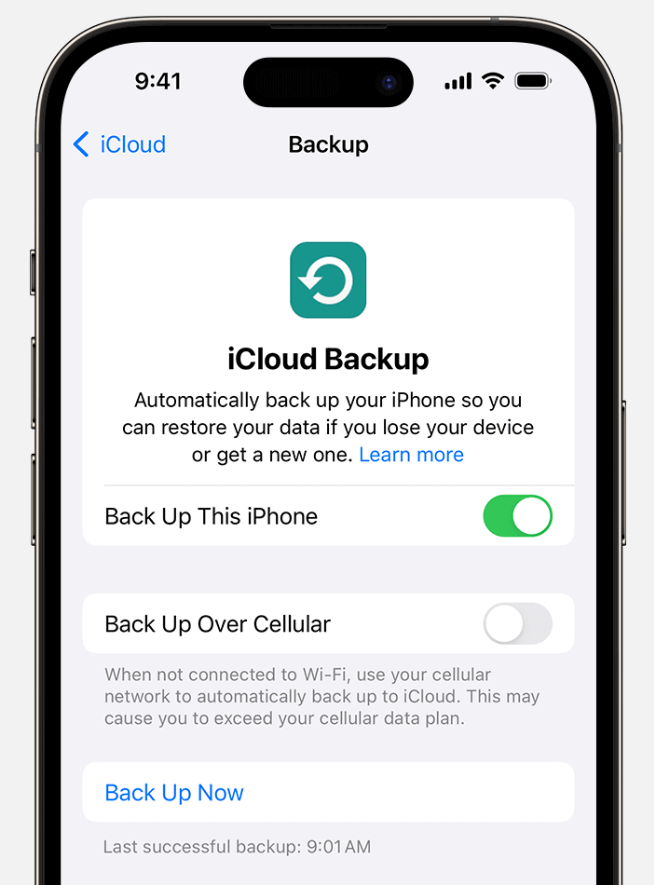
Remain connected to your Wi-Fi network until the process is complete. Under "Back Up Now," you can see the date and time of your most recent backup. If you receive an alert indicating insufficient iCloud storage space to complete the backup. Then you need to choose another way to finish the transfer.
Part 2. How to restore data from iCloud
You can only download data from iCloud backup to finish the iPhone-to-iPhone transfer during the setup process. So if you have already set up your device, you need to reset your iPhone to factory settings before you can use these steps to restore from your backup.
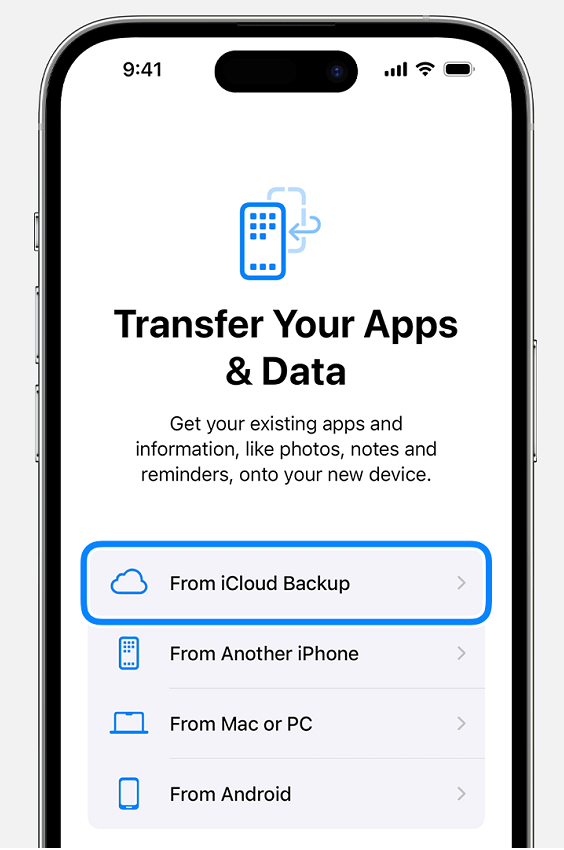
Step 1. Turn on your new iPhone, and you will see the Hello screen > Follow the on-screen setup instructions until you reach the Transfer Your Apps & Data screen, then tap From iCloud Backup.
Step 2. Sign in to iCloud with your Apple ID > Choose a backup based on the date and size of each option to begin.
Step 3. When prompted, sign in with your Apple ID to restore your apps and purchases. If you have content purchased from iTunes or the App Store using multiple Apple IDs, you will need to sign in to each.
Step 4. If you cannot remember a password, you can tap Skip This Step and sign in later, but you won't be able to use the apps until you sign in with the corresponding Apple ID.
Step 5. Stay connected to Wi-Fi and wait for the progress bar to appear and complete. Depending on the size of the backup and network speed, this may take from a few minutes to an hour. If you disconnect from Wi-Fi too soon, the progress will pause until you reconnect.

Once the setup is finished, you can start using your device. Content such as apps, photos, music, and other information will continue to restore in the background for several hours or days, depending on the amount of data. Try to frequently connect to Wi-Fi and power to allow the process to complete.
How to transfer directly from iPhone
Using Quick Start to transfer from old iPhone to new iPhone directly is another useful way to move data during the setup process.
Firstly, you should ensure your current device is connected to Wi-Fi and that Bluetooth is turned on.
Then you can follow the on-screen instructions to begin. If the setup prompt on your current device disappears, restart both devices.
Step 1. Power on your new iPhone and place it near your old one. When the Set Up New iPhone screen appears on your old iPhone, tap Continue to verify your Apple ID.
Step 2. A blue animation will appear on your new iPhone. Use the camera on your old iPhone to scan it. Wait for the activation process to complete on your new iPhone. Once done, a message will appear saying Finish on New iPhone.
Step 3. Enter the passcode from your old iPhone on the new one and set up Face ID or Touch ID if applicable.
Step 4. On the Transfer Your Data screen, choose Transfer from iPhone and tap Continue to start transferring data from your old iPhone to the new one.

1. If your iOS version is higher than 11 but lower than 12.4, Quick Start can help you set up your new iPhone but won't transfer data.
2. If you encounter issues during this process, you can go to this Fix Unable to Complete Data Transfer iPhone 16/15 guide to easily solve the problem.
Is it better to set up a new iPhone from iCloud or iPhone?
For users who already have an iCloud backup, the best method to set up your new iPhone is to restore from a recent iCloud backup. You can tap Restore from iCloud Backup during the setup process to make it. If you don't have backed up old iPhone, transferring from iPhone will also be OK.
However, both methods require a good network quality. If your internet speed is not fast enough or if there is a large amount of data to transfer, opting for the wired connection method mentioned below to quickly complete one-click data transfer between iPhones would be a better solution.
Best way: How to transfer data from iPhone to iPhone without network
When it comes to moving data from old iPhone to new iPhone, which third-party tool will be the most useful and fastest way? That must be professional iPhone transfer software - FoneTool!
With its various advantages, you can efficiently finish the process on your Windows PC in a very short time.
- Highlights:
- Fast transfer speed allows you to transfer 46 GB of data in 39 mins (tested).
- The easy-to-use interface helps you to finish the transfer with a few clicks.
- Safe and stable USB connections protect all your iPhone data from loss.
- Wide compatibility supports various iPhone models and iOS versions, including iPhone 4 to iPhone 16 and iOS 18.
Now you can follow the guidance below to get how to finish the iPhone-to-iPhone transfer, you can go to Part 1 to use the one-click operation to transfer all iPhone data or go to Part 2 to selectively transfer part of old iPhone data to new iPhone.
Part 1. How to transfer all old iPhone data to new iPhone
Step 1. Download and install FoneTool on your Windows PC and launch it > Connect your old iPhone and new iPhone to the computer via 2 USB cables.
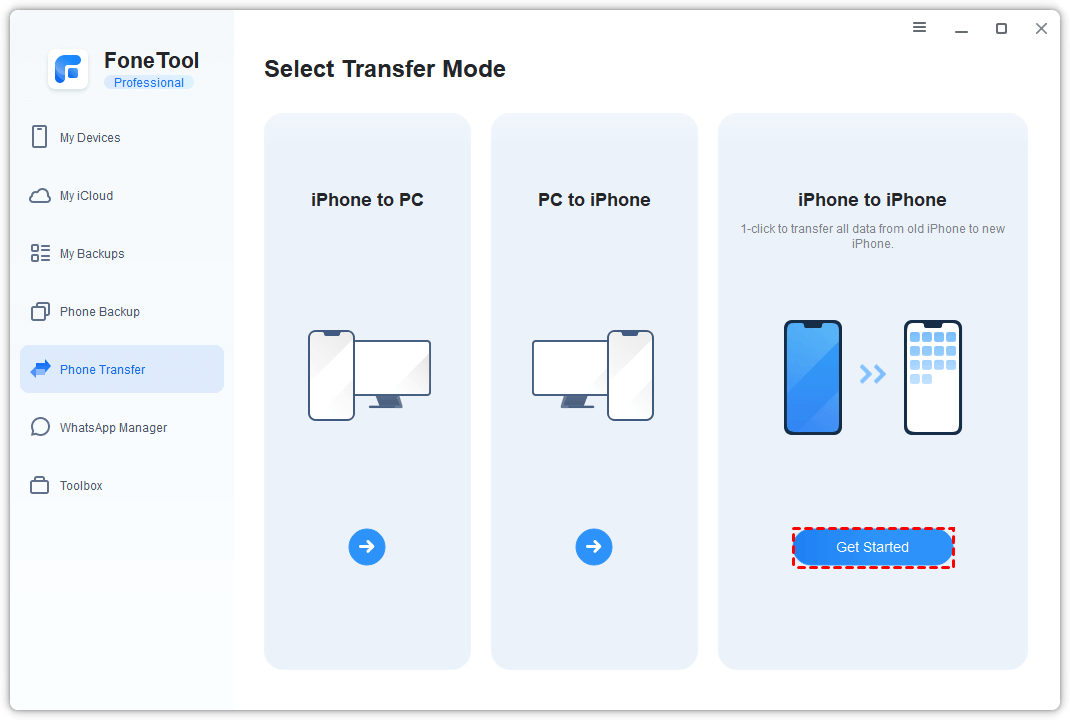
Step 2. Go to Phone Transfer > Choose iPhone to iPhone and click Get Started to continue.
Step 3. Confirm your source iPhone and target iPhone > Check the backup encryption option if you need > Click Start Transfer to begin the task.
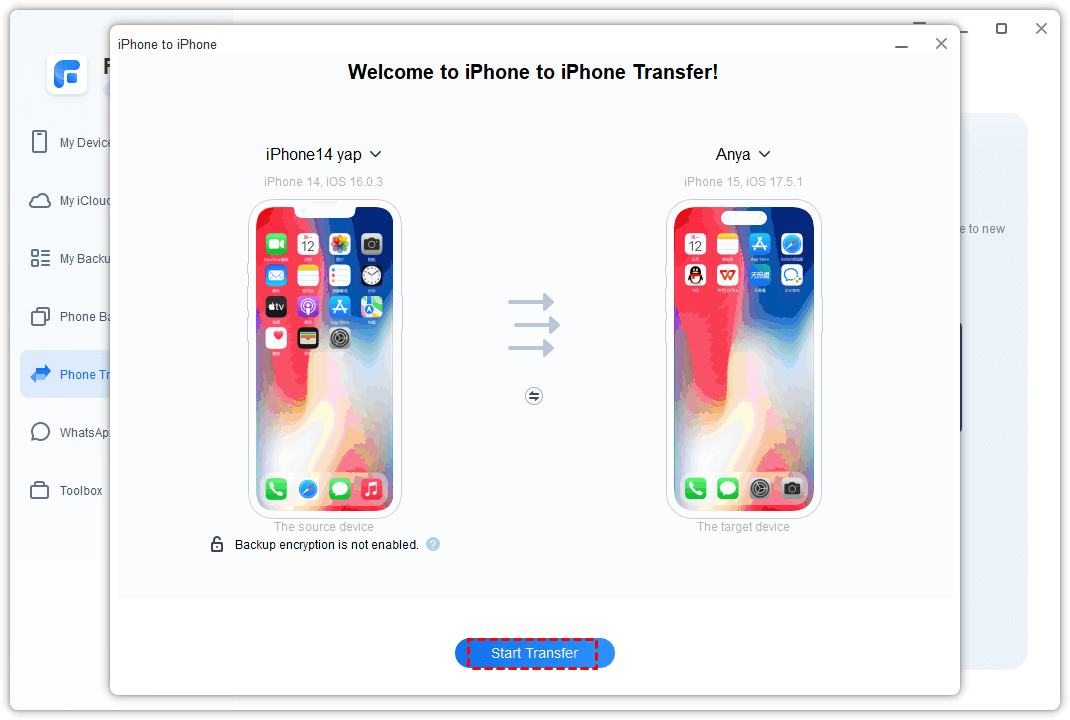
Once the process is completed, all your old iPhone data will be moved to your new iPhone.
Part 2. How to selectively transfer data from iPhone to iPhone for free
You can also use FoneTool to transfer part of iPhone data including photos, videos, music, ringtones and contacts from old iPhone to new iPhone.
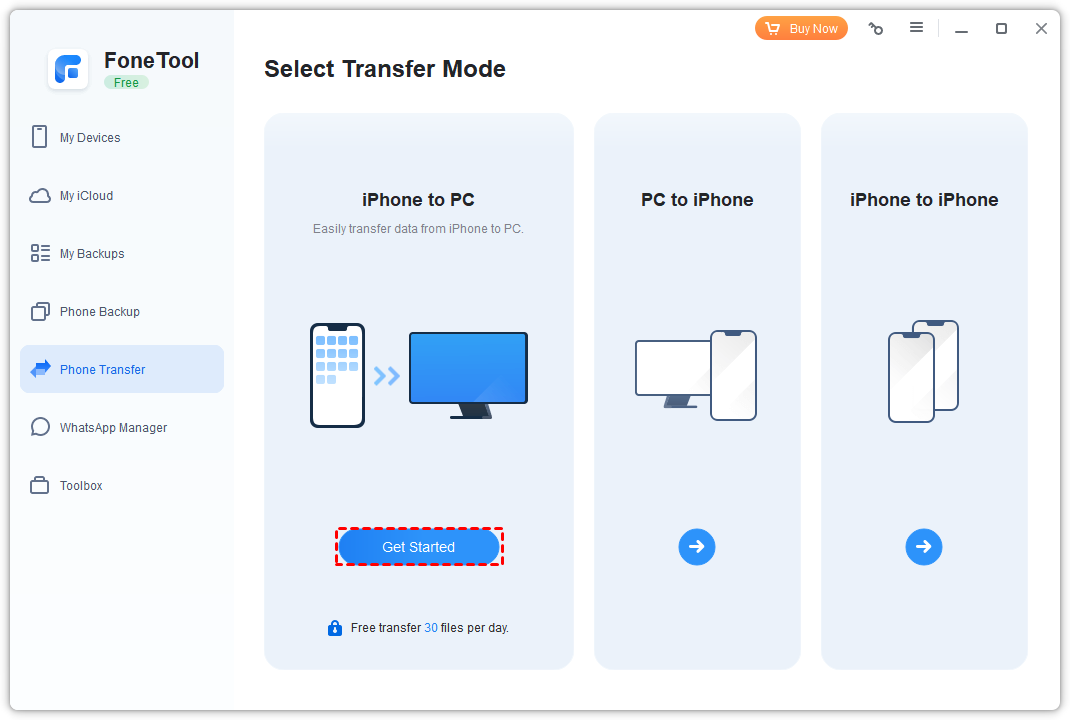
Step 1. Connect your old iPhone to the computer via a USB cable > Launch FoneTool > Go to Phone Transfer > Choose iPhone to PC and click Get Started.
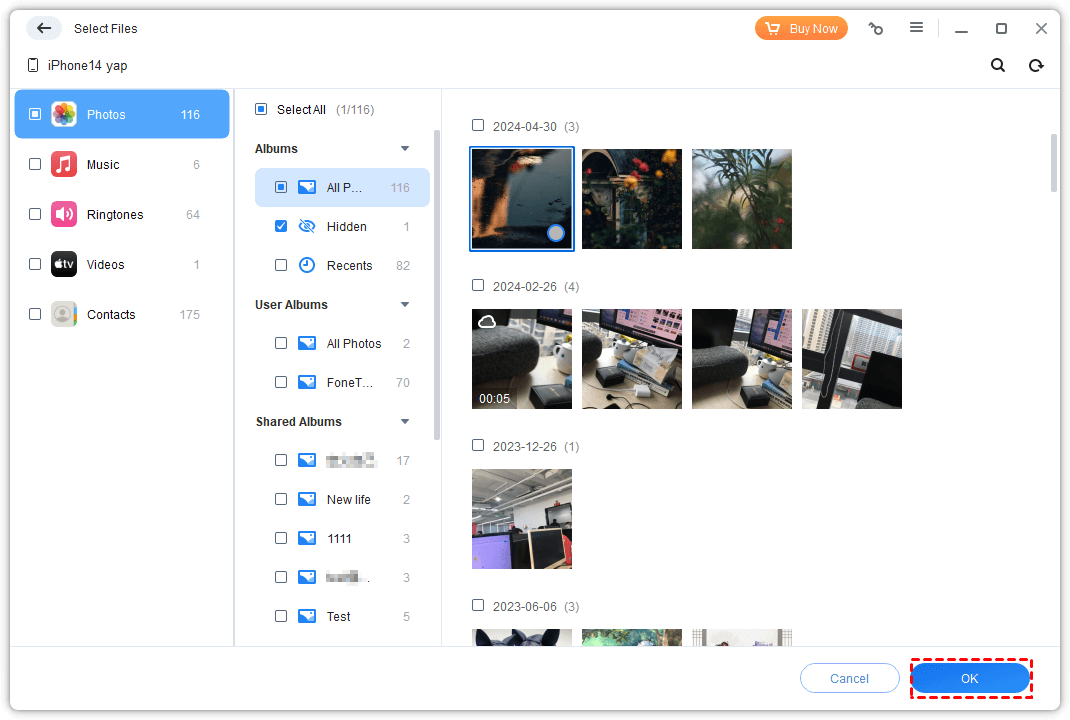
Step 2. Select the data you need and click OK to continue.
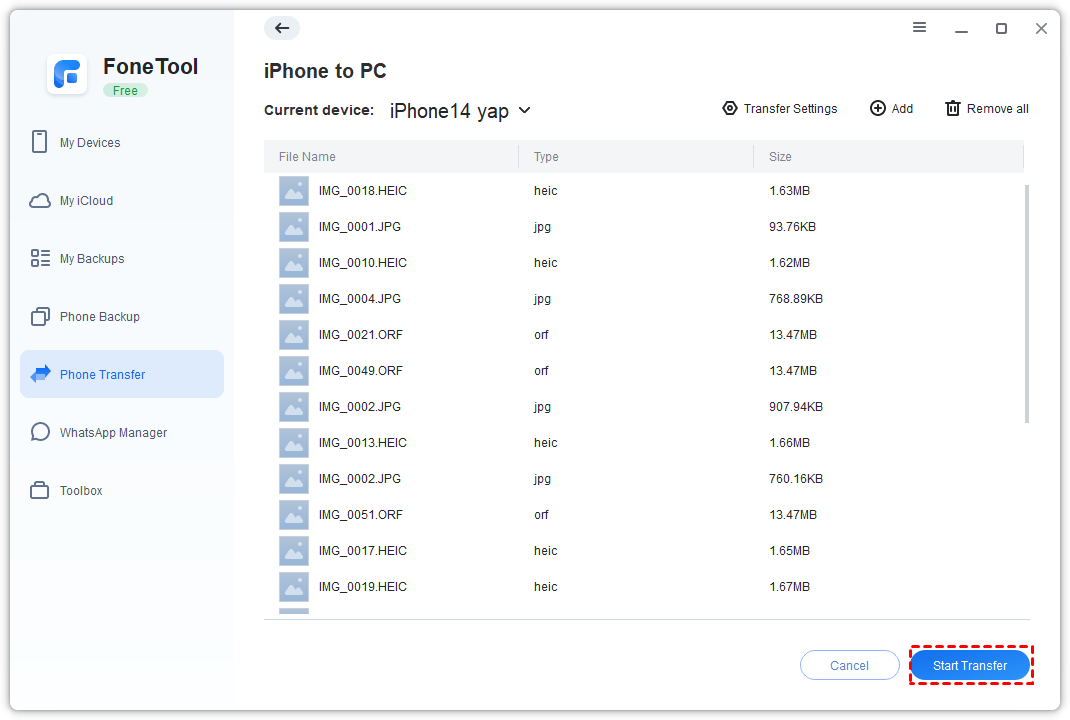
Step 3. Change settings from the Transfer Settings option > Click the Start Transfer button to begin the task.
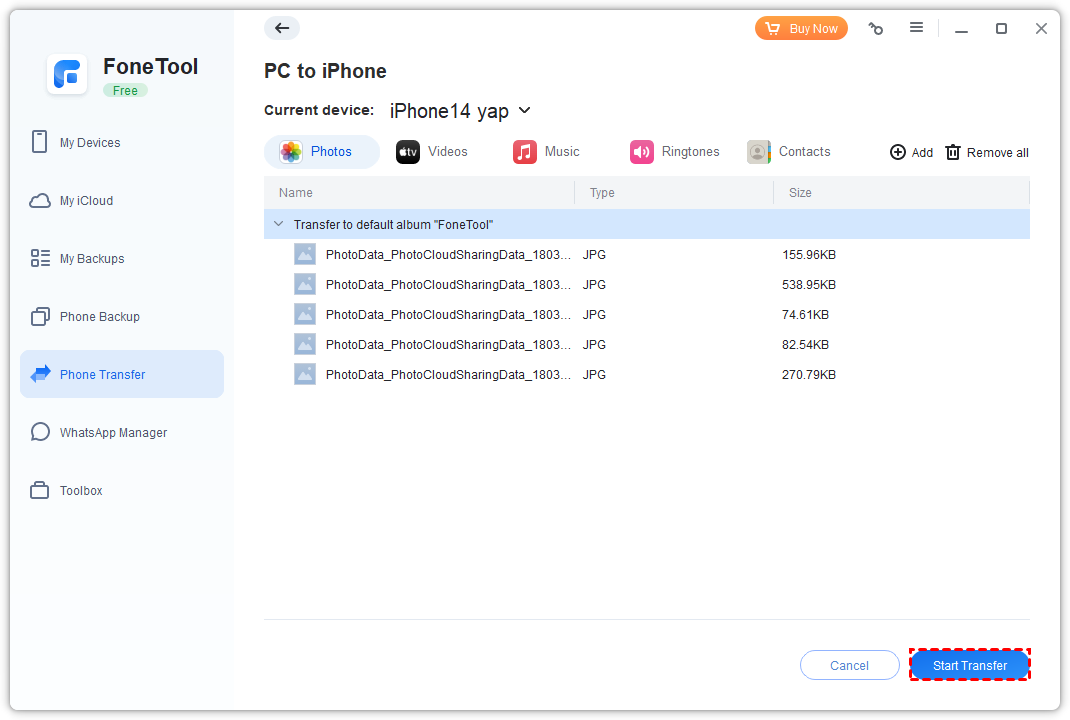
Step 4. Once the iPhone-to-PC transfer process is completed, you can unplug your old iPhone and plug your new iPhone > Go to Phone Transfer and choose PC to iPhone to transfer targeted data from PC to iPhone.
With this way, you can also easily transfer music from Windows Media Player to your iPhone.
Conclusion
From this passage, you can know the full comparison of Restore from iCloud VS Transfer directly from iPhone. You can also get is it better to restore from iCloud or transfer directly from iPhone. Hope you can choose the most suitable way to transfer data from your old iPhone to your new iPhone.
If 2 ways above can't meet your needs, or you encounter the iPhone data transfer cancelled issue, you can use the professional FoneTool to easily finish the process in one-click operation or selectively transfer part of iPhone data to your new iPhone as you like.
FoneTool - All-in-one iPhone Data Manager
Transfer, backup and manage data on iPhone, iPad and iPod touch in an easy way.
-
 iOS 27 Compatible
 iPhone 17 Supported
Windows 11/10/8/8.1/7
100% Secure

Kathy is an editor of FoneTool, who prefers to help more users address a series of iOS-related problems. She likes traveling and being close to nature makes her relax. She is also keen to engage in social activities and spend much free time with her friends.
Read author info >>