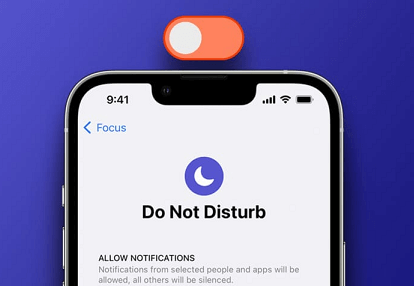
How to Remove “Do Not Disturb” Notification from iPhone
If you are annoyed by the notification that says the Do Not Disturb mode is enabled, this guide will show you how to remove “Do Not Disturb” notification on iPhone and have less annoyance with your device.
Our iPhones are powerful tools that keep us connected to the world, but sometimes we need moments of uninterrupted focus or relaxation. The "Do Not Disturb" feature is designed to provide just that. However, if you've noticed the persistent "Do Not Disturb" notification on your iPhone, you might be wondering how to remove it.
In this article, we'll explore why you might still be getting notifications despite having "Do Not Disturb" active, and we'll guide you through the steps to remove the "Do Not Disturb" notification for a truly distraction-free experience.
Why am I still getting notifications on “Do Not Disturb” on iPhone?
The "Do Not Disturb" feature is designed to silence incoming notifications and calls, allowing you to focus, sleep, or simply enjoy moments of peace. However, there are scenarios where notifications might still come through despite having "Do Not Disturb" active.
★ Allow Calls From Contacts: If you've configured your "Do Not Disturb" settings to allow calls from specific contacts, calls from those contacts will still ring through.
★ Repeated Calls: Enabling the "Repeated Calls" option in "Do Not Disturb" settings allows a second call from the same person within three minutes to ring through.
★ Emergency Bypass: You might have enabled the Emergency Bypass feature for certain contacts. Calls and messages from contacts with Emergency Bypass enabled will come through even during "Do Not Disturb."
★ Alarm Sounds: Alarms will still sound when "Do Not Disturb" is active.
★ Bedtime Mode: If you have Bedtime Mode enabled, it will display the time and incoming calls during scheduled "Do Not Disturb" hours.
How to remove “Do Not Disturb” notification on iPhone?
If the persistent "Do Not Disturb" notification is bothering you, here’s how to remove the “Do Not Disturb” on iPhone. Choose one to suit your needs.
Way 1. Turn off “Do Not Disturb”
To eliminate the notification completely, your only choice is to disable the Do Not Disturb mode on your device. By doing so, the notification won't appear anymore. This action is straightforward.
Disabling this mode will allow all notifications to reach you. However, as outlined in the first method, you can regulate these notifications and determine their delivery preferences on your device.
Here are how to remove “Do Not Disturb” from iPhone:
>> From Control Panel: In Control Panel > Tap Focus (the Half Moon icon) > Tap Do Not Disturb to turn it off.
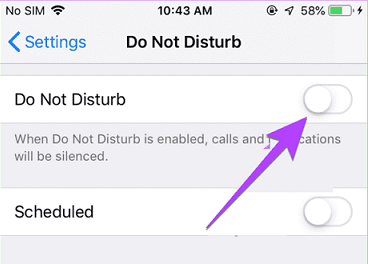
>> From iPhone Settings: Open Settings on your iPhone > Scroll down to locate and tap Focus > Do Not Disturb > Toggle off the switch next to Do Not Disturb.
Way 2. Customize “Do Not Disturb” settings
Apple's developers have provided users with a significant degree of control over the notifications they permit. You have the option to schedule Do Not Disturb to activate automatically during specific periods, enable calls or texts from designated contacts, and create exceptions for certain apps. Here's how to manage these settings besides removing “Do Not Disturb” notification iPhone.
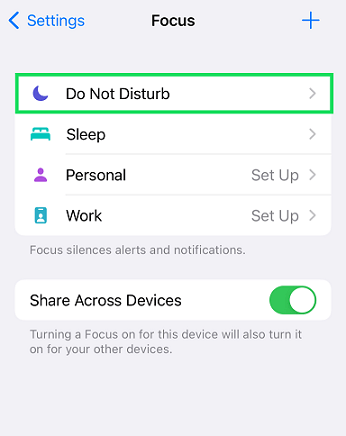
Step 1. Go to the Settings app on iPhone > Tap Focus > Choose Do Not Disturb.
Step 2. Select any of the options on this page to set a timer, add exceptions for contacts or apps.
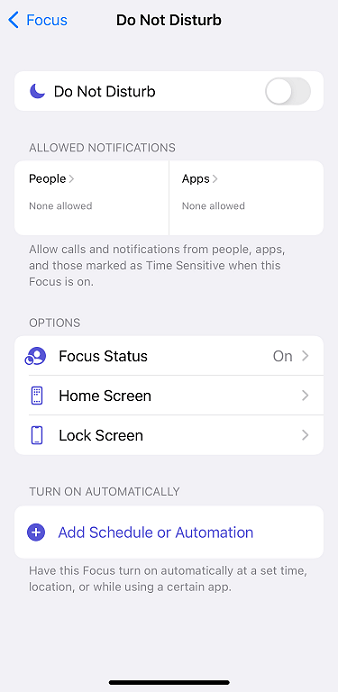
Additionally, you are also allowed to add app exceptions, so you can put your phone in Do Not Disturb but still receive important notifications.
Way 3. Use per app notifications instead of Do Not Disturb
In case you're unaware, you can efficiently manage notifications from most apps directly within the settings app of your device. Within this app, you have the ability to determine whether an app can send you notifications or not. By disabling this option for a specific app, it will no longer deliver notifications to your device. This concept operates similarly to the Do Not Disturb mode, albeit for a single app.
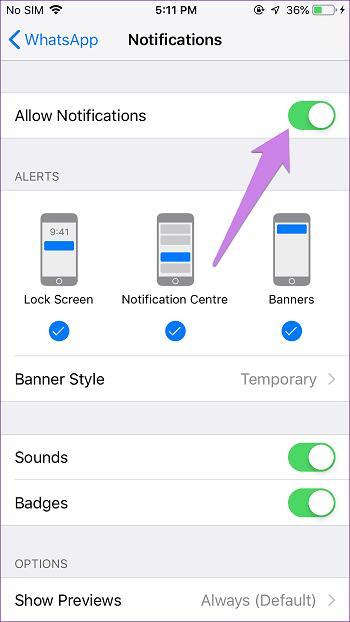
Take disable WhatsApp notification as an example. The steps are slightly the same to disable notification for all apps on your iPhone.
Go to Settings on your iPhone > Search for or scroll down to locate and choose WhatsApp > Notifications > Toggle off the switch next to Allow Notifications.
Moreover, you can extend this rule to encompass all apps on your device, effectively preventing any app from sending you notifications. This creates an environment akin to having the Do Not Disturb mode enabled, which stops apps from delivering notifications to your device.
Summary
That’s all for how to remove “Do Not Disturb” notification from iPhone. Whether you choose to disable the feature, turn off scheduled settings, or customize it to your preferences, you have the power to tailor your iPhone's behavior to suit your needs. With these insights, you can enjoy the full benefits of "Do Not Disturb" without the persistent notification, creating a harmonious balance between staying connected and staying focused.
FAQs
FoneTool - All-in-one iPhone Data Manager
Transfer, backup and manage data on iPhone, iPad and iPod touch in an easy way.
-
 iOS 27 Compatible
 iPhone 17 Supported
Windows 11/10/8/8.1/7
100% Secure

Demi is an editor of FoneTool group as well as an good advisor in the area of iOS-related issues. She does well in finding solutions to people's problems. She enjoys traveling, gardening, and watching movies. She spends most of her free time with her pet and family.
Read author info >>