How to Delete iMessages on iPad (Pro/Mini/Air) Only
Navigate the step-by-step process of deleting iMessages on your iPad with our comprehensive guide, ensuring efficient message management and device optimization.
Can You Delete iMessage on iPad Only?
How do I remove messages from iPad but not iPhone?
My iMessages on my iPad are taking up about half the space on the device, I want to delete them from my iPad but not let that affect anything on my iPhone. Is there a way to do this?
- Question from Reddit
iCloud sync functions make it convenient to view synced photos, contacts, reminders, etc. across devices. However, if you sync data that isn't necessary, the storage space on your device can run out quickly. One of the scenarios is that you may need an effective solution to delete iMessages on your iPad since they have been taking up too much space on your iPad.
In this comprehensive guide, we'll explore the step-by-step process of how to delete iMessages on iPad without deleting them from the other devices. In case, you are worried about losing important messages, it is advisable to selectively backup iMessage in advance. Now, let's get started to know how to delete iMessage on iPad.
Part 1. How to Delete iMessage on iPad Directly
It is straightforward to delete iMessage on iPad. While, if you are wondering whether you can delete iMessage on iPad only but not on iPhone or iCloud, you may need to do some preparations shown below.
Disable iCloud Messages to avoid deleting messages from iCloud/iPhone
On your iPad, go to the Settings app > Tap [your name] > Choose iCloud > Toggle off the switch next to Messages.

Now, you can choose to delete only wanted or all messages on iPad as per your need by following the relative steps below.
Delete selective iMessage on iPad
Step 1. Open the Messages app on your iPad. Tap the conversation that has the messages you want to delete in it.
Step 2. Tap and hold the message you want to delete until the menu pops up. Then, tap More.
Step 3. Check the messages you’d like to delete. Finally, tap Delete x Messages to delete unwanted messages from your iPad.
Delete entire iMessage on iPad
Open the Messages app > Found the conversation you want to delete and swipe right to left across it > Press the trash can > Click Delete to confirm or tap Cancel if you click wrong.
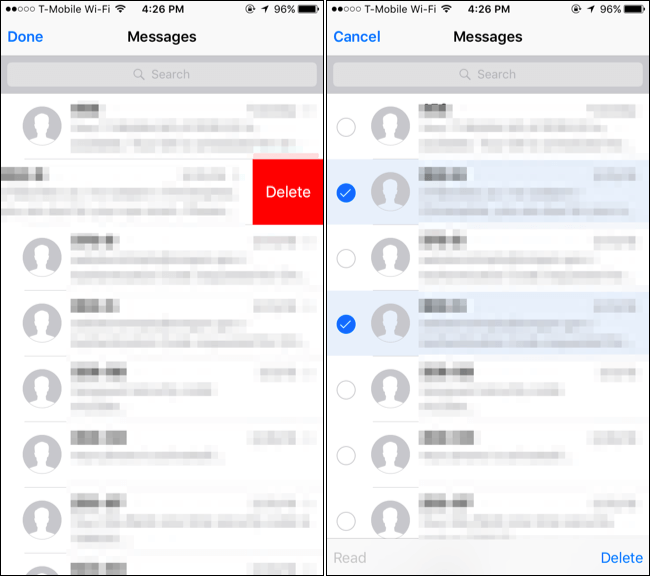
You can also click the three-dot icon > Select Messages > Use two of your fingers to swipe from top to bottom to choose all messages, and click Delete to delete all iMessage from iPad.
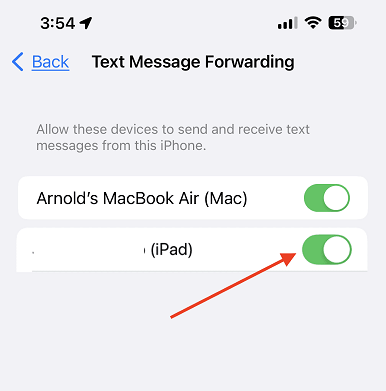
Advanced Tip: How to Disable iPhone from Forwarding Messages to Your iPad
It's also worth noting that iMessage uses the same Apple ID as your other Apple devices, such as your iPhone or Mac. As a result of the forwarding option you enabled on your iPhone, you are most likely receiving iMessage on your iPad.
To stop this, deactivate it on your iPhone. Otherwise, you may continue to get messages even after you turn off the service on your iPad. Here are the steps you can follow to disable the function.
On your iPhone, go to Settings > Tap Messages > Click Text Message Forwarding > Uncheck your iPad from the list to stop receiving iMessage on your iPad.
Part 2. One-Click Erase iMessage on iPad via FoneTool (Unrecoverable)
For users who want to permanently delete iMessage on iPad, FoneTool offers you an ideal solution. FoneTool can effectively erase all of your text messages and iMessages from your iPad with just one click, saving you a ton of time and work.
Moreover, if you are worried that you still need those communications in the future, you may use its Selective Backup service to ensure that you always have quick access to them by pre-saving them to your external hard drive, USB flash drive, or PC.
Now, free download this tool to your computer, and follow the simple steps to erase iMessage on iPad.
Step 1. Launch FoneTool on your PC > Connect your iPhone to the computer with the USB cable > Tap Trust on your iPhone > Go to Toolbox > choose Data Eraser.

Step 2. Click Erase private data > Choose Get Started.

Step 3. Finally, tap Messages and check Enable Deep Erase Technology if you want them unrecoverable, then click Start Erase.
Conclusion
In conclusion, managing your iMessages and ensuring the security of your iPad are essential. By following the step-by-step guide provided in this article, you can efficiently delete iMessages on your iPad completely and permanently. Remember to always have a backup for your data and be careful when deleting messages and any other files from your iPad, iPhone, etc. For more queries, feedback, or suggestions, feel free to contact us.
FoneTool - All-in-one iPhone Data Manager
Transfer, backup and manage data on iPhone, iPad and iPod touch in an easy way.
-
 iOS 27 Compatible
 iPhone 17 Supported
Windows 11/10/8/8.1/7
100% Secure

Demi is an editor of FoneTool group as well as an good advisor in the area of iOS-related issues. She does well in finding solutions to people's problems. She enjoys traveling, gardening, and watching movies. She spends most of her free time with her pet and family.
Read author info >>