Unveiling the Symphony: How to Screen Record on iPad with Sound
Unlock the art of screen recording on iPad, adding a symphony of sound to your captures. A comprehensive guide to creative recording.
The iPad, with its versatile functionality, has become an integral tool for productivity, creativity, and entertainment. One feature that enhances its usability is the ability to screen record – capturing moments, tutorials, or gaming achievements. However, the desire to record not just visuals but also the accompanying sound adds a layer of complexity.
In this comprehensive guide, we will unravel the steps to screen record on iPad with sound. From understanding the native tools to exploring third-party apps, let's embark on a journey to unleash the full potential of screen recording on your iPad.
Native Screen Recording on iPad
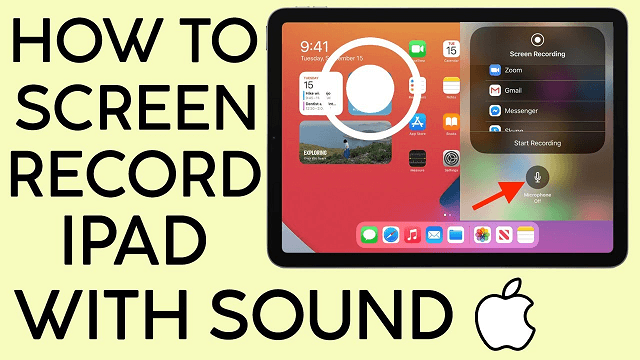
1. Accessing Control Center:
Swipe down or up (depending on your iPad model) to open the Control Center. The Control Center is your command center for various functions, including screen recording.
2. Locating the Screen Recording Button:
In the Control Center, find the screen recording button – a circular icon with a solid circle inside. This button is the native screen recording tool provided by Apple.
3. Adjusting Settings:
Press and hold the screen recording button to access additional settings. You can enable or disable the microphone audio to include or exclude sound in your screen recording.
4. Start Screen Recording:
Tap the screen recording button to initiate the recording countdown. The countdown provides a moment to prepare before the screen recording begins.
5. Stop Screen Recording:
After recording, tap the red status bar or return to the Control Center and press the screen recording button again. Stopping the recording saves the video to your Photos app.
6. Accessing Recorded Videos:
Open the Photos app to find and view your recorded screen videos. Recorded videos are saved in the Photos app, where you can edit or share them.
Including Sound in Native Screen Recording
1. Enabling Microphone Audio:
Before starting screen recording, ensure the microphone icon is highlighted. The highlighted microphone indicates that audio from your iPad's microphone will be recorded.
2. Using External Microphones:
Connect external microphones to your iPad for better audio quality during screen recording. External microphones offer improved audio capture, especially in noisy environments.
Third-Party Apps for Advanced Screen Recording
1. Exploring Third-Party Apps:
Apps like "TechSmith Capture," "DU Recorder," and "ScreenFlow" offer additional features for screen recording. Third-party apps often provide more customization options, editing tools, and advanced settings.
2. Adjusting Audio Sources:
Some third-party apps allow you to select audio sources, including system sound and microphone. Choosing audio sources gives you control over what sounds are included in your screen recording.
3. Editing Features:
Apps like "LumaFusion" offer advanced editing features for refining your screen recordings. Editing tools allow you to enhance the quality of your recordings, add effects, and trim unnecessary segments.
4. Screen Recording with External Devices:
Certain apps enable screen recording with external devices like DSLR cameras for professional-grade videos. Integrating external devices expands the possibilities for high-quality screen recording.
Troubleshooting Common Issues
1. No Sound in Screen Recording:
Check if the microphone is enabled in the Control Center before starting screen recording. Disabling the microphone results in silent screen recordings.
2. Low Audio Quality:
Use external microphones for improved audio quality during screen recording. Built-in microphones may not provide optimal audio quality, especially in noisy environments.
3. Third-Party App Compatibility:
Ensure third-party apps are compatible with your iPad model and iOS version. Incompatibility may lead to performance issues or limited functionality.
Advanced Tips for Professional Screen Recording
1.Utilizing External Audio Sources:
Connect professional microphones or audio interfaces for studio-quality sound. External audio sources enhance the overall audio recording quality.
2. Customizing Frame Rates:
Some third-party apps allow customization of frame rates for smoother video playback. Adjusting frame rates can improve the overall visual experience of your screen recording.
3.Scripting and Planning:
Plan your screen recording in advance, scripting important points to ensure a clear and concise presentation. Planning helps avoid unnecessary pauses or confusion during the recording.
4. Optimizing Lighting Conditions:
Record in well-lit environments to ensure clear visuals and reduce the need for excessive post-processing. Adequate lighting contributes to a professional and visually appealing screen recording.
Examples of Effective Screen Recordings
1. Educational Tutorials:
Creating step-by-step tutorials for app usage or software demonstrations. Educational content benefits from clear audio instructions and synchronized visuals.
2. Gaming Achievements:
Recording gameplay with commentary to showcase achievements or strategies. Adding commentary enhances the gaming experience for viewers.
3. Professional Presentations:
Screen recording presentations for remote meetings or virtual conferences. Professional presentations benefit from polished visuals and clear audio.
Bonus Tip: Quick Way to Transfer iPad Video to PC
Discover the magic of FoneTool, your gateway to a world where transferring iPad videos to your PC is a breeze. Immerse yourself in a seamless experience that transcends boundaries, ensuring your cherished moments are effortlessly preserved.
Step 1: Connect Your iPad
Plug in your iPad to your PC using a USB cable. FoneTool will establish a secure connection instantly.
Step 2: Launch FoneTool
Open the FoneTool app on your PC. Its intuitive interface awaits, ready to simplify your video transfer process.
Step 3: Select Video Files
Navigate to the video section on FoneTool and choose the videos you want to transfer. It's as simple as a click.
Step 4: Initiate Transfer
Click the "Transfer" button, and watch FoneTool orchestrate a swift and reliable transfer of your iPad videos to your PC.
Step 5: Enjoy Your Videos
Once the transfer is complete, relish the joy of having your iPad videos seamlessly accessible on your PC. FoneTool - where memories find their place effortlessly.
Conclusion
Screen recording on iPad with sound opens up a world of possibilities, from educational content creation to professional presentations and entertaining gameplay videos. Whether using the native screen recording tool or exploring third-party apps, the ability to capture both visuals and sound enriches the overall experience. Follow the steps, explore advanced tips, troubleshoot common issues, and unleash your creativity with captivating screen recordings on your iPad.
FoneTool - All-in-one iPhone Data Manager
Transfer, backup and manage data on iPhone, iPad and iPod touch in an easy way.
-
 iOS 26 Compatible
 iPhone 16 Supported
Windows 11/10/8/8.1/7
100% Secure

Demi is an editor of FoneTool group as well as an good advisor in the area of iOS-related issues. She does well in finding solutions to people's problems. She enjoys traveling, gardening, and watching movies. She spends most of her free time with her pet and family.
Read author info >>