9 Ways to Fix iPhone/iPad Unable to Check for Update
Read this passage to get why you are unable to check for update on iPhone/iPad and how to fix. If all ways fail, FoneTool can be another approach for you to reset the device.
Why can’t check for iOS update?
When you are trying to download the latest iOS, a pop-up window may tell you “unable to check for update” on the iPhone/iPad. And from the notification, you can know “an error occurred while checking for a software update”. So why can’t you update your device?

The inability to update could be due to various factors. It might be related to a poor internet connection, Apple's servers being temporarily unavailable, or a software glitch on your device. It's also possible that your device's settings or restrictions are preventing the update check. Sometimes, full iPhone/ iPad storage can also result in an error.
Whatever the reasons, now let’s view the most detailed guidance to learn how to fix the issue.
How to fix unable to check for update on iPhone/iPad
There are 9 ways for you to troubleshoot the problem, you can try them one by one to check if they work. It’s better to connect your iPhone/iPad to a Wi-Fi network and charge your device fully before you check for update again.
Solution 1. Restart your iPhone/iPad
If you encounter difficulties while checking for update on iDevice, a straightforward remedy involves restarting your iPhone/iPad.
On iPhone 8 Plus/8/X or later: Press and release the Volume Up button > Press and release the Volume Down button > Press and hold the side button until Apple logo does appear on your screen.
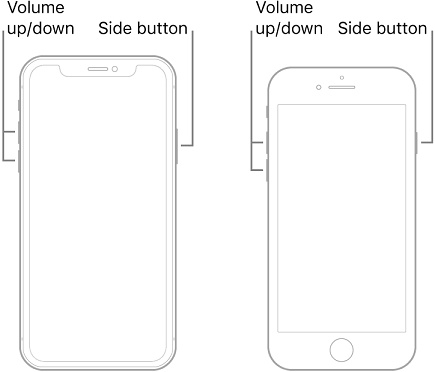
On iPhone 7 Plus or 7: Press and hold Sleep/Wake and Volume Down buttons > Keep holding both buttons until the Apple logo emerges on the screen.
On iPhone 6 or earlier: Press and hold the Home button and Sleep/Wake button > Maintain the pressure on both buttons until the Apple logo appears on your screen.
Restart iPad with Face ID: Quickly press and then release the Volume Up button > Quickly press and release the Volume Down button > Hold down the Power button until the Apple logo comes into view.
Restart iPad with the Home button: Simultaneously press and sustain the Power and Home buttons > Release both buttons when the Apple logo appears.
Solution 2. Check Apple System Status
Occasionally, Apple servers may encounter issues, which could result in difficulties updating your iPhone or iPad. To address this problem, the initial step is to check the Apple System Status.
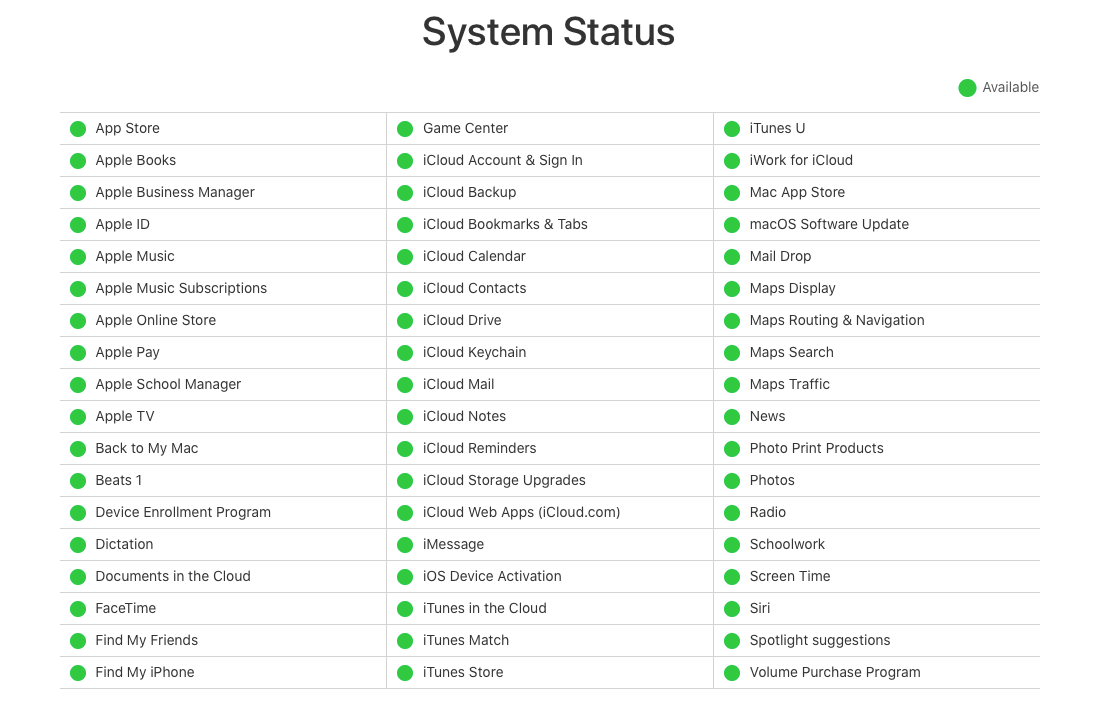
If you observe any server status marked as yellow, it indicates a temporary problem with the server. Then you need to wait for the issue to be resolved by Apple. If necessary, you can reach out to Apple Support for assistance.
And if all servers are displayed in green, it means they are functioning correctly. You can explore other approaches to solve the problem.
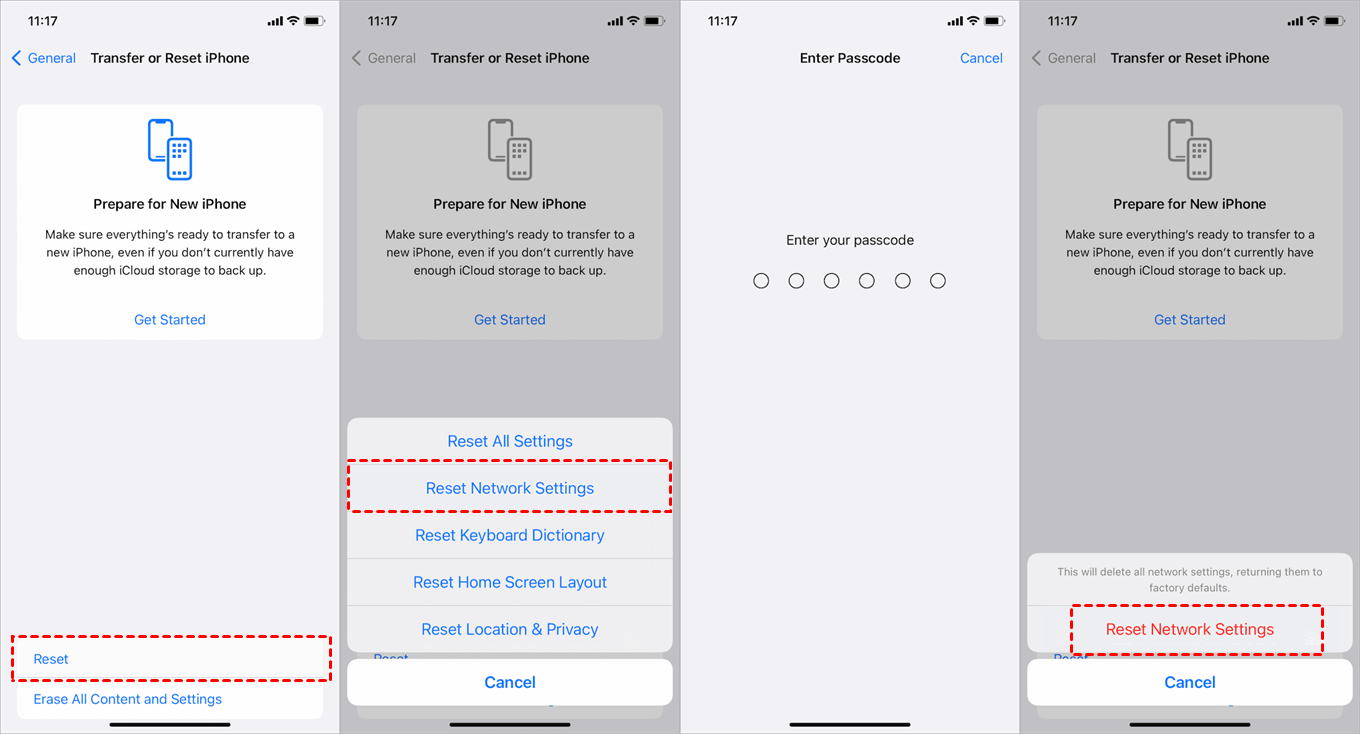
Solution 3. Reset network settings
Sometimes, a poor network condition may cause some issues like “no service on iPad”, “unable to check for update iOS”, and more. Resetting network settings may be a useful way: Go to Settings app > General > Reset > Choose Reset Network Settings.
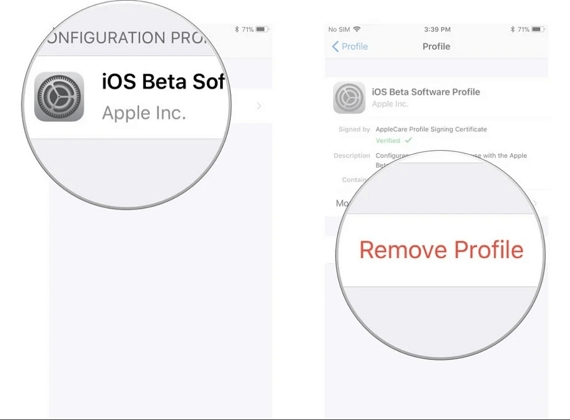
Solution 4. Remove iOS Beta
If you have installed the iOS beta version on your iPhone or iPad, it may result in an update issue. In such a case, you should follow the steps to delete the beta profile.
Go to Settings on your device > Tap General > Scroll down and find Profile > Click on the beta profile associated with the beta version you installed > Select Remove Profile to remove the beta profile from your device.
Solution 5. Change DNS settings
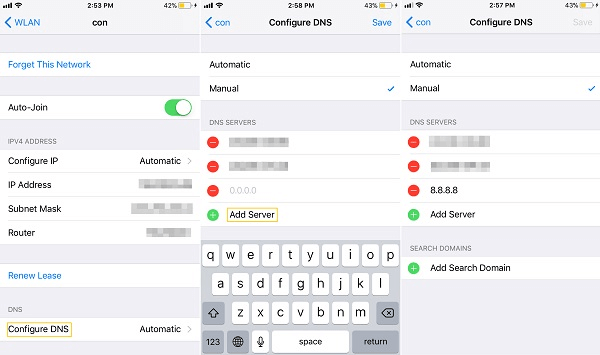
If your iPhone/iPad is unable to check for update after switching to Google's Public DNS: Go to Settings > Wi-Fi > Tap the blue info icon located next to your current Wi-Fi network > Configure DNS > Manual > Add Server and enter the DNS servers - 8.8.8.8 or 8.8.8.4.
Solution 6. Remove and download the update again
If you encounter the same error multiple times while attempting to update your device, it’s better to check for a partial update and remove it: Open Settings on your device > General > iPhone/iPad Storage > Locate and click the iOS or iPadOS update in the list of apps, then select Delete Update.
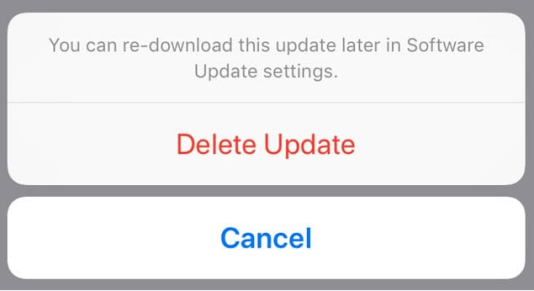
After the removal, it is recommended to try downloading the update again, preferably using iTunes (solution 8) or Finder (solution 9) on your computer.
Solution 7. Clear up some space on iPhone/iPad
Sometimes, full iPhone/iPad storage may cause the error. You can check it first: Turn on Settings > General > Storage. If there is not enough space, try to clear it up by deleting some files. When there are too many files need to be erased, the professional iPhone/iPad data management software - FoneTool can help you a lot.
With this powerful app, you can erase your private data including photos, music, videos, podcasts, contacts and more in a few clicks. Before the process, it’s recommended to backup your iPhone/iPad to PC with the FoneTool.
Step 1. Connect your device to computer via USB > You may need to tap Trust to let your computer access iPhone/iPad data.
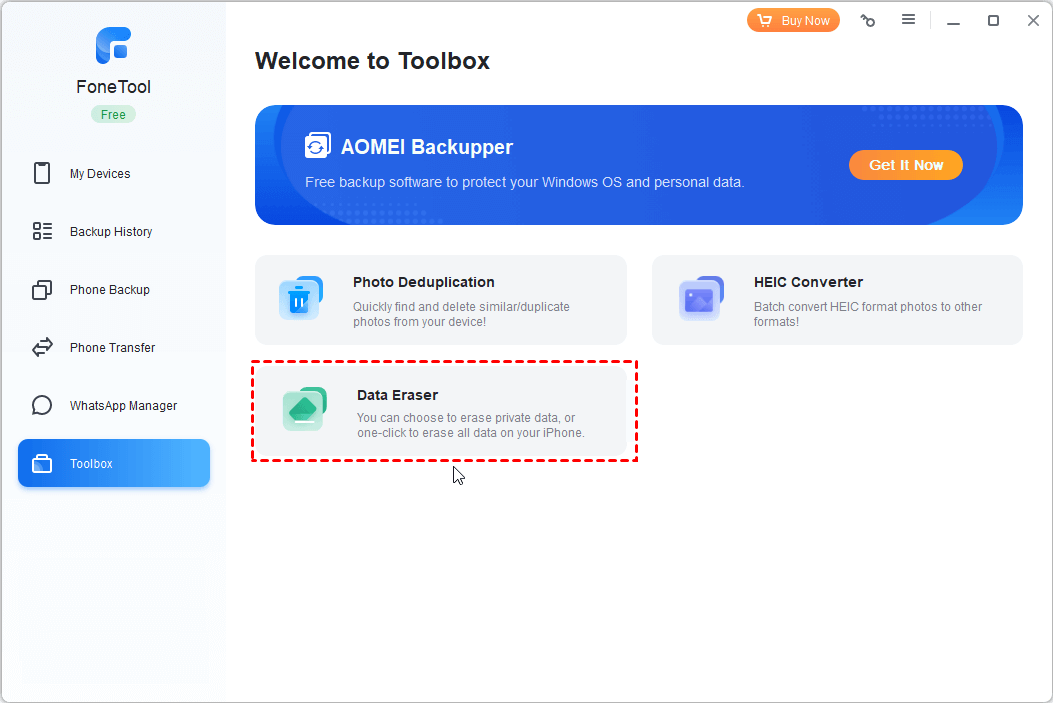
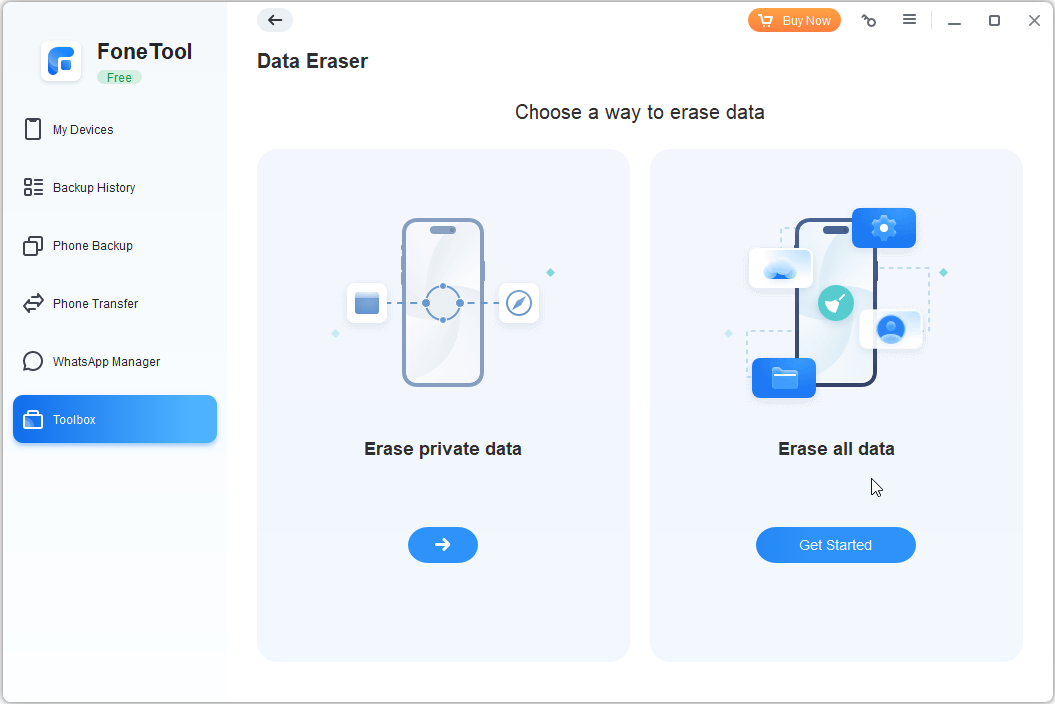
Step 2. Launch FoneTool and click Toolbox > Data Eraser > Then select Erase private data and click Get Started.

Step 3. Check each icon to choose the data > Check Enable Deep Erase Technology to ensure complete data erasure if you need > Tap Start Erase.
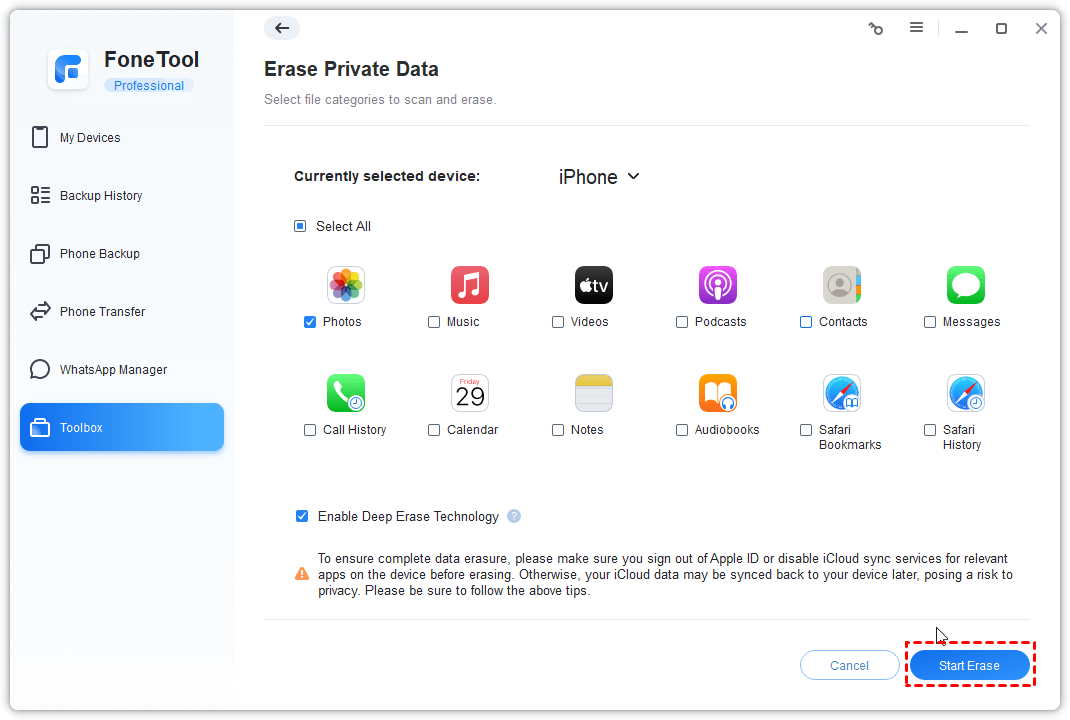
Besides, you can also go to Toolbox > Photo Deduplication to find and delete duplicate photos in iOS devices.
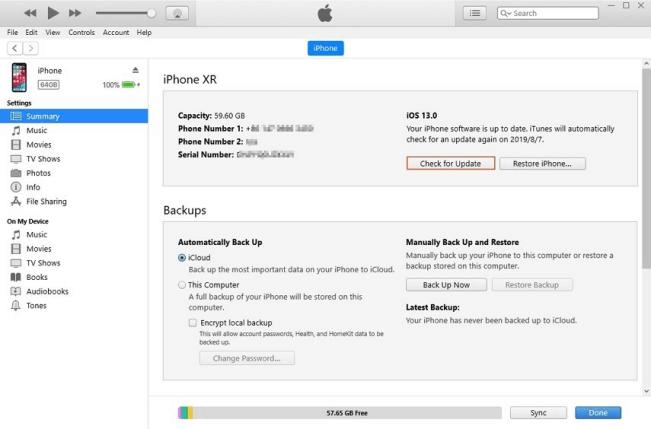
Solution 8. Check for update with iTunes (For Windows)
If none of the previously mentioned methods yield positive results, it may be time to check for updates using iTunes. Before proceeding with the method, ensure to back up your essential device data.
Step 1. Launch iTunes on your computer > Connect your iPhone/iPad to the computer.
Step 2. Click the device icon > Summary > Check for Updates > Download and update the device with the available update.
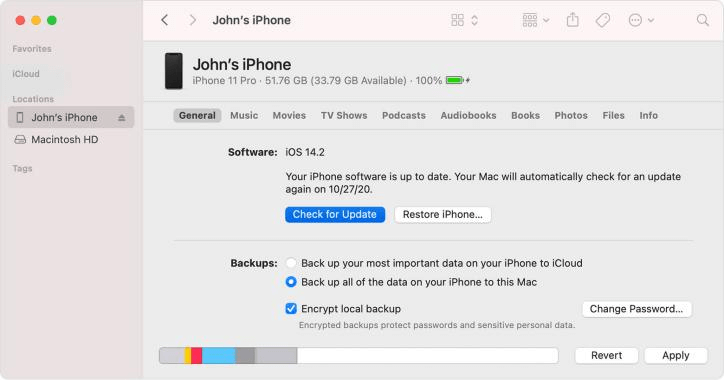
Solution 9. Check for update with Finder (For Mac)
Before the update, remember to back up your device. Then launch Finder to start the task: Connect your device to the Mac > Choose the device in the left sidebar on Finder > Click General and tap on Check for Update > Choose Download and Update and follow the onscreen instructions to finish the process.
Reset iPhone with professional tool to fix the issue
When all ways above don’t work, don’t worry. In addition to erasing private data, FoneTool can also help you factory reset iPad/iPhone to tackle the problem.
As a handy iOS data management tool, FoneTool is perfectly compatible with various iPad, iPhone, and iPod Touch models. So it’s easy for you to fully back up your device and erase all data using FoneTool.
Before the erase: Fully back up iPhone/iPad
With FoneTool, you can easily back up all crucial data on your device, such as photos, contacts, text messages, application data, private data, and user settings. This one-click operation ensures a comprehensive backup similar to iTunes.
Step 1. Launch FoneTool > Connect your iPhone/iPad to a computer > You may need to tap Trust on your device.
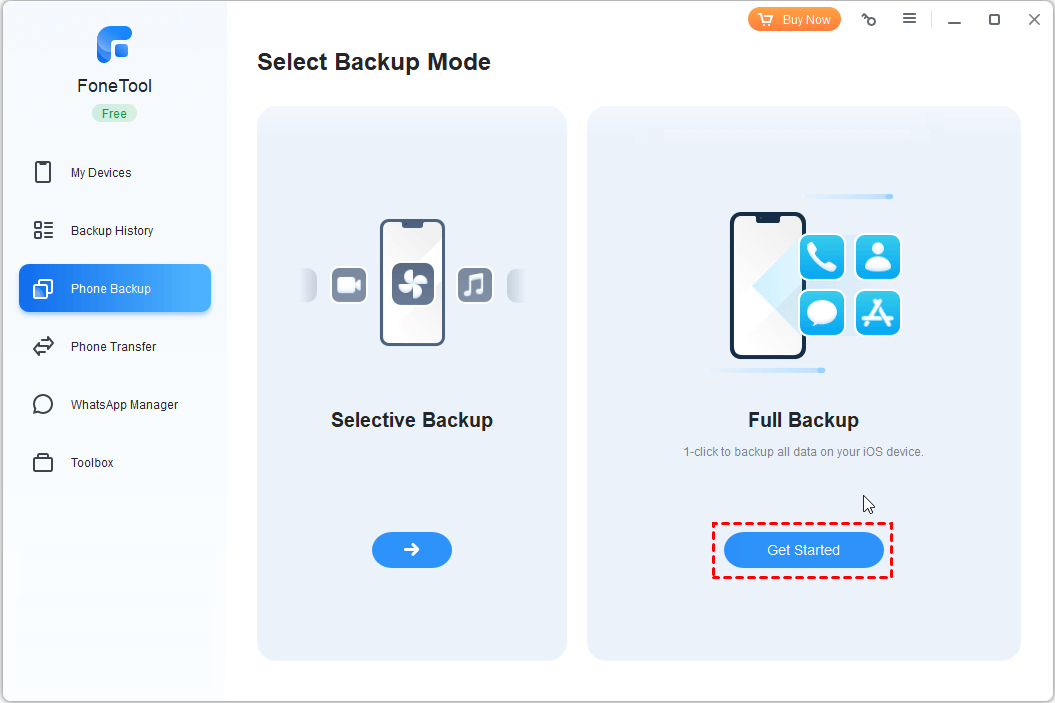
Step 2. Click Phone Backup > Go to Full Backup and click Get Started. (If need, you can choose to selectively back up iPhone/iPad data.)
Step 3. Click Enable Backup Encryption according to your needs. If it is enabled, your data such as Fitness records, Health, and Keychain can be private > Select a storage path to save the backup > Click Start Backup to start the task.

Now you can erase your iPhone to fix the issue.
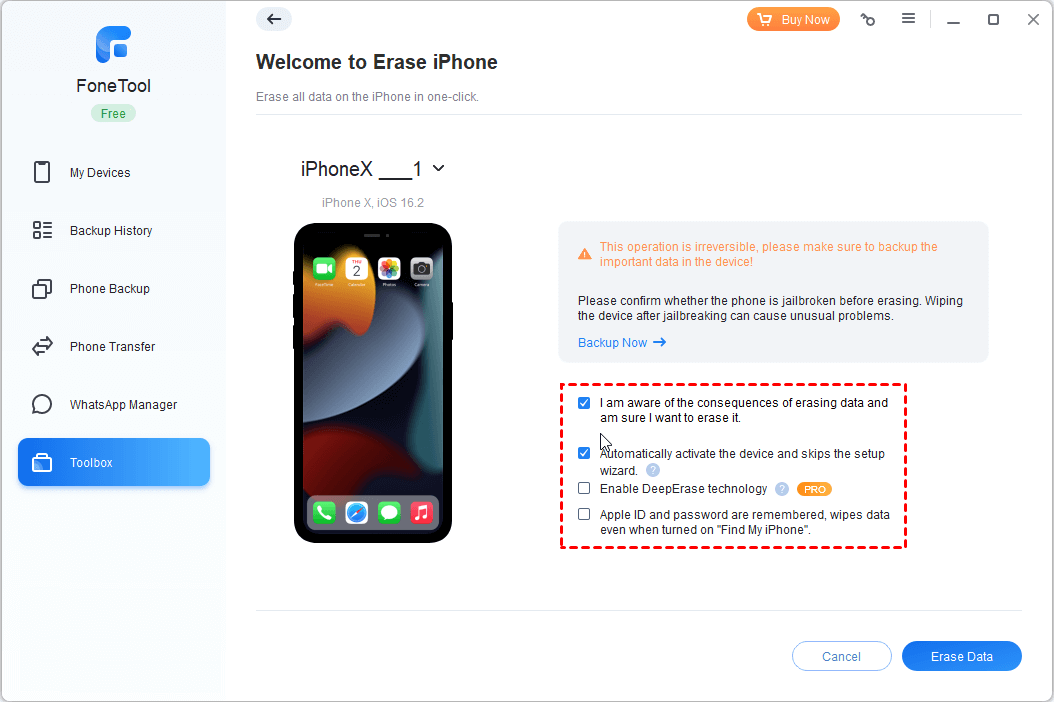
One click to erase your iPhone/iPad
Step 1. Click Toolbox on the main interface > Choose Data Eraser.
Step 2. Choose Erase all data and tap Get Started.
Step 3. Check the instructions on the screen > Tap Erase Data button to confirm the choice.
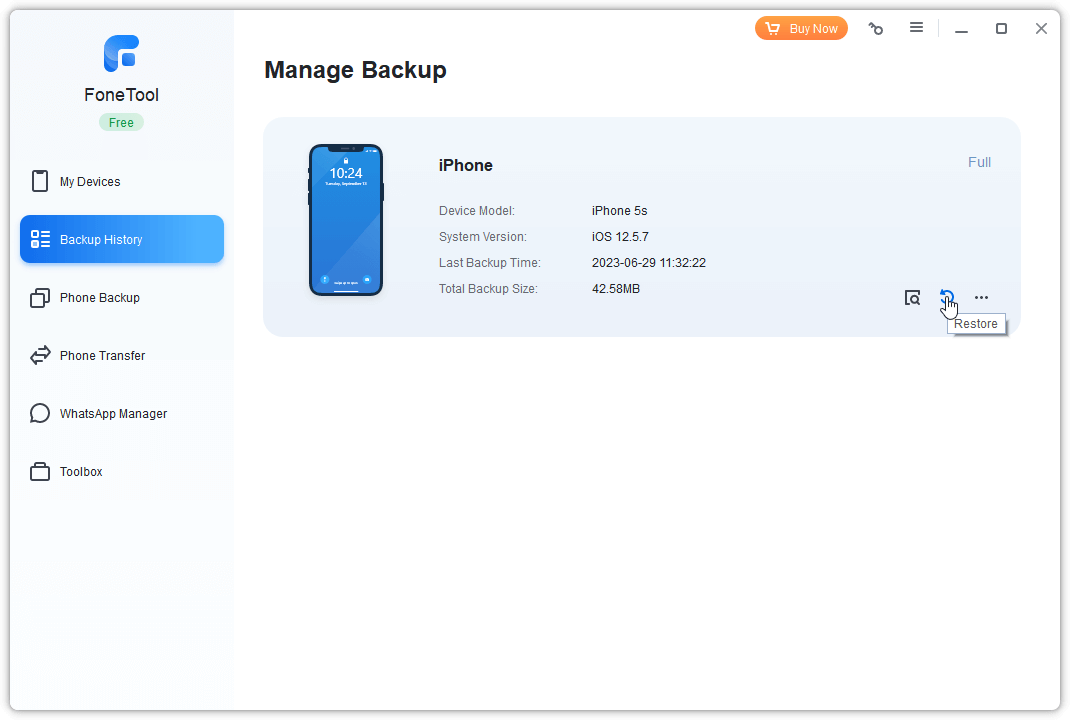
After the erasing, you can go to Backup History to restore your iPhone/iPad.
Conclusion
From this detailed passage, you can get how to fix unable to check for update issue clearly. If these 9 ways do not work, FoneTool can be an effective approach to reset an iPhone/iPad to factory settings. From the steps, you can also find that it’s a handy backup tool to help you back up iOS devices without any data loss.
FoneTool - All-in-one iPhone Data Manager
Transfer, backup and manage data on iPhone, iPad and iPod touch in an easy way.
-
 iOS 27 Compatible
 iPhone 17 Supported
Windows 11/10/8/8.1/7
100% Secure

Kathy is an editor of FoneTool, who prefers to help more users address a series of iOS-related problems. She likes traveling and being close to nature makes her relax. She is also keen to engage in social activities and spend much free time with her friends.
Read author info >>