[2026 Updated] How to Erase Contacts on iPhone
Want to erase contacts on iPhone? In this guide, we will go over several methods for deleting contacts from your iPhone one by one or all of them at once. You will get a satisfactory one to suit your needs.
After using mobile phone for a long time, your iPhone Contacts app must be lying a large number of contacts that may never to be in touch again. They may belong to your former colleagues, friends who will never contact, etc. What is the point of keeping these contacts if you don't delete them?
![]()
Here in this guide, we will show you the simple steps to erase contacts on iPhone using different workable methods in every detail. Feel free to look through them one after another, and choose one that meet your demands.
✍ Warm tip: Before using any of the following methods to delete your iPhone contacts, you can backup iPhone contacts that are matter so that you won’t lose anything important after deletion process.
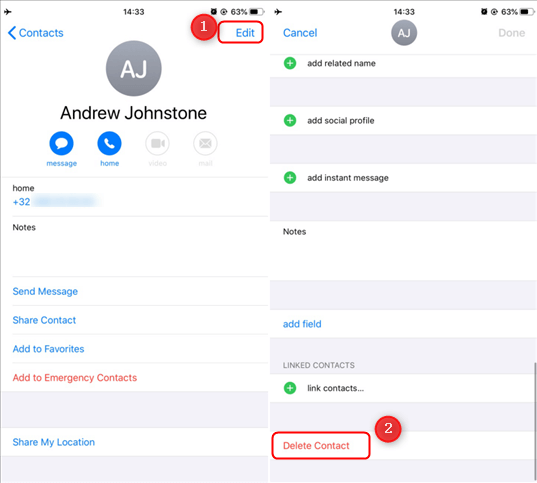
Way 1. How to delete contacts on iPhone individually
The most common method you may think about is to delete contacts from your iPhone Contacts app one by one. If you don’t have a large number of contacts to delete, it will be a wise choice to delete contacts from iPhone Contacts app. Follow steps below to know how to erase iPhone contacts from the Contacts app.
Step 1. Open the Contacts app on your iPhone > Tap the contacts you’d like to delete.
Step 2. Click Edit icon in the upper-right corner > Scroll down to the bottom and tap the Delete Contact button.
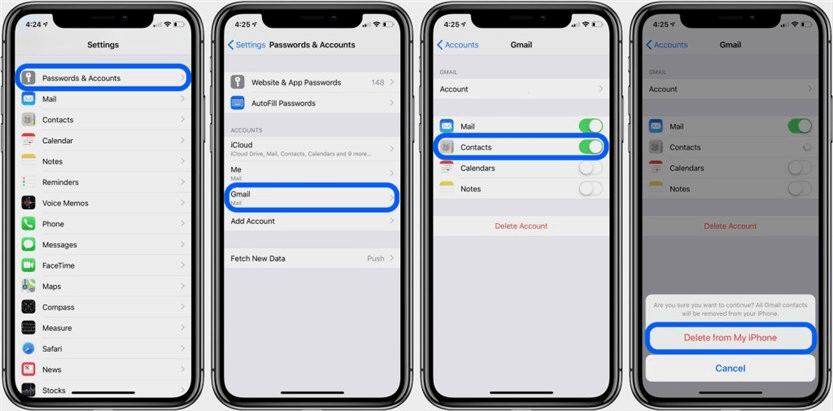
Way 2. How to erase all contacts on iPhone via Gmail/Outlook/Yahoo
If your iPhone contacts were imported from your email account, like Gmail, Outlook, and Yahoo, you can make use of your email accounts to erase iPhone contacts. Here are steps of how to delete multiple contacts on iPhone via Gmail or other accounts.
Step 1. Go to your iPhone Settings app > Scroll down to locate and choose Password & Accounts, where you can see all your accounts that apply to this iPhone.
Step 2. Select the account you want to delete contacts from > Toggle off the Contacts option.
Step 3. When a window prompts, tap Delete from My iPhone to confirm.
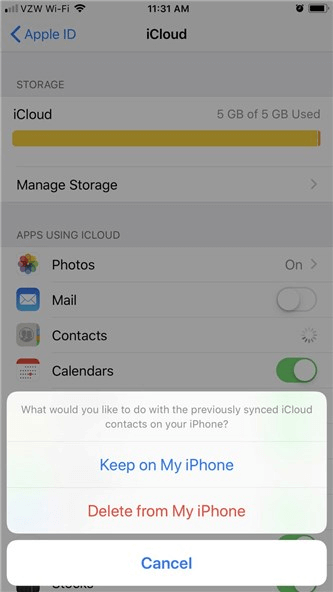
Way 3. How to erase contacts on iPhone with iCloud
It can be kind of time-consuming to only delete contacts one-by-one on iPhone or delete contacts from your certain email accounts. To get the job done fast or erase all contacts on iPhone at once, iCloud can do you a favor.
Before we go over how to erase all contacts on iPhone using iCloud, make sure you have synced iPhone contacts to iCloud. You can now delete all previously synced iCloud contacts from your iPhone with the steps below.
Step 1. Open the Settings app on your iPhone > Tap [your name] > Tap iCloud > Scroll down to locate and toggle off the switch next to Contacts.
Step 2. When a window prompts, tap on Delete from My iPhone.
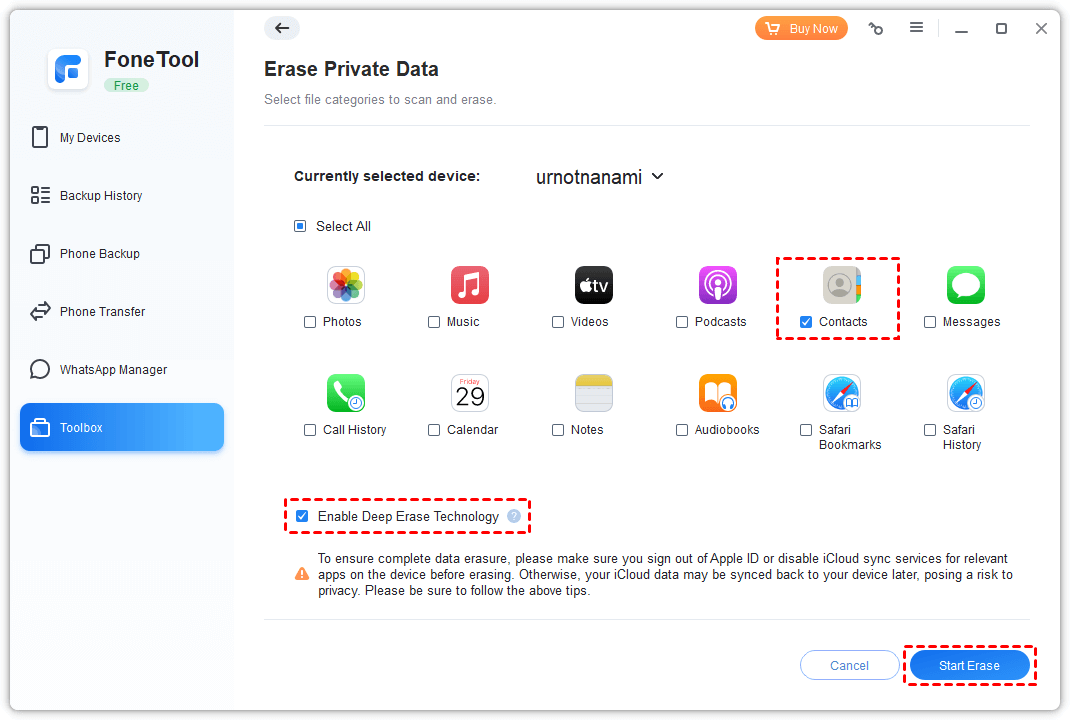
Way 4. One-click erase all iPhone contacts using FoneTool
To simplify the contact erase process, we highly recommend FoneTool, a free iPhone data management tool. Within one-click, you can extract and remove contacts on your iPhone deeply and permanently.
In case you will need the deleted contacts in the future, you can first backup the contacts. FoneTool lets you preview and select the contacts you want to backup.
Get the tool right now and follow the simple steps to backup iPhone contacts and other data using FoneTool.
Step 1. Connect your iPhone to computer via USB > You may need to tap Trust to let your computer access iPhone data.
Step 2. Launch FoneTool, and click Toolbox > Data Eraser > Mouse over to Erase private data and click Get Started.

Step 3. Check the Contacts icon > You can check Enable Deep Erase Technology to ensure complete data erasure > Tap Start Erase to begin the task.
Conclusion
In conclusion, it is a quick and simple process to erase contacts on iPhone in just a few steps, which makes your iPhone Contacts app better-organized. Whether you choose to delete single contacts one by one or clear all of your contacts at once, it’s important to backup files before proceeding. Hope this guide can help you, and for more queries or feedback, please feel free to contact us.
FoneTool - All-in-one iPhone Data Manager
Transfer, backup and manage data on iPhone, iPad and iPod touch in an easy way.
-
 iOS 27 Compatible
 iPhone 17 Supported
Windows 11/10/8/8.1/7
100% Secure

Demi is an editor of FoneTool group as well as an good advisor in the area of iOS-related issues. She does well in finding solutions to people's problems. She enjoys traveling, gardening, and watching movies. She spends most of her free time with her pet and family.
Read author info >>