6 Quick & Useful Ways: How to Transfer Music from iPod to iPad
Want to know how to transfer music from iPod to iPad? You will be given 6 effective ways with detailed instructions in this guide to make it with no effort.
How do I move music from iPod and iPad?
I have an old iPod with music that is stored in iTunes. I recently purchased an iPad Pro and I want to move the music onto the iPad, but I can't figure out how to do it. It doesn't even seem that the iPad has iTunes, instead it just has app entitled "Music".
- Question from Apple Community
With the new iteration of electronic devices, iPod, as once one of the most popular portable music players, is becoming less and less necessary. Even if you don't listen to music on your old iPod anymore, you don't want to lose the music on your iPod. Then, you may think of how to transfer music from iPod to iPad.
Here in this guide, you will be given six ways to transfer music from iPod to iPad. Look through them one after another, and choose one that can most satisfy your needs.
1# Fastest way to transfer music from iPod to iPad
If your iPod saves non-purchased music, iPod and iPad are using different Apple IDs, or you don’t want to utilize iTunes or iCloud, then you can let the professional iOS data transfer tool - FoneTool do you a favor. Before reaching to the detailed steps, let's have an overview about what you can benefit from FoneTool.
Key Features & Advantages of FoneTool
? No Data Loss. All songs in your iPhone music library can be transferred to iPad, including purchased and non-purchased ones.
? Visible Transfer Process. You are able to preview and choose all or only wanted songs, videos, etc. from iPod to iPad using FoneTool.
? No Account Limitation. Even if you are using different Apple IDs on iPod and iPad, FoneTool helps transfer music files with no limitations.
? Widely Compatible. FoneTool can fully work well with models of iPod, iPad, and iPhone with operating systems from the old one to the latest.
Now, free download FoneTool on your iPhone, and follow the steps to transfer music from iPod to iPad using this powerful freeware.
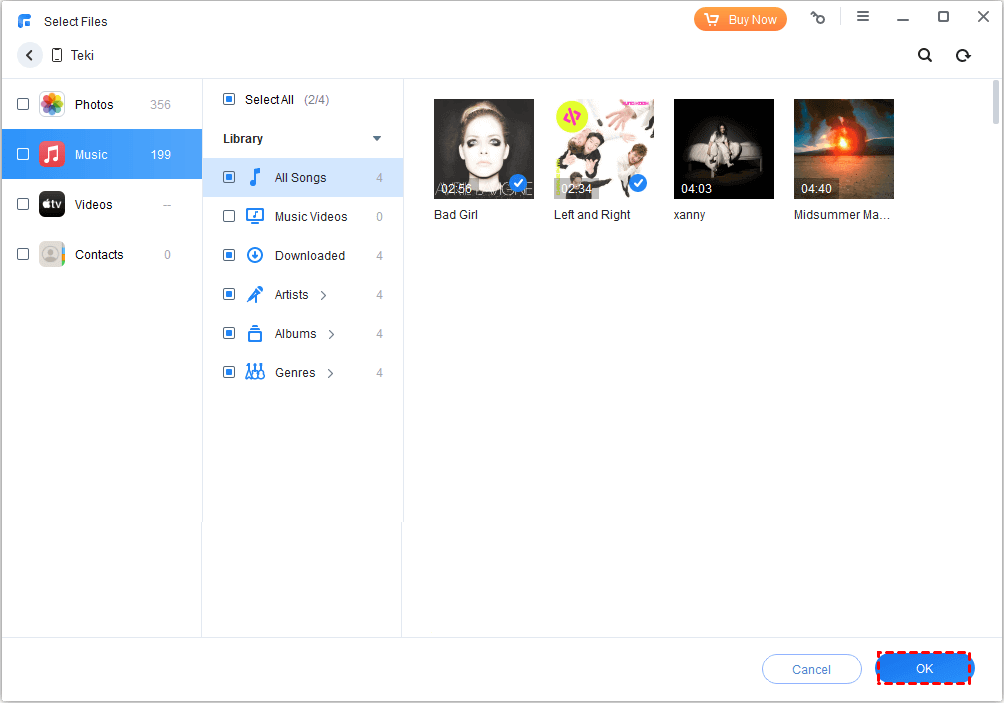
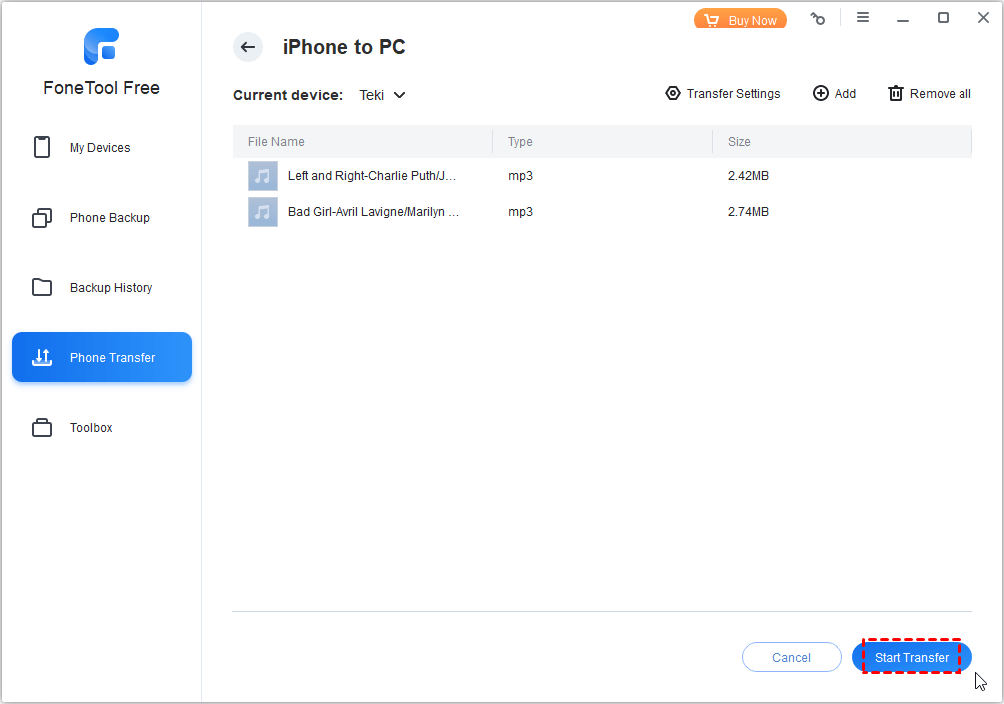
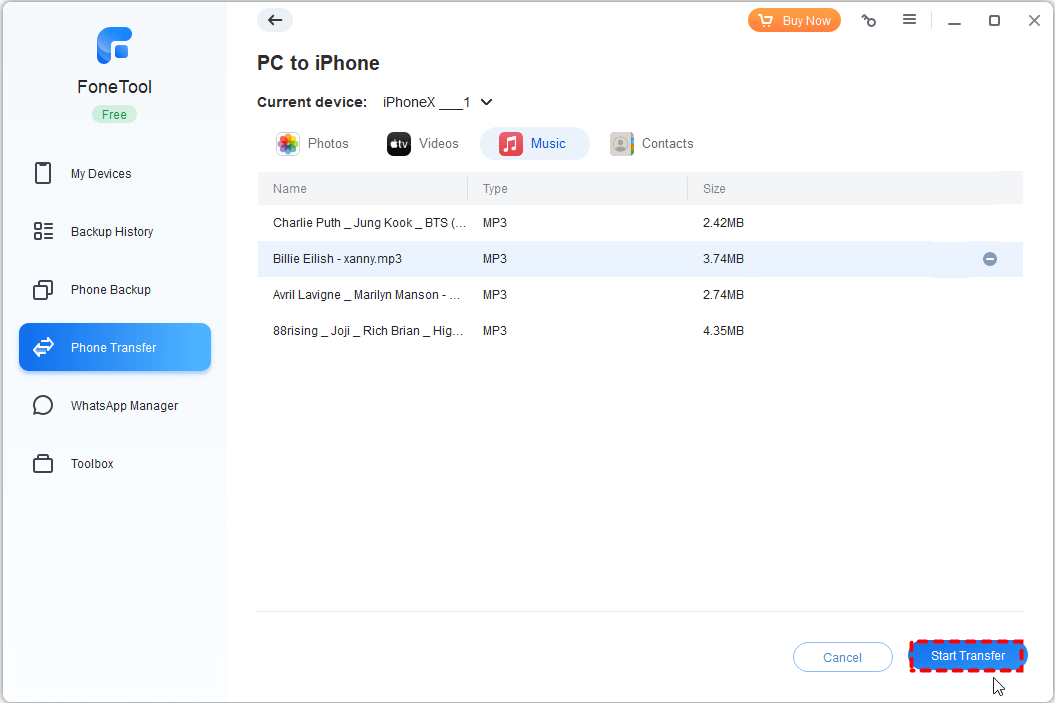
Step 1. Transfer songs from iPod to computer
• Launch FoneTool > Connect your iPod to computer with USB > Click Phone Transfer > Mouse over to iPhone to PC and click Start Transfer.

• Click the plus icon to browse music on your iPod > Select the songs you want to transfer to computer > Click OK to confirm.
• Choose a storage path and adjust other settings from Transfer Settings > Click Start Transfer to start the process.
Step 2. Transfer music to iPad
• Unplug iPod from computer and connect your iPad to computer.
• On FoneTool, choose Phone Transfer > PC to iPhone. You can click the file icon to choose music files. Or directly drag and drop your files to FoneTool.
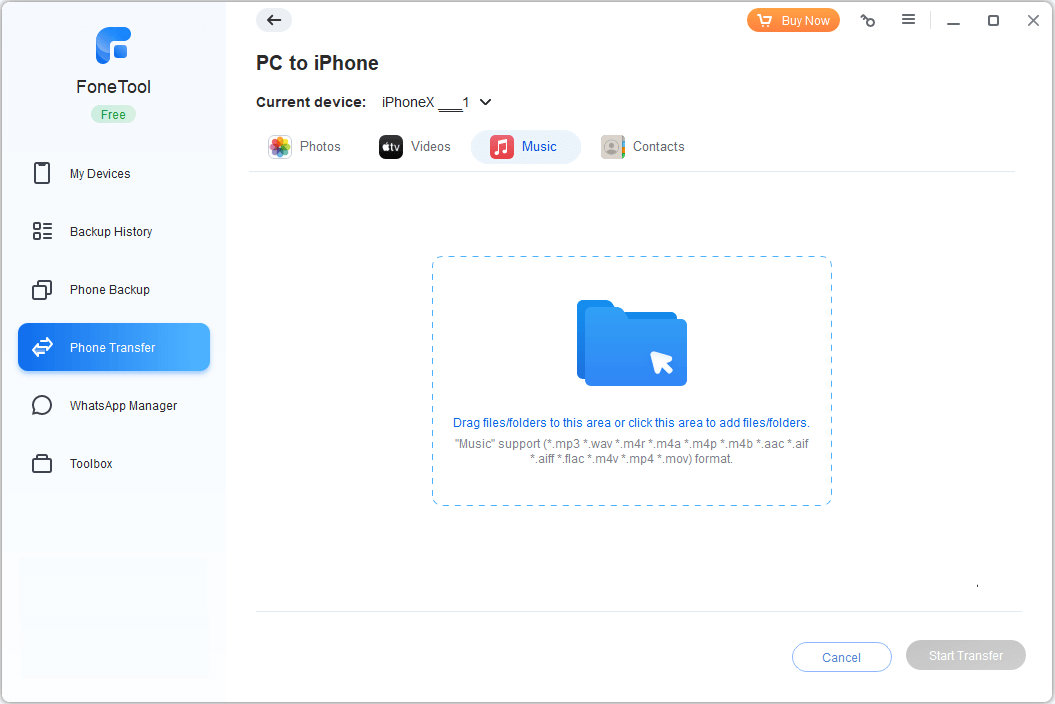
• Click Start Transfer to import iPod music to iPad.
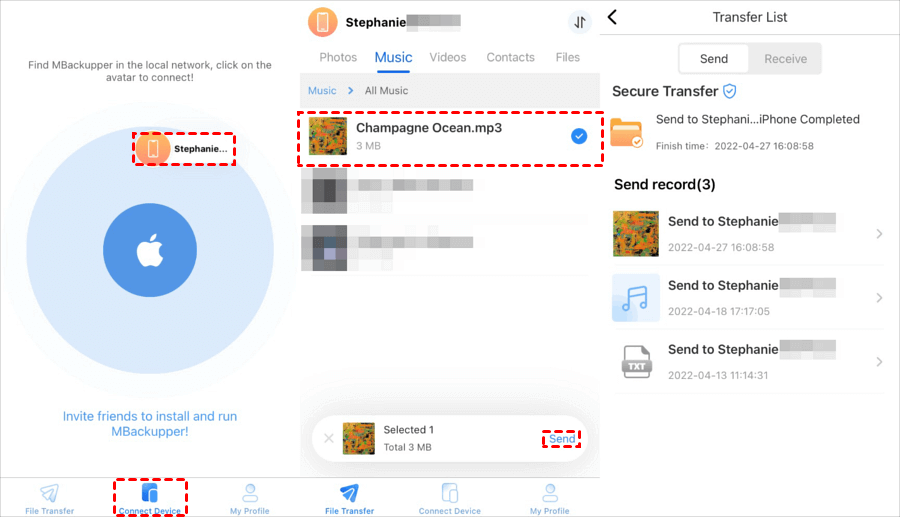
? How to transfer music from iPod to iPad without computer via FoneTool
Have no computer available at hand? FoneTool also offers a mobile app version for you to wirelessly transfer music and other types of files between iOS devices and Android phones directly.
2# How to transfer music from iPod to iPad using iTunes
When it comes to managing media files on your iOS devices, you must think of utilizing iTunes. If you wonder how to transfer music from iPod to iPad using iTunes, follow the steps below to transfer purchased iPod music files to iTunes and then sync them to iPhone.
Step 1. Download the latest version of iTunes on your PC and then connect your iPod to computer.
Step 2. Click File > Devices > Transfer Purchase from [device’s name]. The purchased music on iPod would be transferred to iTunes library.
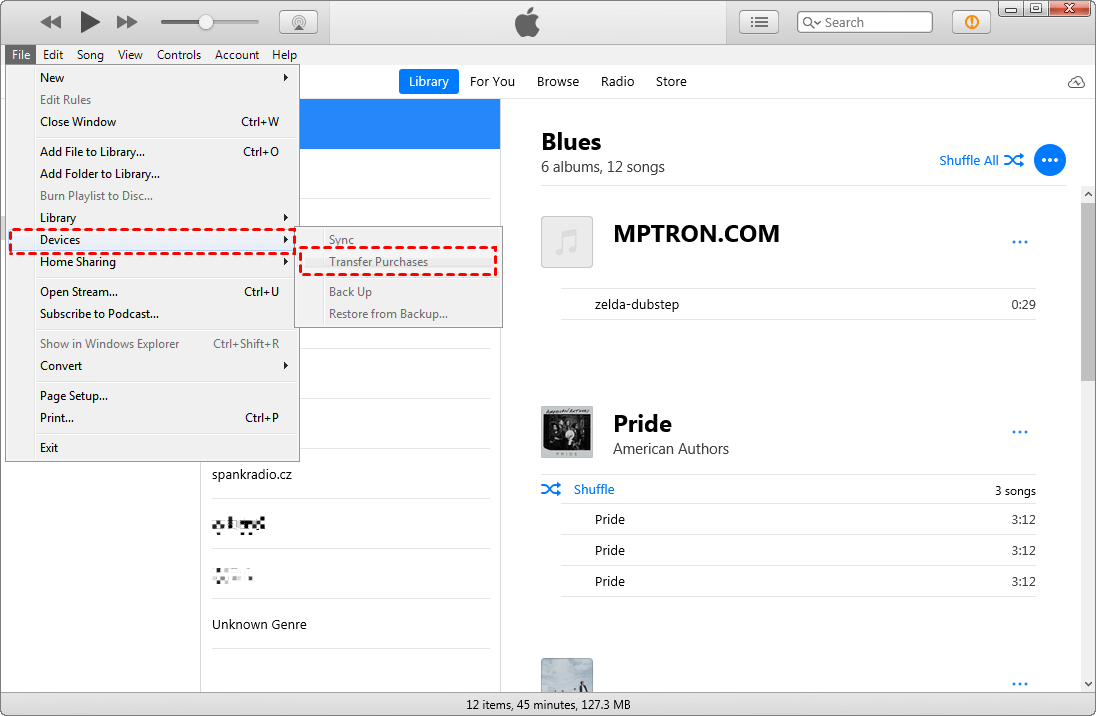
Step 3. Disconnect the iPod and plug your iPad into the computer.
Step 4. Click Music > Songs in the sidebar and the playlist will be shown. You could select the preferred music tracks and then right-click them > Add to Device > [device’s name].
3# Sync music from iPod to iPad by Apple Music
If you use Apple Music, you can sync your Music Library across devices without downloading all of your songs. To sync and play your songs to your iPad, you will need a stable Wi-Fi/network connection. Here are detailed steps on how to sync music from iPod to iPad.
Step 1. Go to the Settings app on your iPod > Choose Music > Toggle on the switch next to Sync Library.
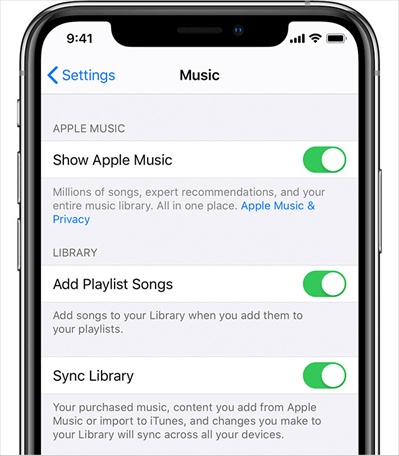
Step 2. Make sure your iPad is signed in with the same Apple account > Run Apple Music on your iPad.
Step 3. Wait patiently for the music playlist to finish being synced to your iPad.
4# Transfer music from iPod to iPad via AirDrop
The in-app iPod transfer feature AirDrop allows you to transfer music from iPod to iPad via Bluetooth. Make sure you have enable Wi-Fi, Bluetooth on both iPod and iPad, and follow the steps below to make it.
Step 1. Turn on AirDrop on both iPod and iPad: Go to Settings > Tap General > Tap AirDrop > Choose Contacts Only or Everyone.
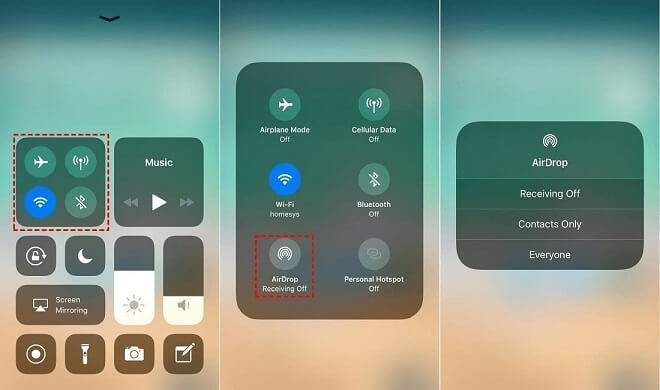
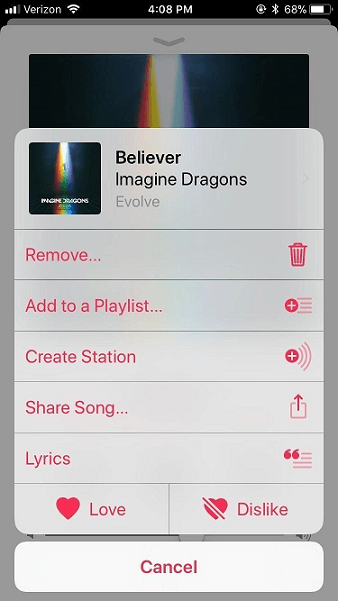
Step 2. On iPod: Go to Music app > Find the song you’d like to share > Click the three-dots icon to access the Share option > Click Share Song > Tap your iPad as the destination device.
Step 3. On your iPad: Tap View on the pop-up message that appears to check the link.
You can repeat the steps above to airdrop other music files you’d like to listen to on your iPad though it can be kind of time-consuming.
5# Share music from iPod to iPad with Home Sharing
The Home Sharing function enables you to share music tracks among up to 5 devices. You can share purchased music tracks among them as long as you sign in with the same ID.
Please keep in mind that Home Sharing does not help you copy music, but only allows you to play iPod music on your iPad. Here are steps to share music from iPod to iPad with Home Sharing.
Step 1. Make sure that both your iPod and iPad are connected to the same Wi-Fi network.
Step 2. On the iPod, go to Settings > Music > Scroll down to choose Home Sharing and sign in with your Apple ID. Perform the two steps on the iPad.
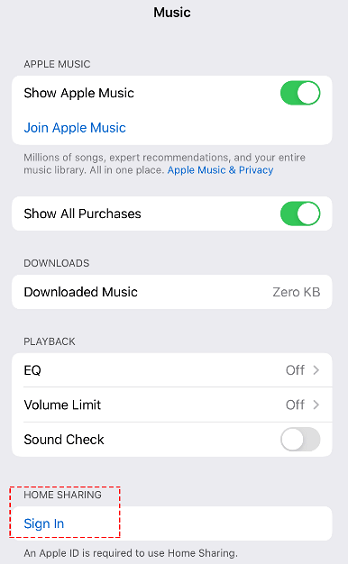
After these steps are finished, your iPad would share the music library between iPod and iPad. Go to Music app > Tap My Music > Tap Songs or Albums > Choose Home Sharing to have a check.
6# Transfer music from iPod to iPad using Email
You can send selective music as attachments in an email. It’s a quick way to transfer no more than 10 songs because there is a limitation to the size of the email.
Step 1. Download an Email app in App Store (you’d better have an account for that) and log in.
Step 2. Choose the recipient or type an address.
Step 3. Tap Add Attachments (usually at the bottom).
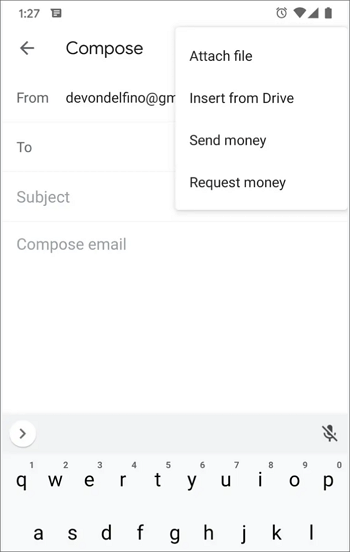
Step 4. Select the music files you’d like to send. You could type its name in the search bar to find it.
Step 5. Check whether the recipient has received those files.
Conclusion
That’s all about how to transfer music from iPod to iPad in 6 effective ways. As you can see, if you want to transfer both purchased and non-purchased music from iPod to iPad, the transfer tool - FoneTool can be your best choice. What’s more, FoneTool also enables you to transfer videos, photos, or even everything among iOS devices and PC.
Is this guide helpful? You could share it to help more people.
FoneTool - All-in-one iPhone Data Manager
Transfer, backup and manage data on iPhone, iPad and iPod touch in an easy way.
-
 iOS 27 Compatible
 iPhone 17 Supported
Windows 11/10/8/8.1/7
100% Secure

Demi is an editor of FoneTool group as well as an good advisor in the area of iOS-related issues. She does well in finding solutions to people's problems. She enjoys traveling, gardening, and watching movies. She spends most of her free time with her pet and family.
Read author info >>