7 Ways to Fix Trusted Devices List is Not Available
Want to know why your iPhone says Trusted Devices List is not available and how to fix it? Read this guide to reveal the reasons and 7 ways to fix it easily and safely.
Trusted devices list is not available
Recently, I noticed that on my iPhone SE and iPhone 5c, the trusted device list no longer appears under my Apple ID. When I log into appliedapple.com, all devices are displayed under my account. Has anyone else seen this problem and determined the root cause? How can I solve it?
- Question from Apple Discussions
Why does my iPhone say my trusted device list is not available?
Are you in trouble with the “Trusted Devices List is not available”? You are not alone. This issue occurs frequently if you are an iOS user.
The function of Trusted Devices includes enhancing account security, password reset, account recovery, etc. The Trust Devices List is not available, which will cause login delays or failure of two-factor authentication; if unauthorized devices access the account, there will be security risks. So, what causes the Trusted Device List not available:
- A poor network can prevent the list from loading.
- Apple ID has the wrong settings or isn’t being verified correctly.
- An outdated iOS system may cause this issue.
- Two-factor authentication is not enabled.
- No trusted devices are registered.
Don't worry! This guide explains why it is unavailable and how to fix it in 7 easy ways. Read and fix it.
7 ways to fix Trusted Devices List is not available
After reading the reasons for the iPhone Trusted Devices List is not available, let’s walk through the 7 solutions.
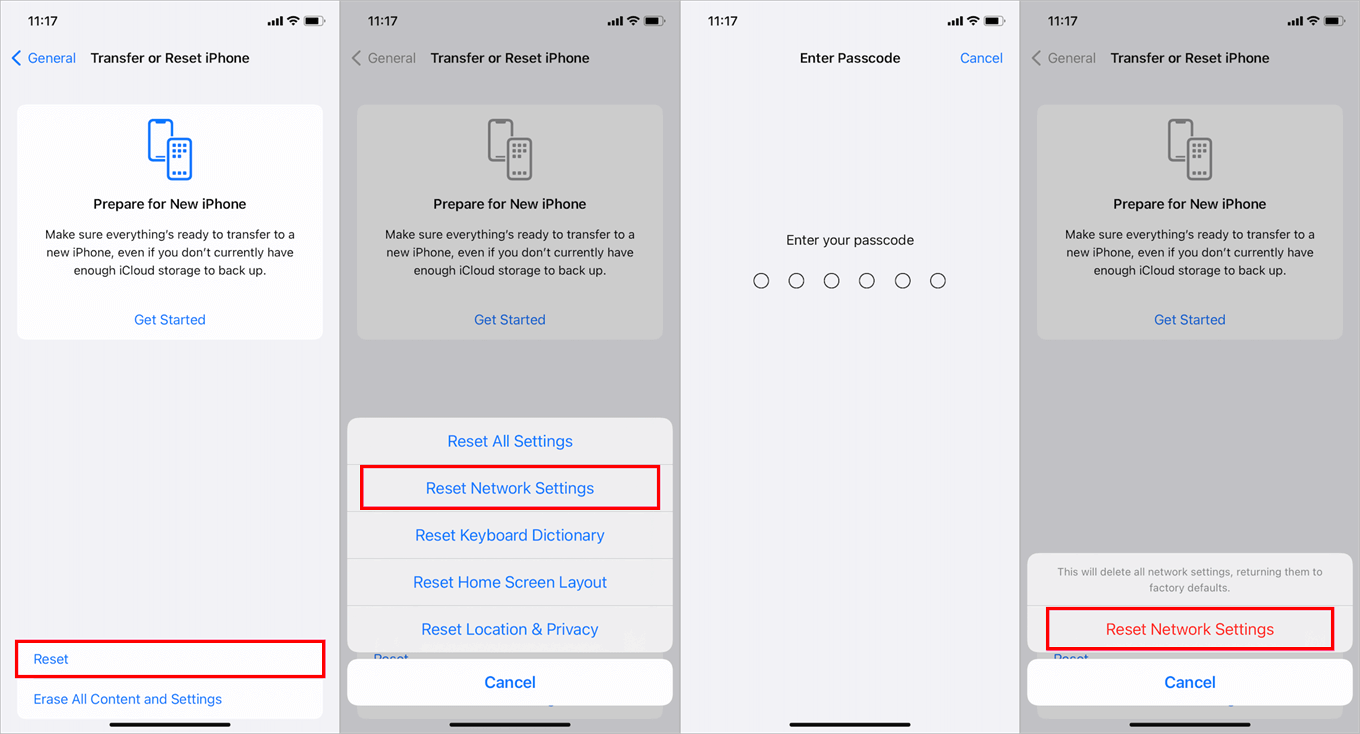
Way 1. Check network connection
If your device won’t connect to a stable network, the Trusted Devices List may not upload. So you need to reset your network on your iPhone:
Step 1. Go to Settings > General.
Step 2. Scroll down and tap Transfer or Reset iPhone.
Step 3. Tap Reset and select Reset Network Settings.
Step 4. Enter your password and tap Reset Network Settings to confirm again.
Way 2. Resign your Apple ID
Your Apple ID might have expired but you don’t know. You can resign the Apple ID on your devices to refresh the connection between your devices and Apple’s servers.
Step 1. Go to Settings > General.
Step 2. Tap your Apple ID name > Scroll and tap on Sign Out.
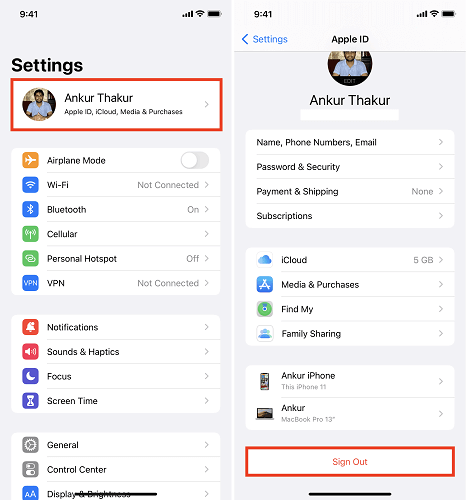
Step 3. Enter your password to turn off Find My > Tap on Turn Off.
Step 4. Sign in your Apple ID as usual.
Way 3. Restart your iPhone
If resign Apple ID cannot work, you can also restart your iPhone. When you restart your devices, the bugs or temporary system catching can be deleted. Just go to Settings > General > Shut Down, and then you can restart your devices.
Follow the guide to Force Restart your iPhone if you can’t restart your iPhone by following the steps above.
For iPhone 8 and later.
Step 1. Quickly press and release the Volume Up button > Volume Down button.
Step 2. Press and hold the Side button. Release the button until the Apple logo appears.
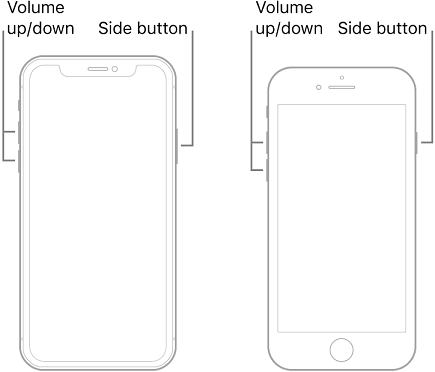
For iPhone 7 or 7 Plus.
Step 1. Press and hold the Volume Down > the Wake/Sleep button.
Step 2. Hold both buttons > Release both buttons until the Apple logo appears.
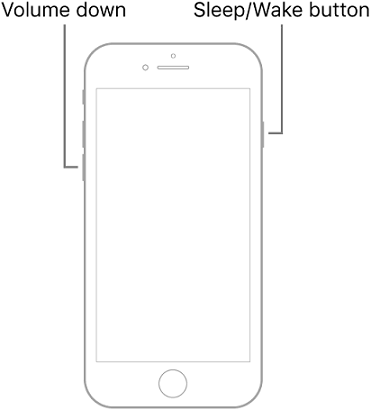
For iPhone 6 and earlier models.
Step 1. Press and hold the Home button and Wake/Sleep button.
Step 2. Hold both buttons > Release both buttons until the Apple logo appears.

Way 4. Enable Two-Factor Authentication
If the Trusted devices list is still not available, your Two-Factor Authentication probably not been enabled. Here’s how to enable it:
Step 1. Go to Settings > [User’s name] > Sign-In & Security.
Step 2. Tap Turn on Two-Factor Authentication.
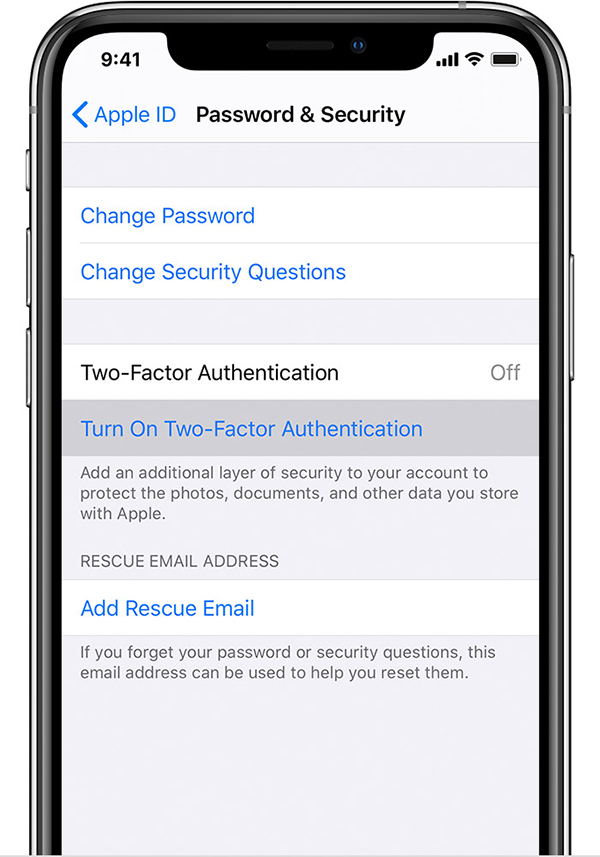
Step 3. Tap Continue > Enter your trusted phone number > Tap Next.
Step 4. Enter the verification code you received.
Then you can see the Trusted Devices List on your device.
Way 5. Check your Apple ID via another iPhone
You can check whether your account is working properly and the Trusted Devices List appears there. If you can see your Trusted Devices List on your other device, then it means it’s your iPhone’s problem. Please check Way 6 and Way 7 in this guide.
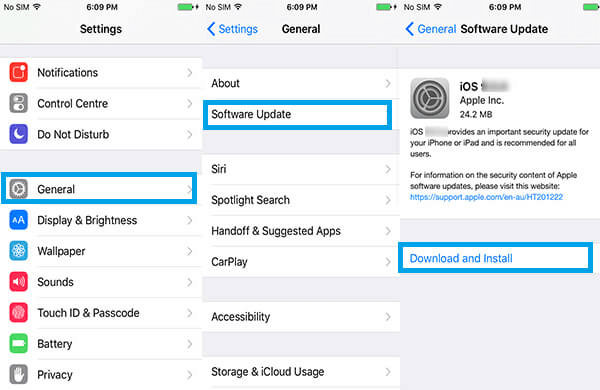
Way 6. Update iOS system
Old iOS system may have some known software bugs, these bugs may cause the Trusted Device List not available. So updating your iOS system to the latest version may fix this issue.
Step 1. Go to Settings > General > Software Update.
Step 2. Click on the latest version of iOS available > Download and Install.
- Unable to check for updates? Please check:✎...
- Software glitch.
- Device’s settings or restrictions.
- Your device’s storage.
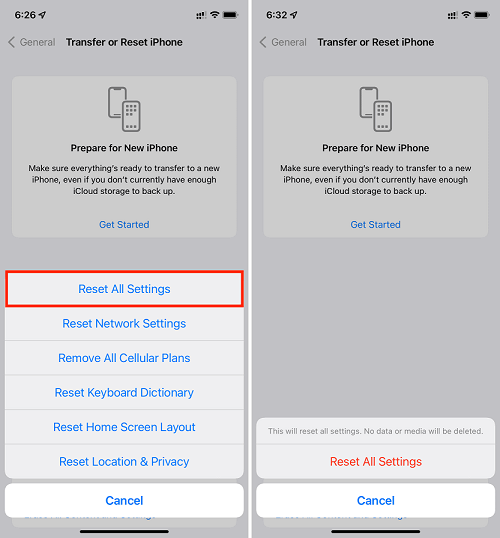
Way 7. Reset all settings
Still have trouble seeing Trusted Devices List on your device? Then you can try resetting all settings on your device. It will not erase your data but will restore system settings.
Step 1. Go to Settings > General.
Step 2. Scroll down and click Transfer or Reset iPhone > Reset > Reset All Settings.
Step 3. Enter your passcode and click Reset All settings.
Can’t log out of Apple ID without password? Fixed here!
If your Apple ID expires but cannot log out, it may cause the trusted device List not available. You can use a professional tool, FoneTool Unlocker, to sign out your Apple ID safely. With the FoneTool Unlocker, you can efficiently remove your Apple ID even without a password.
- ★Highlights:
-
- Remove Apple ID without password from your devices.
- Safe and stable process protects your data from leakage.
- Powerful feature offers a high success rate.
- Bypass Activation Lock without Apple ID.
- Easily remove all passwords without technical skills.
- Wide compatibility with the latest iOS devices and versions.
Let’s see how to remove your Apple ID from your Apple devices:
Step 1. Launch FoneTool Unlocker on your computer > Connect your iPad to your PC with a USB cable.
Step 2. Find Remove Apple ID and click it on the interface.
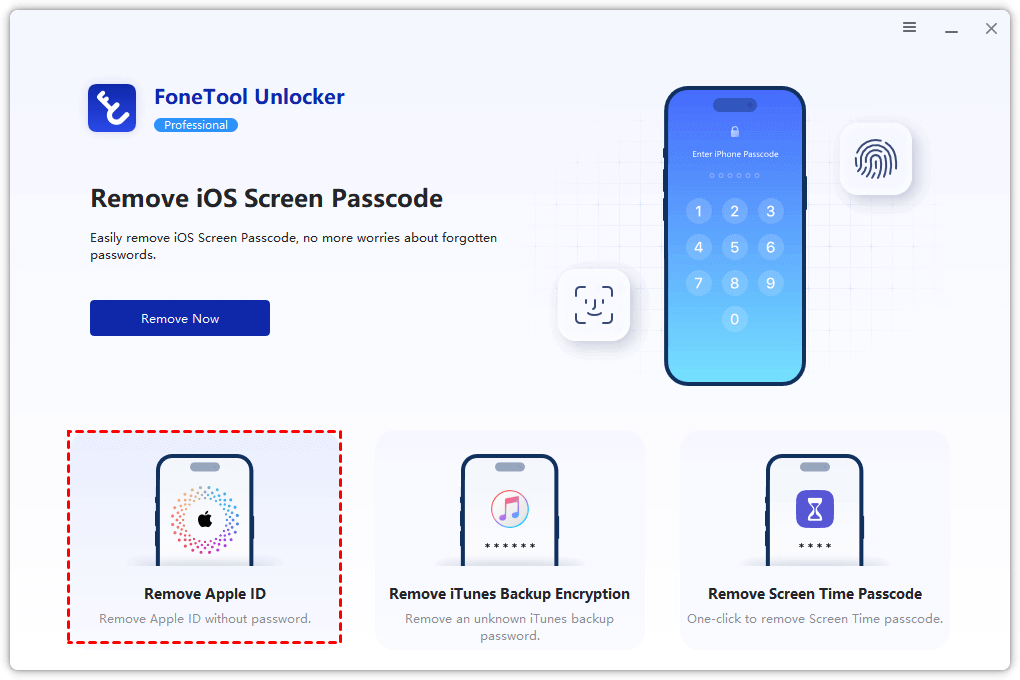
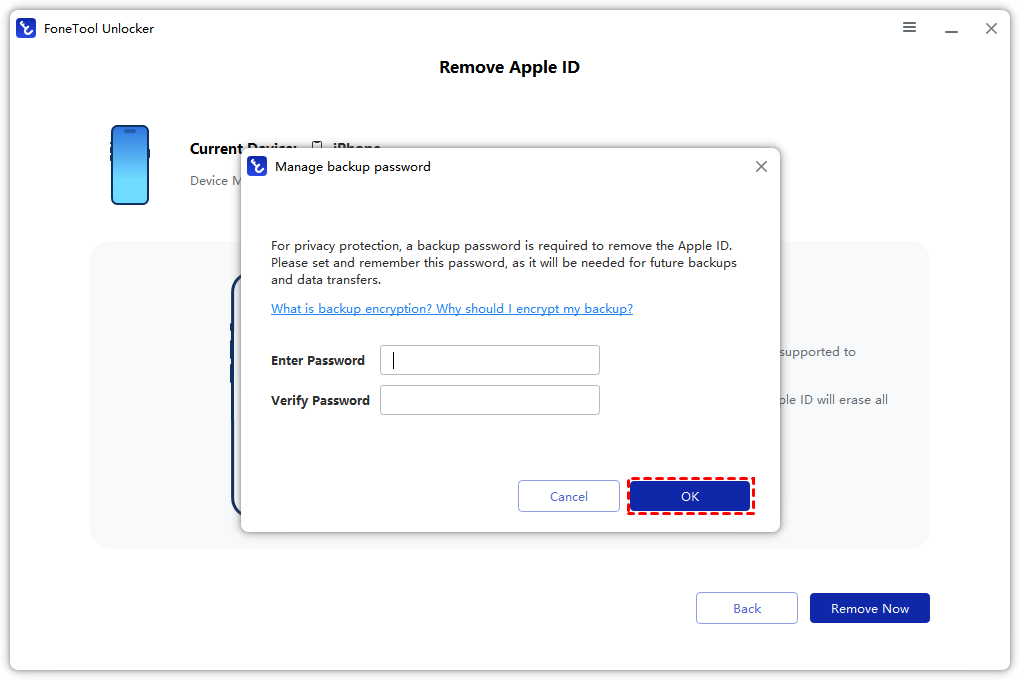
Step 3. Enter a backup password and remember this password.
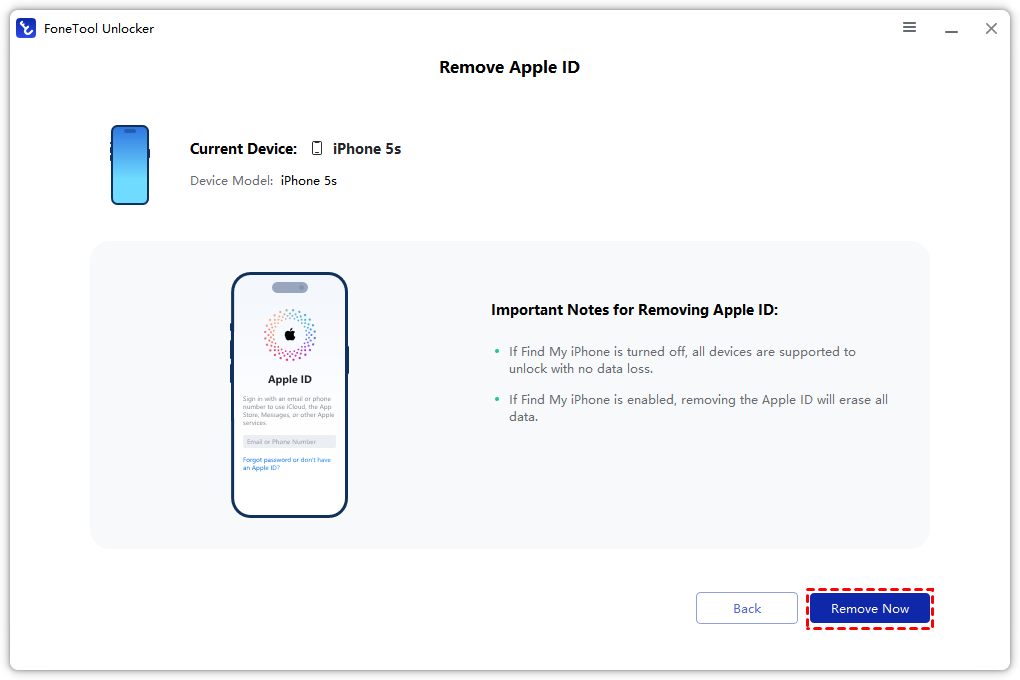
Step 4. Click Remove Now to remove your Apple ID without password.
FAQs on Trusted Devices List is not available
Conclusion
Now, you know the reasons why for Trusted Devices List is not available. You can also try these 7 ways in this guide to fix this issue. Also, FoneTool Unlocker is recommended here if you cannot log out of your Apple ID to fix the current issue.
FoneTool Unlocker - 1-Click iPhone Unlock Software
Easily unlock all passcodes and restrictions on your iPhone, iPad, and iPod Touch.
-
 iOS 27 Compatible
 iPhone 17 Supported
100% Secure

Scarlett is an editor of FoneTool, with years of experience in the field of mobile data backup, transfer, recovery, and data management in solving iOS-related issues. She hopes her writing can help people out of their current problems.
Read author info >>