How to Delete All Emails on iPhone
As both important and trash emails filling up your Email account on your iPhone, you may wonder how to delete all emails on iPhone to clear up your email box. Just try one of the methods in this guide to make it.
With the ever-increasing flow of emails inundating our inboxes, managing email clutter has become a necessity. If you're an iPhone user looking to streamline your inbox and delete all emails efficiently, you've come to the right place.

In this comprehensive guide, we will explore various methods and techniques to help you delete all emails on iPhone. Whether you prefer deleting them one after another or erasing them at once, we've got you covered.
1# Delete all emails on iPhone one by one
Removing all emails from the Inbox, Sent, and Draft folders in the default Mail app on your iPhone can be quite a tedious and frustrating task. Unlike the "Trash" and "Junk" folders, which offer a convenient "Delete All" option for swiftly clearing your emails with just a single click, the "Inbox," "Drafts," and "Sent" folders lack this feature.
Consequently, you're left with the laborious process of manually selecting individual emails before initiating the deletion. However, there is a workaround that allows you to select multiple emails simultaneously, streamlining the process of deleting multiple emails on your iPhone or iPad. The following will show you how to delete multiple emails on iPhone one by one.
Step 1. On your iPhone, go to the Mail app > Go to Inbox or Sent, tap Edit.
Step 2. Select the emails you want to delete and tap Trash.
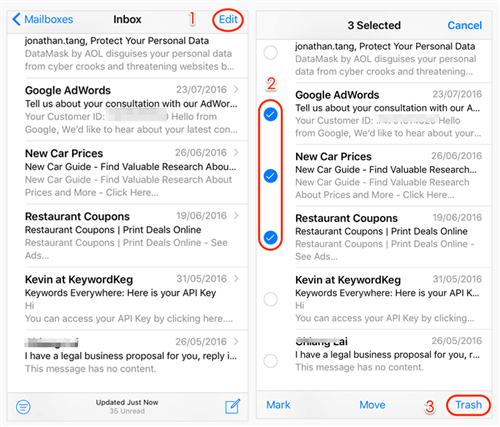
By following this method, your emails will be transferred to the Trash folder. To permanently remove them, you'll need to access the Trash folder and repeat the same deletion process. It may seem a bit repetitive, having to go through the process twice, but the second round should be considerably faster as the Trash folder will only contain the emails you intend to delete.
2# How to delete all emails at once on iPhone
One of the most straightforward methods for instantly mass-deleting emails on your iPhone is by removing the associated email account from the Mail app. This way doesn’t delete the email account itself or emails from the server but only from your iPhone.
However, it's worth noting that this approach can be quite drastic, often referred to as a "nuclear" option, as it means that you need to access your emails from the web or using other emails app in the future. If you don’t mind, follow the steps below to make it.
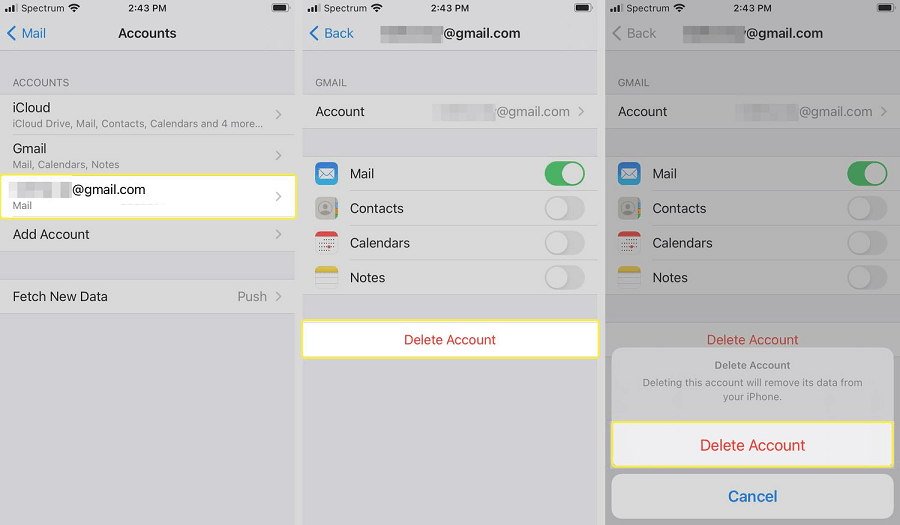
Step 1. Go to the Settings app on your iPhone > Scroll down to locate and tap Email.
Step 2. Select the email account you wish to delete emails from > Click Delete Account > Tap Delete Account again to confirm it.
3# How to delete all emails from one sender on iPhone
If you have a co-worker who sends too many emails for one message or you're getting too many emails from a company's marketing department, you might want to delete all emails from that sender on your iPhone.
Deleting emails from your most frequent senders can help you clear a significant amount of storage space and keep your inbox neat. While it might not be immediately apparent in the iOS Mail app, the process of deleting all emails from a specific sender is straightforward. Just follow these steps:
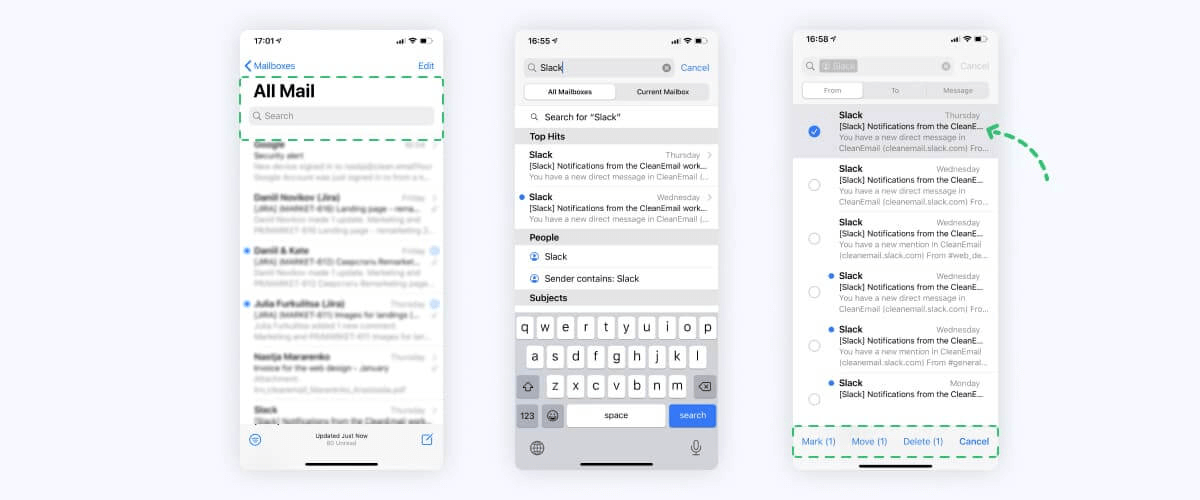
Step 1. Go to the Mail app on your iPhone > Select any inbox you want.
Step 2. Type in the sender whose emails you want to delete in the search box at the tip of the page.
Step 3. Tap Edit > Select any email from the sender > Tap Trash to delete unwanted emails from your iPhone.
Summary
Managing your email inbox on your iPhone can be a breeze with the right knowledge and techniques. Hopefully, you now have a comprehensive guide on how to delete all emails on iPhone efficiently. Remember to exercise caution when deleting emails, especially if they contain important information. Happy inbox cleaning!
FAQs
FoneTool - All-in-one iPhone Data Manager
Transfer, backup and manage data on iPhone, iPad and iPod touch in an easy way.
-
 iOS 26 Compatible
 iPhone 16 Supported
Windows 11/10/8/8.1/7
100% Secure

Demi is an editor of FoneTool group as well as an good advisor in the area of iOS-related issues. She does well in finding solutions to people's problems. She enjoys traveling, gardening, and watching movies. She spends most of her free time with her pet and family.
Read author info >>