Convert WAV to Ringtones for iPhone Easily | 2 Proven Ways
Our guide covers the process of converting Wav to ringtones for iPhone, including software options and easy-to-follow instructions. You can choose the easiest way to convert wav to m4r for iphone ringtone.
Can You Make WAV to iPhone Ringtones?
You have a perfect WAV audio file – such as sound effects, voice recordings, or clips from your favorite songs – and you want to use it as your iPhone's ringtone. But when you try to set it up, i0s doesn't recognize it. Why? The ringtone format required for iPhone phone must be M4R format. You need to convert high-quality WAV files to this format first.
This complete guide shows you exactly how to convert WAV to iPhone ringtone using two distinct methods. Whether you want a one‑click solution without iTunes or prefer the official Apple process, you'll find clear, step‑by‑step instructions here.
WAV vs. M4R
| Format | Purpose | Key Characteristics |
|---|---|---|
| WAV | Professional audio, music production | Lossless, uncompressed, high file size—not recognized by iPhone Ringtone settings |
| M4R | iPhone ringtone (Apple proprietary) | Compressed, optimized for iOS, the only format iOS accepts for ringtones |
Way 1. [Easiest] Convert WAV to iPhone Ringtone Without iTunes
If you want to skip the complicated iTunes steps and have your ringtone ready in under two minutes, this method is for you. FoneTool is a dedicated iOS ringtone maker that handles the entire WAV → M4R conversion and transfer process automatically. No manual file renaming. No sync errors. No learning curve.
Why do you choose FoneTool?
![]() True one‑click conversion – Select your WAV file; FoneTool creates the M4R and transfers it to your iPhone instantly
True one‑click conversion – Select your WAV file; FoneTool creates the M4R and transfers it to your iPhone instantly
![]() Visual ringtone editor – Drag to select the perfect 30‑second clip with real‑time preview
Visual ringtone editor – Drag to select the perfect 30‑second clip with real‑time preview
![]() Works with any audio format – MP3, M4A, FLAC, AAC, AIFF, and yes, WAV
Works with any audio format – MP3, M4A, FLAC, AAC, AIFF, and yes, WAV
![]() Direct device access – Automatically detects audio files already on your iPhone or lets you choose files from your PC
Direct device access – Automatically detects audio files already on your iPhone or lets you choose files from your PC
![]() No data loss – Adds ringtones without erasing existing music or tones (unlike iTunes sync)
No data loss – Adds ringtones without erasing existing music or tones (unlike iTunes sync)
Now, download and install FoneTool to your Windows PC, and follow the steps to learn how to switch WAV to ringtone via FoneTool. If you also want to convert mp4 to M4R, you can use FoneTool, too.
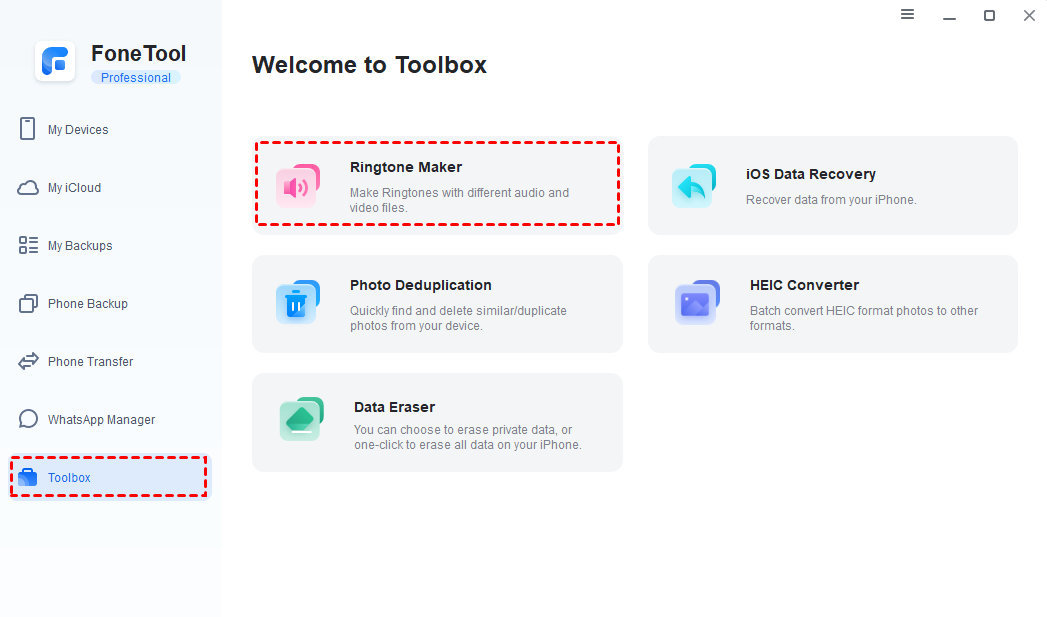
Step 1. Connect the iPhone to the computer with USB cable > Open FoneTool > Click Toolbox on the left panel > Choose Ringtone Maker option.
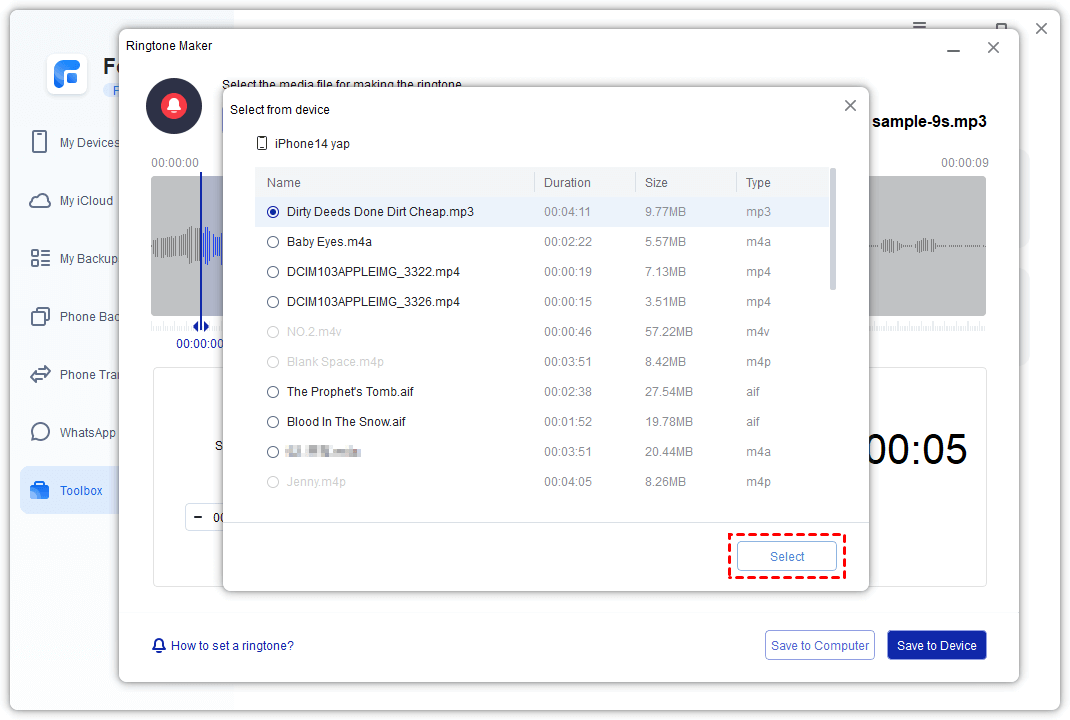
Step 2. Select the source music files.
- Click From Computer if your WAV file is saved on your PC
- Click From Device if you've already transferred the WAV file to your iPhone and want to use it directly
Step 3. Check and choose the WAV file that you want to change to M4R > Click Select.
Step 4. You can edit the audio as you like > Then you can name the ringtone and tap on Save to Device to send it to your iPhone. FoneTool will generate M4R files automatically.

Step 5. After the above steps, you can go to the iPhone Settings > Sounds & Haptics > Ringtone, to check and personalize your iPhone ringtones.

Way 2. Convert WAV to iPhone Ringtones with iTunes
iTunes enables the conversion of WAV files to iPhone ringtones by transforming them into a compatible format. This process doesn't require any third-party applications but involves more complicated steps. With it, you can easily create iPhone ringtones from WAV music files stored on your system.
Check the steps to convert WAV to iPhone ringtone with M4R via iTunes, and be patient:
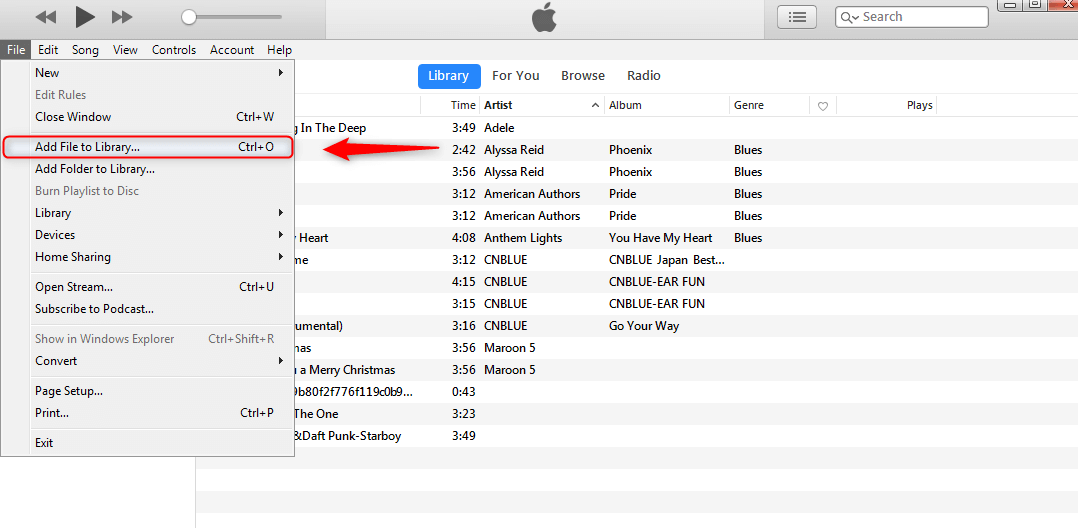
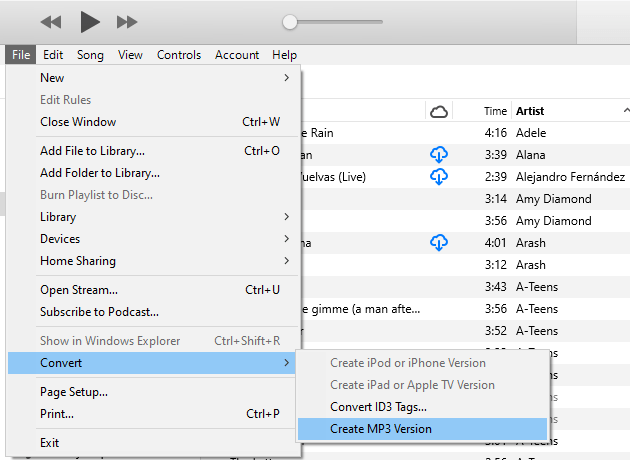
Step 1. Run the latest iTunes app on the PC > Click on File > Tap Add File to Library to add the WAV file to iTunes. The added file will appear under the Music tab.
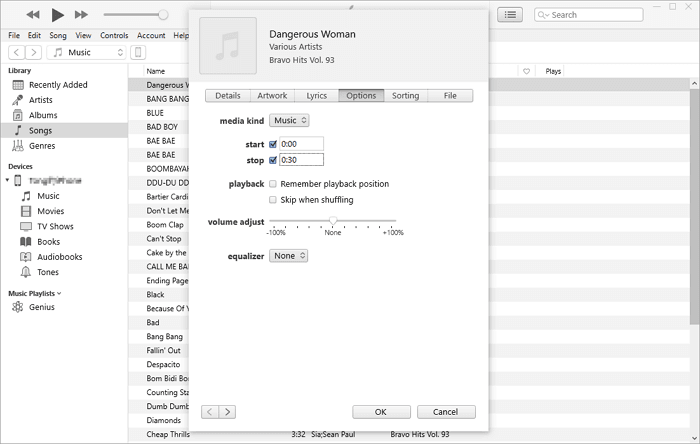
Step 2. Choose and right-click this added file in the iTunes > Select Song Info > Open the Options section and adjust the Start and the Stop time.
Step 3. Tap on File > Click Convert > Choose Create AAC Version to generate the WAV file copy into AAC format (If Create MP3 version is the only option available, choose it).
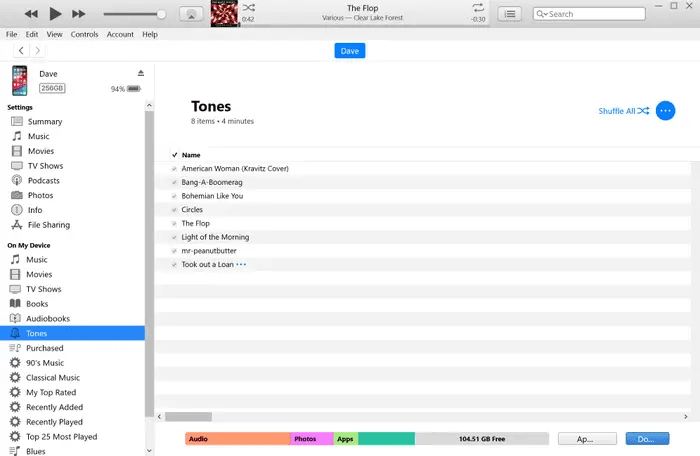
Step 4. Then select the AAC file > Right-click and tap Show in Windows Explorer option to open the folder containing the AAC file.
Step 5. Tap on the View tab > Select the File Name Extensions option to view and edit the extensions > Rename the file and change its extension from M4R.
Step 6. Press Enter to convert the file into an iPhone ringtone > Confirm the change in the file extension by clicking Yes.
Step 7. Finally, drag the new M4R file back to iTunes. This will add it to the iPhone ringtone category.
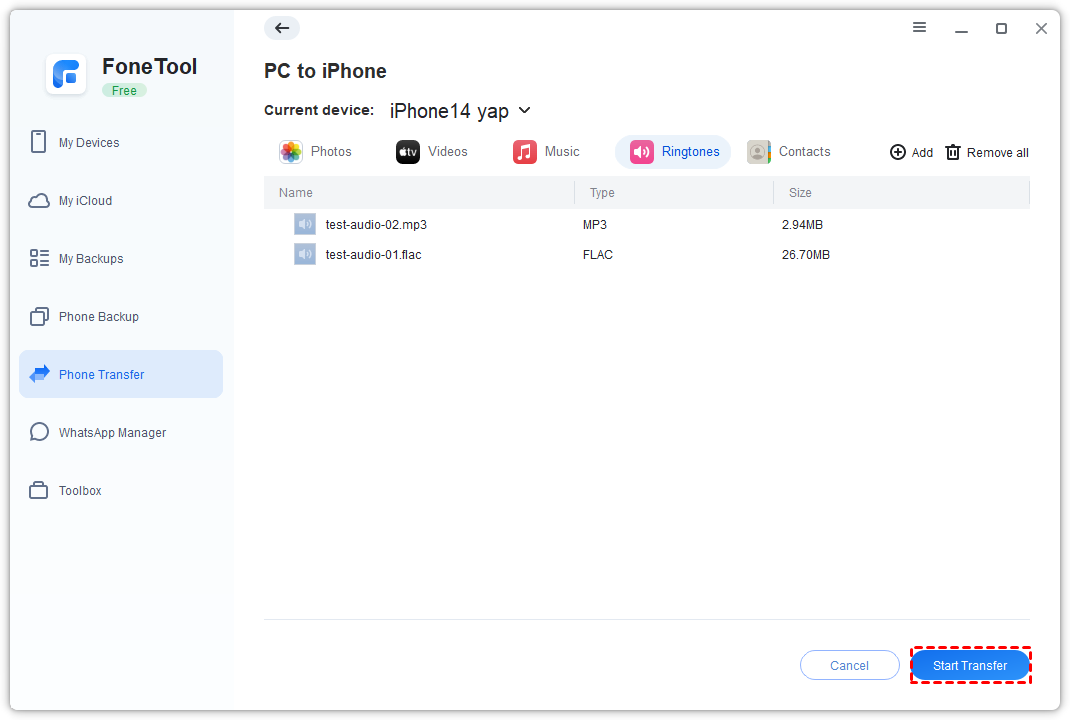
Bonus Tip: Transfer Multiple Ringtones from PC to iPhone in Bulk
Once you've created several custom M4R ringtones, you'll want an efficient way to move them all to your iPhone without iTunes erasing your existing ones. FoneTool is also an iPhone transfer tool to help you solve this problem:
Here is the detailed steps to transfer ringtones from PC to iPhone.
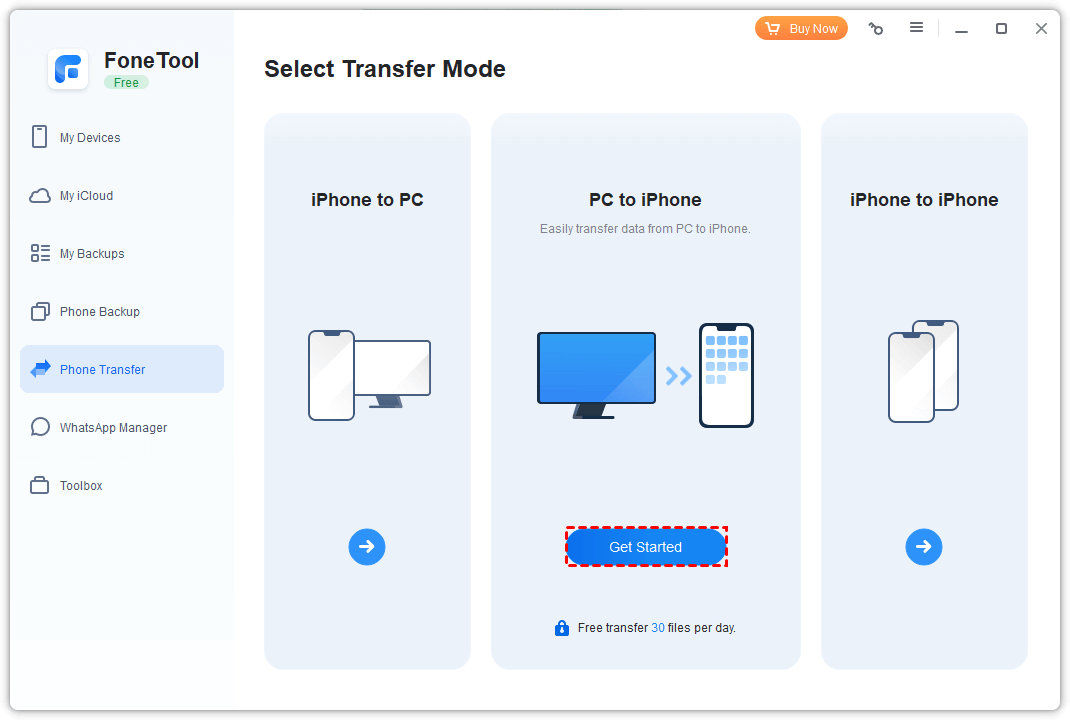
Step 1. Connect the iPhone to computer > Open FoneTool > Tap Phone Transfer > Choose PC to iPhone > Click Start Transfer.
Step 2. Click the Ringtones tab > Tap the blue folder icon to add files. You can directly drag ringtones or folders to Windows.
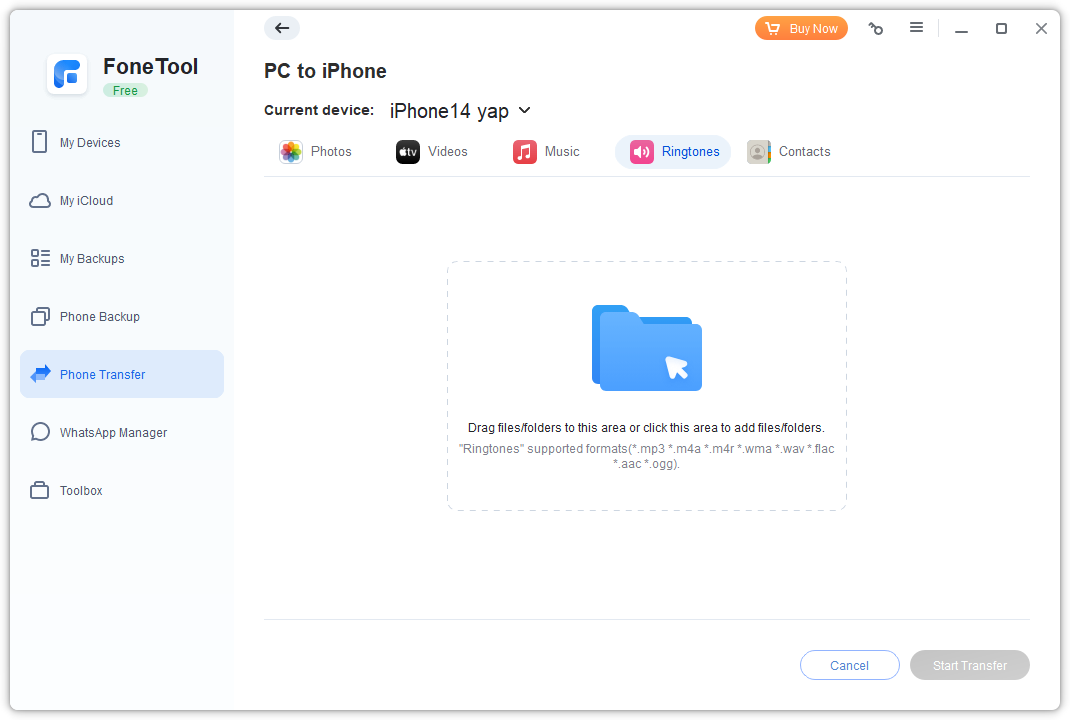
Step 3. After that, tap Start Transfer to begin.
❓ Frequently Asked Questions
Conclusion
That’s all about how to convert WAV to ringtones for iPhone. The above content shows you 2 top ways, you can set iPhone ringtones with iTunes or custom iPhone ringtones via an easier tool - FoneTool. FoneTool also can help you transfer ringtones from PC to iPhone or iPhone to PC.
FoneTool - All-in-one iPhone Data Manager
Transfer, backup and manage data on iPhone, iPad and iPod touch in an easy way.
-
 iOS 27 Compatible
 iPhone 17 Supported
Windows 11/10/8/8.1/7
100% Secure
Kelsey is an English editor at FoneTool, passionate about helping users solve tech issues. She specializes in iPhone data management, backup, and recovery. In her free time, she enjoys learning IT skills and spending time with loved ones.
Read author info >>