How to Put iPhone in DFU Mode|2026 Step-by-Step Guide
Master iPhone DFU mode with traditional button methods or new one-click FoneTool solution. Complete guide for all iPhone models with troubleshooting tips and comparison between different recovery modes.
How to Put iPhone in DFU Mode: Traditional & One-Click Methods
Device Firmware Update (DFU) mode is the deepest restore state for iPhones, allowing direct firmware access without loading iOS. While traditionally requiring precise button combinations, new tools like FoneTool Repair now offer one-click alternatives for easier access.
DFU Mode vs. Recovery Mode: Quick Comparison
Understanding the distinction between DFU mode and recovery mode is crucial for effective iPhone troubleshooting. While both are restoration states, they serve different purposes and exhibit distinct characteristics:
|
Feature |
DFU Mode |
Recovery Mode |
|
Screen Display |
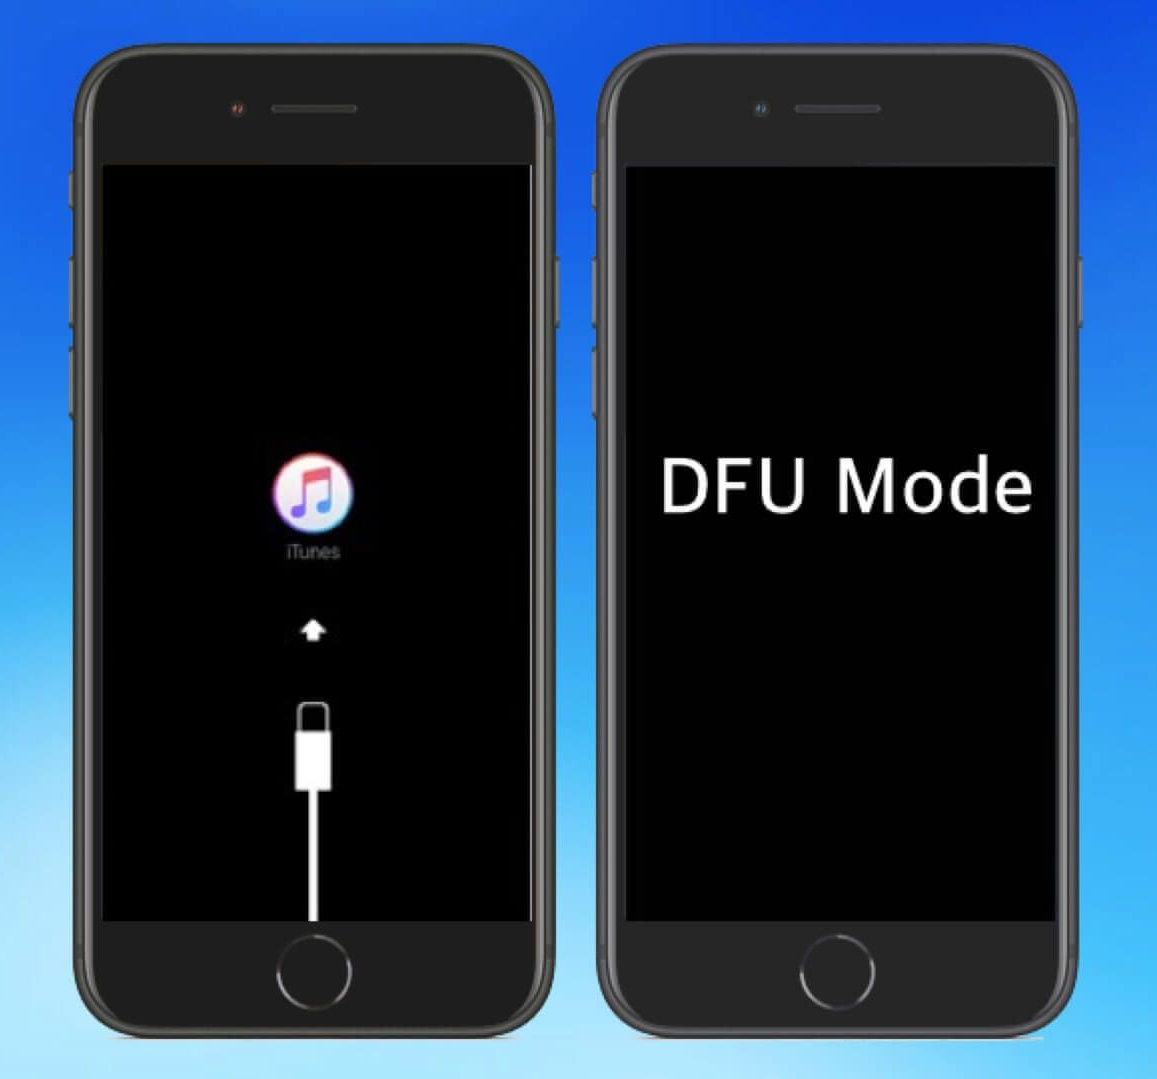
Completely black |
Cable/computer icon |
|
System Access |
Direct firmware level |
Standard restoration |
|
Primary Use |
Firmware updates, iOS downgrades |
Basic system recovery |
|
Data Risk |
High (usually erases data) |
High (usually erases data) |
|
Entry Difficulty |
Complex timing required |
Simple button presses |
When to Choose Each Mode?
✏ Use DFU Modefor firmware-related issues, iOS downgrades (when signed), persistent boot loops, or jailbreaking procedures
✏ Use Recovery Modefor standard system restoration, iTunes/Finder recognition issues, or when iPhone stuck in DFU mode and DFU mode entry proves too challenging
✏ Consider FoneTool Repairas an alternative to both methods, offering one-click system repair without complex button combinations
This comparison table helps you quickly identify which restoration method suits your specific situation, saving time and ensuring the right approach for your iPhone troubleshooting needs.
Method 1.Put iPhone in DFU Modewith Traditional Way
Now that you understand what DFU mode is and when to use it, let's dive into the specific button combinations for different iPhone models. Follow these step-by-step instructions carefully, as the process varies significantly between devices with and without Home buttons. Pay close attention to timing - this is crucial for successful DFU mode entry.
- ★Tip:
- Before entering DFU mode, taking essential precautions canl help prevent data loss and ensure a smooth process.
For iPhone 8 and Newer (Including iPhone 17Series)
Step 1. Connect to computer and open iTunes/Finder.
Step 2. Press/release Volume Up, then press/release Volume Down.
Step 3. Hold Side button for 10 seconds until screen goes black.
Step 4. While holding Side button, press/hold Volume Down for 5 seconds.
Step 5. Release Side button but keep holding Volume Down for 5 more seconds.
Step 6. Success: Black screen with computer detection.
For iPhone 7 and 7 Plus
Step 1. Connect to computer with iTunes/Finder open.
Step 2. Hold both Side + Volume Down buttons for 8 seconds.
Step 3. Release Side button but keep holding Volume Down for 5 seconds.
Step 4. Success: Screen stays completely black.
For iPhone 6s and Earlier (with Home Button)
Step 1. Connect to computer and launch iTunes/Finder.
Step 2. Hold Home + Top/Side buttons for 10 seconds.
Step 3. Release Power button but keep holding Home for 5 seconds.
Step 4. Success: No logos or icons on screen.

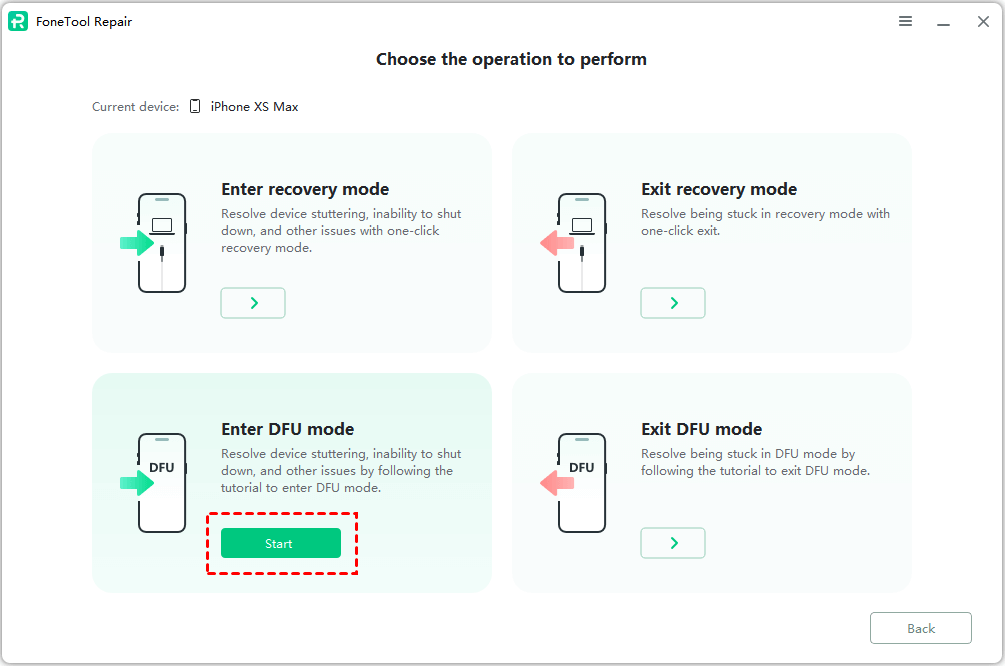
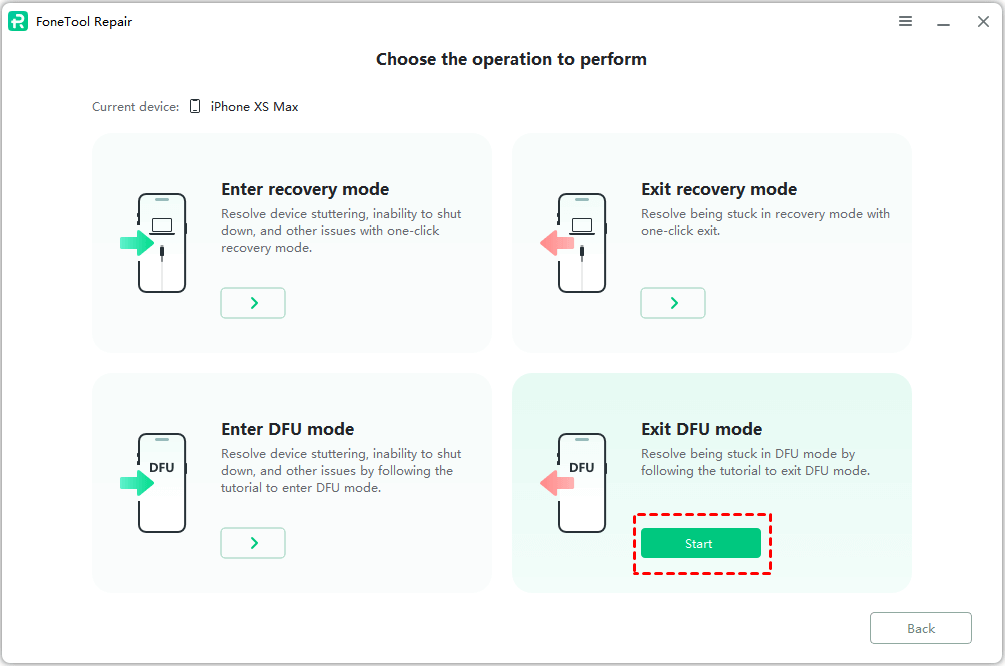
Method 2. One-ClickManageDFU Mode with FoneTool Repair
Skip the complex button combinations and use FoneTool Repairfor effortless DFU mode access and system repair in one tool.
This powerful iOS system repair tool is the best way to fix iOS/iPadOS issues without data loss
Step 1. Download and Install FoneTool Repair to your PC, connect iPhone via USB cable and launch the software.
Step 2. Select "Recovery Mode" from the main interface.

Step 3. Select "Enter DFU Mode"> “Start” based on your needs.
Step 4. Follow prompts to download the appropriate firmware package.
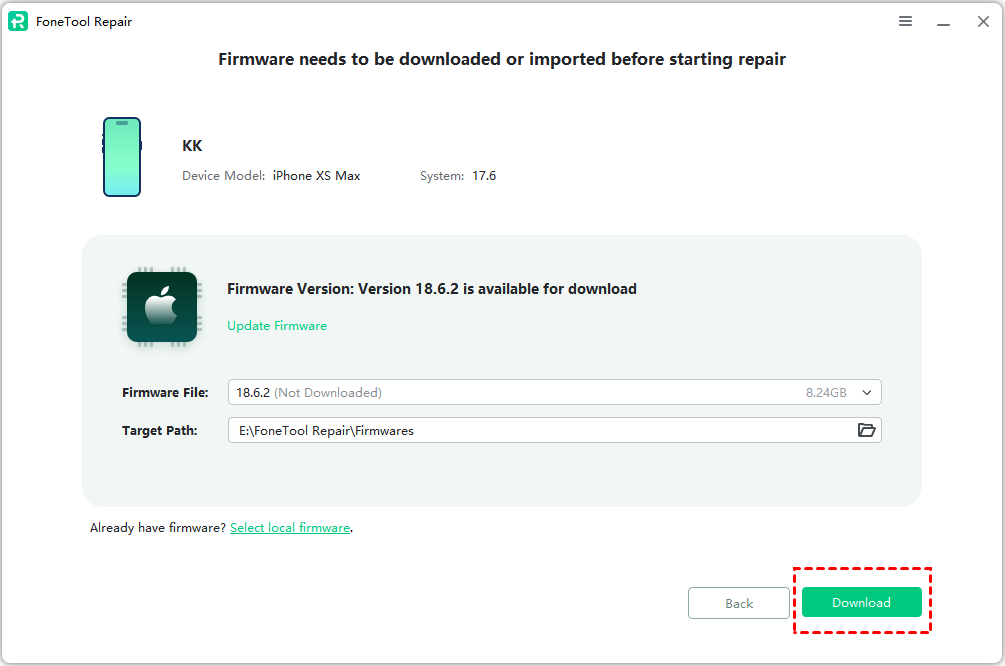
Step 5. Launch the task and wait for your iPhone to enter DFU mode.
Essential Precautions Before Entering DFU Mode
💡Backup Your Data First
DFU mode processes typically erase device content. Create a recent backup using iCloud or computer before proceeding. For data-safe alternatives, use FoneTool Repair's Standard Mode which can fix many issues without data loss.
✅Use Proper Equipment
Ensure you have Apple-certified cables and updated iTunes/Finder. For one-click methods, install the latest version of FoneTool Repair for optimal performance.
Troubleshooting Failed DFU Mode Attempts
If you encounter issues with traditional DFU mode entry, here are quick solutions:
⏰Button Timing Problems
- Apple Logo Appears: Released buttons too late - try faster timing
- Recovery Mode Screen: Held buttons too long - shorten duration
- Solution: Use FoneTool Repair's one-click feature to avoid timing issues
🔁Connection Issues
- Computer Not Detecting: Check cables, try different USB ports
- Multiple Failures: Wait 5 minutes between attempts
- Alternative: Switch to FoneTool Repair for reliable connection handling
Bonus Tip: How to Exit DFU Mode
Traditional Method:
- iPhone 8 & Newer: Quick press Volume Up, Volume Down, then hold Side button
- iPhone 7 Series: Hold Side + Volume Down simultaneously
- Older Models: Hold Home + Power buttons together
One-Click Method:
- Use FoneTool Repair's "Exit DFU Mode" feature
- Automatic detection and recovery from any state
Frequently Asked Questions on DFU Mode
Conclusion
While traditional DFU mode remains valuable for advanced users, FoneTool Repair revolutionizes the process with one-click accessibility. Whether you choose manual button methods or prefer the simplicity of FoneTool Repair, you now have complete solutions for entering DFU mode and resolving even the most stubborn iOS system issues.
For most users, FoneTool Repair offers the ideal balance of power and simplicity - providing professional-level system repair with consumer-friendly one-click operation. Choose the method that best fits your technical comfort level and get your iPhone back to optimal performance today.
Fixes 160+ iOS/iPadOS issues, boot loops, crashes, failed updates, with no data loss.
-
 iOS 26 Compatible
 iPhone 17 Supported
100% Secure
Kelsey is an English editor at FoneTool, passionate about helping users solve tech issues. She specializes in iPhone data management, backup, and recovery. In her free time, she enjoys learning IT skills and spending time with loved ones.
Read author info >>