How to Transfer Photos from SD Card to iPhone | 5 Easy Ways
When you need to export pictures from SD card to iPhone, you can rely on an adapter, or choose FoneTool, iCloud and iTunes to finish the process. And this guide will give you detailed steps.
Why Transfer Photos from an SD Card to Your iPhone?
Moving photos from an SD card to your iPhone serves several practical purposes:
- Immediate Editing & Sharing- Edit photos with iPhone apps like Lightroom Mobile or VSCO and share them directly to social media.
- Camera Workflow Backup- Quickly back up shots from a DSLR or drone during a shoot before clearing the card.
- Consolidated Storage- Gather all photos from multiple cameras and devices into one centralized, portable library.
- Quality Preservation - Transfer full-resolution RAW or JPEG files without the compression typical of email or messaging apps.
Select the right method for your situation using this quick guide.
| Method | Best For | Key Tools Needed | Speed | Key Advantage |
| Direct Import | Photographers & travelers | Apple SD Card Reader | ⚡⚡⚡⚡ | Fastest, direct, no computer |
| 👍🏻FoneTool | Selective & format-converted transfers | FoneTool software, Computer | ⚡⚡⚡⚡⚡ | Selective transfer & format conversion |
| Cloud Sync | Automated workflows | Cloud service app (Dropbox, etc.) | ⚡⚡ | Set up once, syncs automatically |
| iTunes | Large, organized transfers | Computer, USB cable | ⚡⚡⚡⚡ | Best for bulk organization |
| Wireless SD Card | Convenience & on-the-go | Wireless SD card/Adapter | ⚡⚡⚡ | No cables or dongles required |
1. How to transfer photos from SD card to iPhone with adapter
If you have Apple camera adapters, you can export photos directly from the SD card to your iPhone without using a computer.
Step 1. Insert the SD card into the card reader and connect it to your iPhone with an Apple camera adapter.
Step 2. If the import tab doesn’t launch automatically within the Photos, you can go to the app and tap Import manually.
Step 3. Choose your targeted photos > Click Import or click Import All to move all SD card photos to your iPhone.
Step 4. Once all photos are moved, you can choose to keep or delete the photos on your SD Card.
- ★Pro Tip for Professionals:
- If you shoot in RAW, ensure"Keep Originals" is enabled inSettings > Photos. This prevents iOS from automatically converting RAW files to JPEGs during import.
2. How to transfer photos from SD Card to iPhone with computer [Free & fast]
How to transfer photos from camera SD card to phone? For the iPhone users, FoneTool’s powerful data transfer feature will help you a lot. You need to connect your SD card and iPhone to the Windows PC at the same time, then your photos will be transferred in simple clicks.
Best SD Card to iPhone Photo Transfer Software
- 46 GB of photos can be exported in 39 minutes without limitation.
- Easily recognize photos on SD card and transfer them in 3 steps.
- Preview and select photos stored in different folders to transfer at one time.
- Common photo formats are supported, like jpg, png, bmp, gif, heic, raw, etc.
- Common types of SD cards are easily compatible (SanDisk, Sony, Lexar, etc.).
- Supports various iPhone models and iOS versions (iPhone 16/iOS 18).
Windows 11/10/8/8.1/7
100% Secure
Now you can download and install FoneTool on your PC to explore this stable and fast transfer process.
Step 1. Insert your SD card into a card reader > Connect your card reader and iPhone to the computer via 2 USB cables > If asked, tap Trust on iPhone to continue.
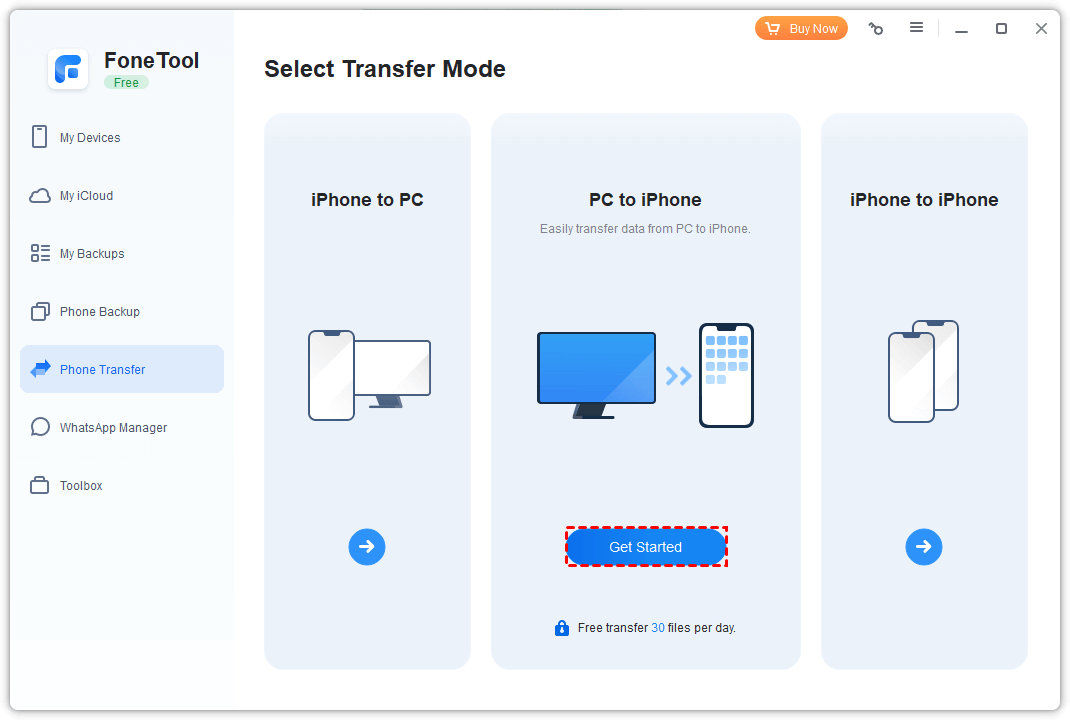
Step 2. Once your SD card and iPhone have been recognized, you can now launch FoneTool > Go to Phone Transfer > Choose PC to iPhone and click Get Started.
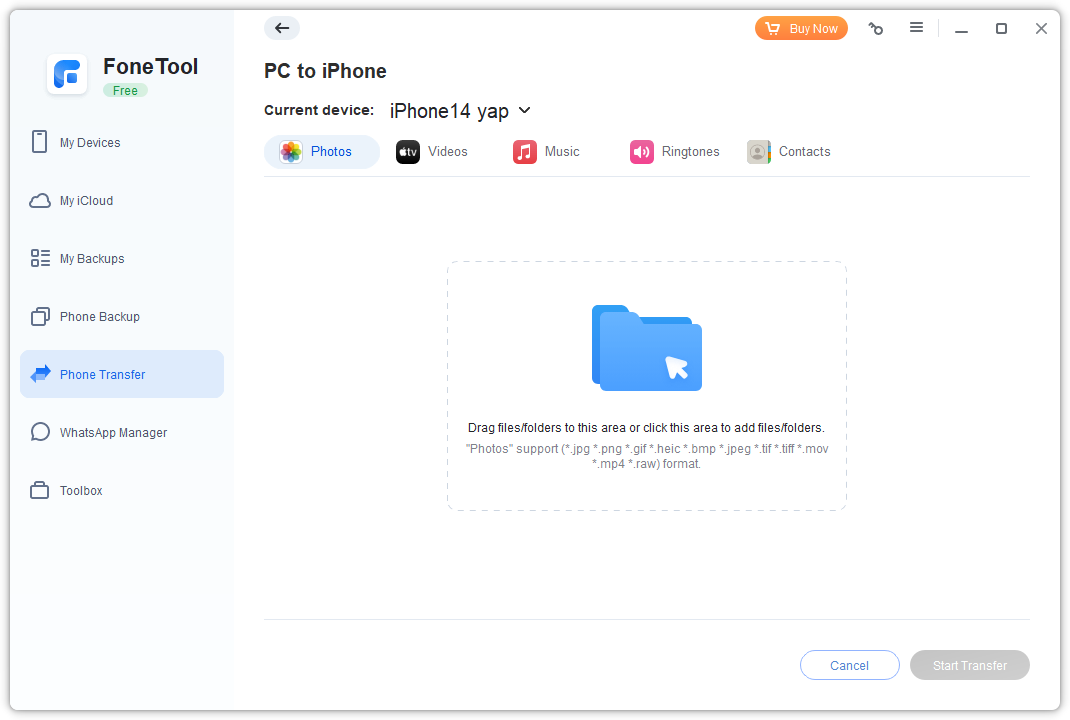
Step 3. Choose the Photos button > Click the box and choose your wanted files from the SD card > Clik Open to add them.
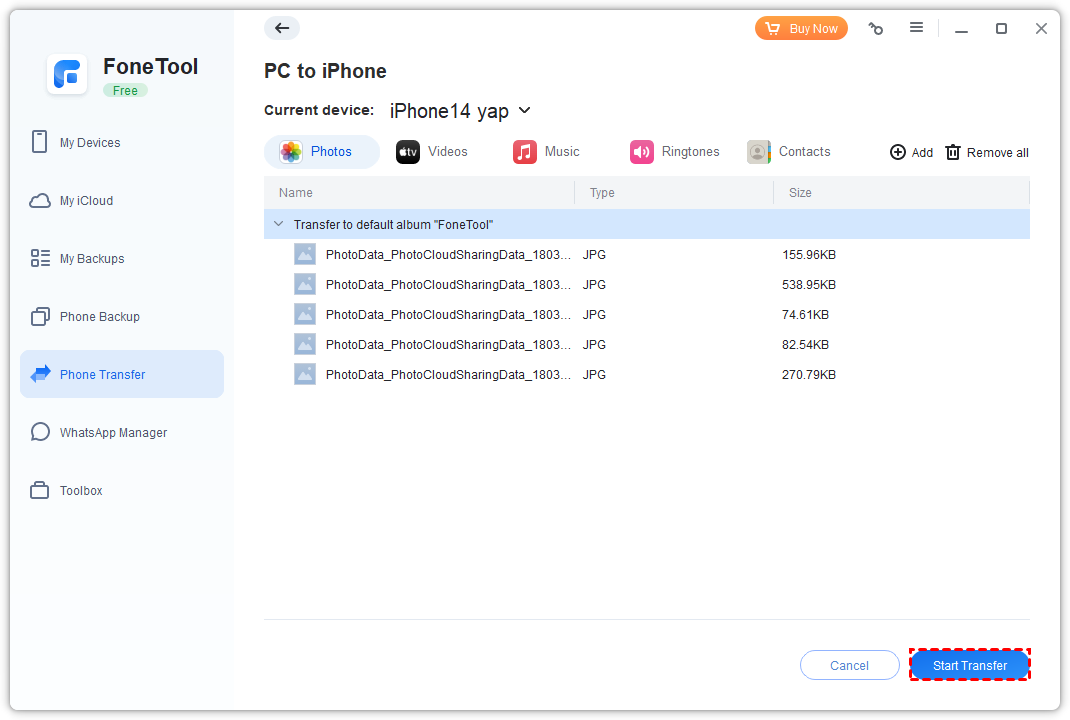
Step 4. Confirm your targeted data and click Start Transfer to move pictures from memory card to iPhone.
You can also use FoneTool to transfer photos from iPhone to external hard drive, like an SD card, memory stick, etc. Just connect 2 devices to the PC as mentioned above > Go to iPhone to PC and set your SD card as the storage device from the Transfer Settings > Click Start Transfer to begin the task.
3. How to get photos from SD card to iPhone - iCloud
Aside from the two methods mentioned above, you can also consider using cloud services like iCloud to transfer photos. What you need to do is connect the SD card to your computer, upload the photos to iCloud on the computer, and then enable the sync feature on your iPhone to easily download them.
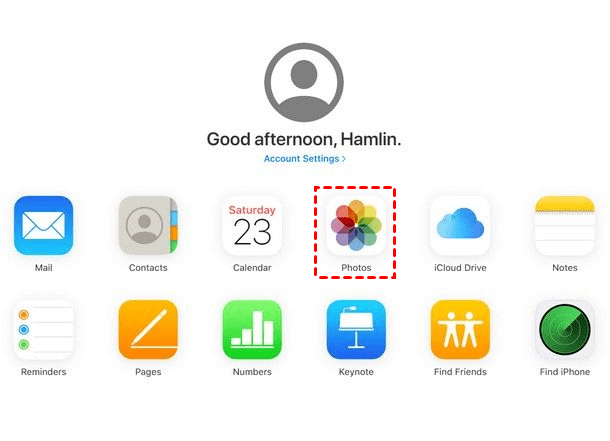
Step 1. Insert your SD card into the card reader and connect it to the computer > Go to https://www.icloud.com/ from your computer > Log in with your Apple ID > Click the Photos option > Click the Upload button to select the photos you need from the SD card.
- Tip:
- To speed up iCloud Photos upload process, Windows users can rely on FoneTool’s powerful feature. You can use it to upload 1, 000 photos to iCloud within 40 minutes (My iCloud > Log in your account > Manage iCloud), while iCloud.com will take 6-8 hours.
Download Freeware Win 11/10/8.1/8/7/XPSecure Download
Step 2. When the upload process is finished, you can go to the Settings app on your device > Click [your name] > Choose iCloud and enable the iCloud Photos option. Wait for a while, all photos will be synced to your iPhone and you can check them in the Photos app.
4. How to import photos from card reader to iPhone - iTunes
iTunes is another available way to help you easily finish the process, but you must remember that iTunes only supports one-way synchronization, so once you have synced pictures to your iPhone, the current media data on your device may be erased and rewritten.
Now you can follow the guidance below to start the photo transfer task.
Step 1. Download and install the latest version of iTunes on your computer.
Step 2. Insert your SD card into the card reader > Connect your iPhone and card reader to the computer and iTunes will launch automatically. If not, open it manually.
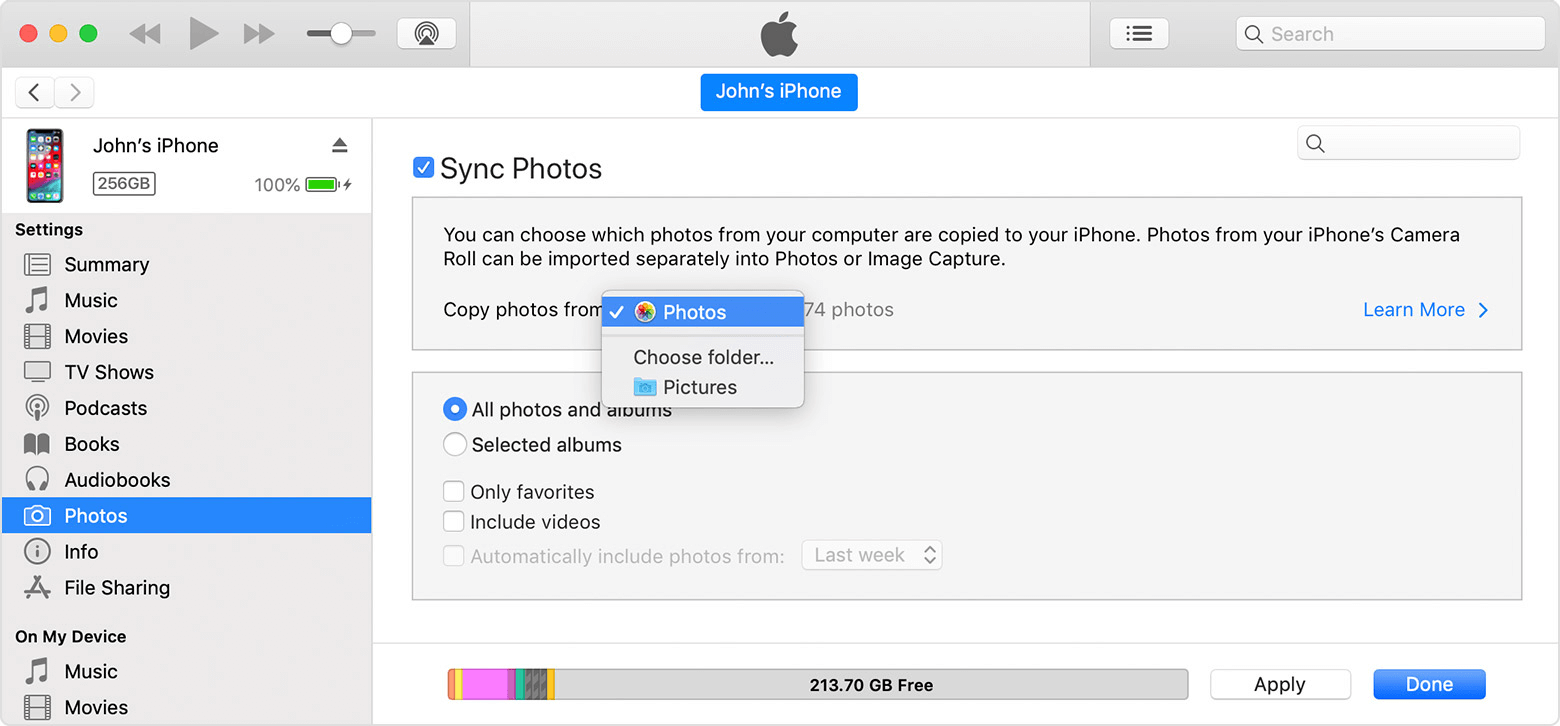
Step 3. Click the Device icon > Click Photos under the Settings section > Check the Sync Photos option.

Step 3. Click the Copy photos from option to select the photos you want to transfer from your SD card > Click Apply to begin the task.
5. How to move photos from a wireless SD card to iPhone
Ideal for action cameras (like GoPro) or situations where you don't have a physical card reader.
How It Works
-
Option A: Use a wireless SD card (like Eyefi or Toshiba FlashAir).
-
Option B: Use a wireless card reader (like Sanho HyperDrive Cloud) that creates its own Wi-Fi network.
Step 1. Insert your standard SD card into the wireless card or reader and ensure it's powered on.
Step 2. On your iPhone, go to Settings > Wi-Fi and connect to the network broadcast by the wireless device (the network name and password are usually on the device itself).
Step 3. Open the companion app associated with the wireless device (e.g., the HyperDrive app). You can then browse, select, and download photos directly to your iPhone's camera roll.
Troubleshooting common iPhone data import issues
"Device Not Supported" or No Import Screen: This is often due to using a non-Apple card reader. Apple's readers have an authentication chip; third-party readers may not work reliably. Always use an MFi-certified reader.
Photos App Not Opening Automatically: If the Import screen doesn't appear, manually open the Photos app. It should then detect the SD card.
RAW Files Not Importing: Check your iPhone's storage. Importing large RAW files requires significant space. Also, verify the "Keep Originals" setting in Settings > Photos.
Slow Transfer Speeds: This can be caused by an old or slow SD card (like a Class 4). For best performance, use a UHS-I Class 10 or faster card.
Pro tips for managing transferred photos on iPhone
1. Create Albums Immediately: After importing, immediately create a new album (e.g., "Italy Trip - DSLR") to keep photos organized and easy to find.
2. Use "Hidden" Album: For sensitive photos, use the "Hidden" album feature (available in the Albums tab under "Utilities") which requires Face/Touch ID to access.
3. Optimize iPhone Storage: If you use iCloud Photos, enable "Optimize iPhone Storage" (Settings > Photos) to keep smaller versions on your device while storing originals in the cloud, saving valuable space.
Conclusion
Now you know how to transfer photos from SD card to iPhone, you can seamlessly integrate any camera into your mobile workflow, ensuring your best shots are always ready to edit and share from your iPhone. To move a large number of photos from SD card to iPhone, you can choose FoneTool help you.
Hope you can get a suitable way from this passage. If it is helpful, you can share it with more people.
FoneTool - All-in-one iPhone Data Manager
Transfer, backup and manage data on iPhone, iPad and iPod touch in an easy way.
-
 iOS 27 Compatible
 iPhone 17 Supported
Windows 11/10/8/8.1/7
100% Secure
Kelsey is an English editor at FoneTool, passionate about helping users solve tech issues. She specializes in iPhone data management, backup, and recovery. In her free time, she enjoys learning IT skills and spending time with loved ones.
Read author info >>